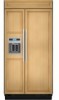
KitchenAid KSSO48QTX Installation Guide - Page 17
Classic, Architect, and Complete Series, Custom Side Panels
 |
UPC - 883049038483
View all KitchenAid KSSO48QTX manuals
Add to My Manuals
Save this manual to your list of manuals |
Page 17 highlights
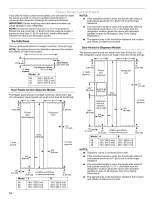
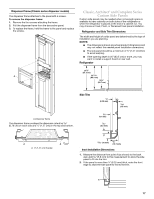
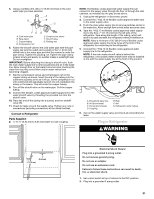
Dispenser Frame (Classic series dispenser models) The dispenser frame attaches to the panel with 4 screws. To remove the dispenser frame: 1. Remove the four screws attaching the frame. 2. Pull the dispenser frame from the decorative panel. 3. To replace the frame, hold the frame to the panel and replace the screws. Classic, Architect® and Complete Series Custom Side Panels Custom side panels may be needed when not enough space is available to have cabinets on both sides of the refrigerator or when the refrigerator is placed at the end of a cabinet run. You may choose an Inset, Flush, or Recessed Inset panel installation. Refrigerator and Side Trim Dimensions The width and height of a side panel are determined by the type of installation you are planning. NOTES: ■ The dimensions shown are actual product dimensions and may not reflect the needed panel installation dimensions. ■ The side panel should be a minimum of ½" (1.27 cm) thick to avoid warping. ■ If the opening depth is 25" (63.5 cm) or more, you may want to install a support board on rear wall. Refrigerator 24¹⁄₈" (61.3 cm) A 23 (60.3 cm) 23¹⁄₂" (59.7 cm) Side Trim ¹⁄₄" (6.35 mm) A. Dispenser frame The dispenser frame overlaps the dispenser cutout by 0.78 cm) on each side and ¹⁄₂" (1.27 cm) on the top and bottom. 4.7 mm) 5.5 mm) 4.5 mm) A A A 1.27 cm) Overlap 10 mm) ⁵⁄₈" (15.7 mm) Inset Installation Dimensions 1. Measure the distance from point A (as shown) to the back wall. Add 5.6 mm) to this measurement to allow the side panel to fit into the trim. 2. If the panel is more than ¹⁄₄" (6.35 mm) thick, route the front edge to allow the side panel to fit into the trim. A 17
-
 1
1 -
2
-
3
-
4
-
5
-
6
-
7
-
8
-
9
-
10
-
11
-
 12
12 -
 13
13 -
 14
14 -
 15
15 -
 16
16 -
 17
17 -
 18
18 -
 19
19 -
 20
20 -
 21
21 -
 22
22 -
23
-
24
-
25
-
26
-
27
-
28
-
29
-
30
-
31
-
32
-
33
-
34
-
35
-
36
-
37
-
38
-
39
-
40
-
41
-
42
-
43
-
44
-
45
-
46
-
47
-
48
-
49
-
50
-
51
-
52
-
53
-
54
-
55
-
56
-
57
-
58
-
59
-
60
-
61
-
62
-
63
-
64
-
65
-
66
-
67
-
68
-
69
-
70
-
71
-
72
-
73
-
74
-
75
-
76
 |
 |
