KitchenAid KUDC20FVSS Installation Instructions - Page 16
Install Custom Panel, Option 2
 |
UPC - 883049157573
View all KitchenAid KUDC20FVSS manuals
Add to My Manuals
Save this manual to your list of manuals |
Page 16 highlights
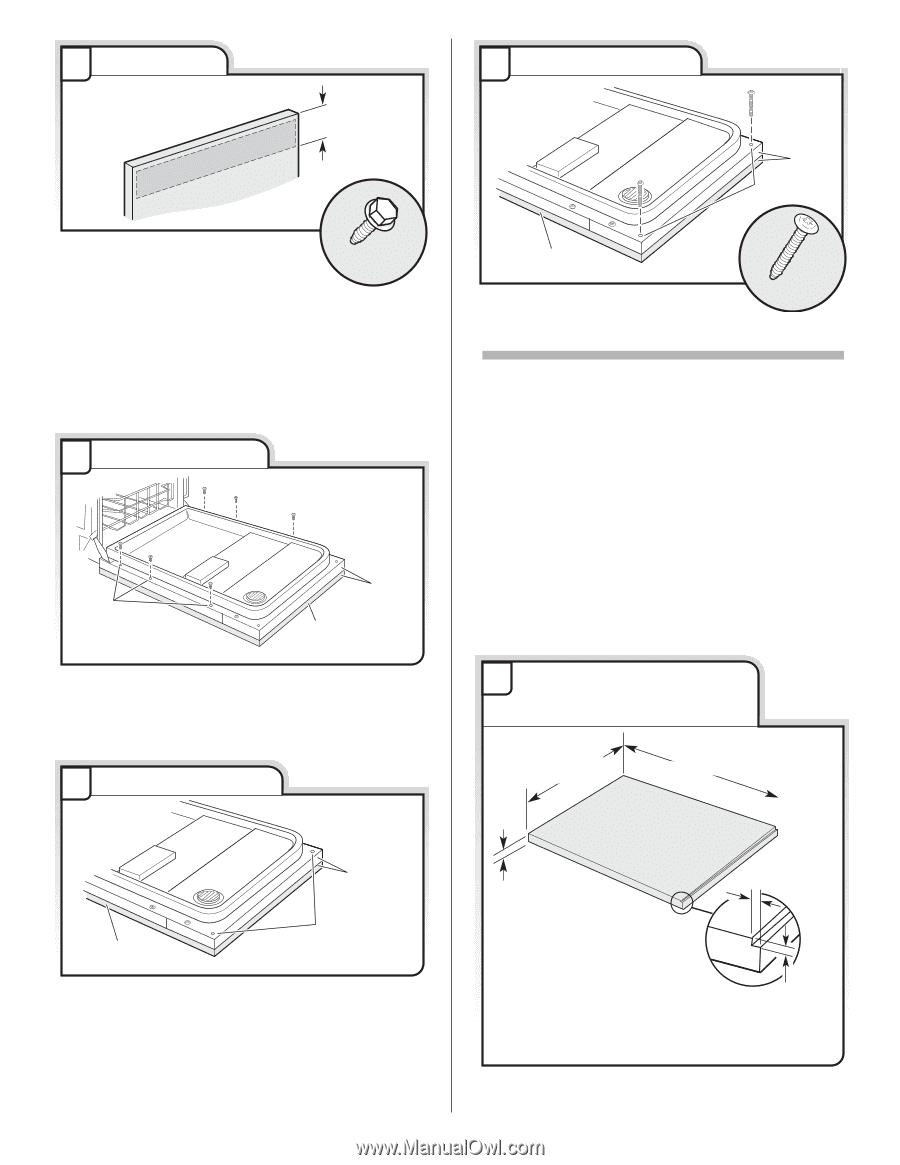
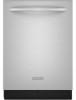
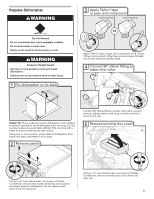
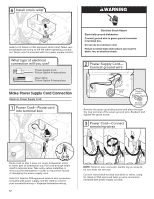
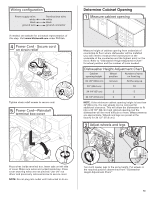
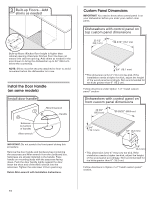
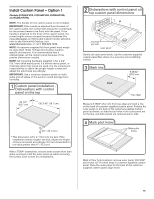
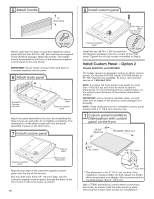
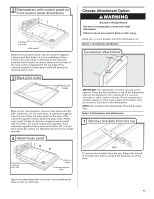
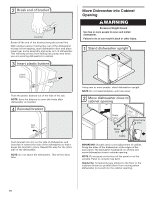
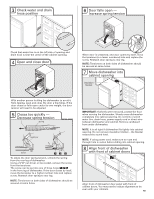
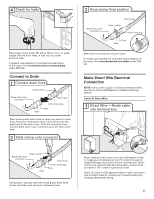
5 Attach handle 6" (15.2 mm) Hex Head Screw Attach outer panel to back of customer-supplied custom panel with the four #10-16 x 3/8" hex head screws supplied in the literature package. Attach the handle. The handle should be centered on the front of the customer-supplied custom panel in the area shown. IMPORTANT: Screw heads must be flush with back of customer-supplied custom panel. 6 Attach body panel Reinstall 3 screws each side Align top edges Customer-supplied panel Attach the panel assembly to the door by reinstalling the three screws on each side; do not tighten completely. This reinstallation of the three screws will hold the panel assembly in place on the door frame. 7 Install custom panel 8 Install custom panel Align top edges Drill through these holes Customer-supplied panel 1-3/8" Screw Install the two #8-18 x 1 3/8" screws from the literature package in the top corners of the inner panel. Tighten the six side screws reinstalled in Step 6. Install Custom Panel - Option 2 (Models KUDC03IV and KUDS30IV) All models require an accessory option to attach custom panels. Kit Number 8171555 (black), 8171556 (white) or 8171557 (biscuit) are available. To order, call customer service at 1-800-444-1230. NOTE: A custom full front panel must weigh no more than 14 lbs (6.3 kg) and must be made to specific dimensions. It is recommended that a cabinetmaker cut the custom panel because of the precise dimensions needed. IMPORTANT: Use a moisture resistant sealer on both sides and all edges of the panel to avoid damage from humidity. NOTE: These dimensions are for frameless custom panel models with a 4" (10.2 cm) console only. 1 Custom panel installation - Dishwashers with control panel on the front 23 3/8" (65.8 cm) *25 29/32" (65.8 cm) Align top edges Customer-supplied panel Drill through these holes Align the top edge of the customer-supplied custom panel with the top of the console. Drill two 3/32" pilot holes 1/2" (13 mm) deep, into the customer-supplied custom panel, through the holes in the top corners on the inner panel, as shown. 16 3/4" (19.1 mm) 1/8" (3.2 mm) 1/8" (3.2 mm) * This dimension is for 4" (10.2 cm) toe kick. If the installation needs a higher toe kick, adjust the height of the wood panel accordingly. Not recommended for toe kicks greater than 6" (15.2 cm). With a TORX® screwdriver, remove three screws from both sides, as shown; hold the outer panel up while removing the screws. Save screws for reinstallation.
-
 1
1 -
2
-
3
-
4
-
5
-
6
-
7
-
8
-
9
-
10
-
 11
11 -
 12
12 -
 13
13 -
 14
14 -
 15
15 -
 16
16 -
 17
17 -
 18
18 -
 19
19 -
 20
20 -
 21
21 -
22
-
23
-
24
-
25
-
26
-
27
-
28
-
29
-
30
-
31
-
32
-
33
-
34
-
35
-
36
-
37
-
38
-
39
-
40
-
41
-
42
-
43
-
44
-
45
-
46
-
47
-
48
-
49
-
50
-
51
-
52
 |
 |