KitchenAid KUDL15FXWH Installation Guide - Page 12
Custom panel dimensions
 |
View all KitchenAid KUDL15FXWH manuals
Add to My Manuals
Save this manual to your list of manuals |
Page 12 highlights
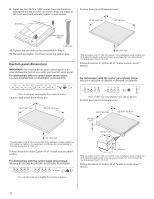
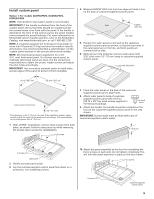
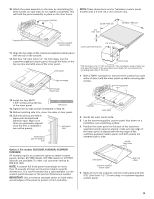
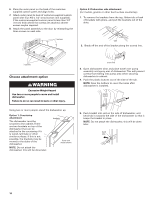
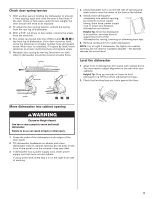
9. Install the two #8-18 x 1-3/8" screws from the literature package in the top corners, as shown. Align top edges of full front panel and console; tighten corner screws. 2 screws Custom door panel dimensions are: 23-3/8" (59.4 cm) *30" (76.2 cm) align top edges 1-3/8"screw 10. Tighten the two side screws reinstalled in Step 8. 11. Reinstall and tighten the three remaining side screws. Custom panel dimensions IMPORTANT: You need to know what control panel is on your dishwasher before you order your custom door panel. For dishwashers with the control panel shown below: (models KUDP02FSPA, KUDS02FSPA, KUDU02FSPA) 3/4" (19.1 mm) *This dimension is for 4" (10.2 cm) toe kick. If the installation needs a higher toe kick, adjust the height of the wood panel accordingly. Not recommended for toe kicks greater than 6" (15.2 cm). Follow directions in Option #2 of "Install custom panel" section. For dishwashers with the control panel shown below: (Models KUDC02IR, KUDI02IR, KUDP02IR, KUDS02IR) (Your model may vary slightly from picture above.) Custom door panel dimensions are: 23-1/2" (59.7 cm) *30-3/16" (76.7 cm) (Your model may vary slightly from picture above.) Custom door panel dimensions are: 23-3/8" (59.4 cm) 3/4" (19.1 mm) *25-29/32" (65.8 cm) 3/4" (19.1 mm) *This dimension is for 4" (10.2 cm) toe kick. If the installation needs a higher toe kick, adjust the height of the wood panel accordingly. Not recommended for toe kicks greater than 6" (15.2 cm). Follow directions under Option #1 of "Install custom panel" section. For dishwashers with the control panel shown below: (Models KUDI02FR, KUDP02FR, KUDS02FR, KUDU02FR) 1/8" (3.2 mm) 1/8" (3.2 mm) *This dimension is for 4" (10.2 cm) toe kick. If the installation needs a higher toe kick, adjust the height of the wood panel accordingly. Not recommended for toe kicks greater than 6" (15.2 cm). Follow directions in Option #3 of "Install custom panel" section. (Your model may vary slightly from picture above.) 12
-
 1
1 -
2
-
3
-
4
-
5
-
6
-
 7
7 -
 8
8 -
 9
9 -
 10
10 -
 11
11 -
 12
12 -
 13
13 -
 14
14 -
 15
15 -
 16
16 -
 17
17 -
18
-
19
-
20
-
21
-
22
-
23
-
24
-
25
-
26
-
27
-
28
-
29
-
30
-
31
-
32
-
33
-
34
-
35
-
36
-
37
-
38
-
39
-
40
-
41
-
42
-
43
-
44
 |
 |
