KitchenAid KUDL15FXWH Installation Guide - Page 16
Choose attachment option
 |
View all KitchenAid KUDL15FXWH manuals
Add to My Manuals
Save this manual to your list of manuals |
Page 16 highlights
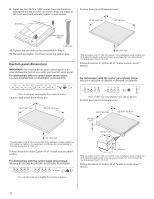
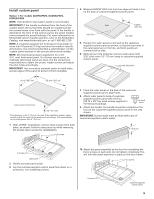
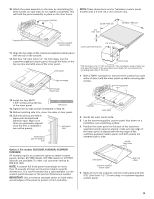
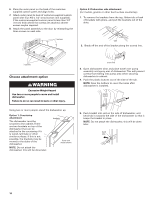
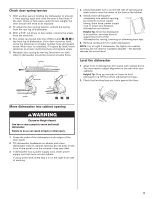
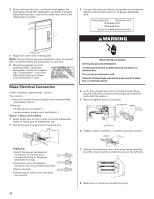
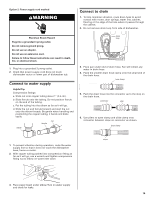
6. Place the outer panel on the back of the customersupplied custom panel and align holes. 7. Attach outer panel to back of customer-supplied custom panel with four #10 x 1/2" wood screws (not supplied). If the customer-supplied custom panel is less than 3/4" (1.9 cm) thick where the screws are attached, shorter screws maybe required. 8. Attach the panel assembly to the door by reinstalling the three screws on each side. 3 screws Option 2: Dishwasher side attachment (for marble, granite or other hard surface countertop) 1. To remove the brackets from the top, flatten tab at back of brackets with pliers, and pull the brackets out of the slots. tabs 2. Break off the end of the bracket along the scored line. 3 screws Choose attachment option WARNING Excessive Weight Hazard Use two or more people to move and install dishwasher. Failure to do so can result in back or other injury. Using two or more people, stand the dishwasher up. Option 1: Countertop attachment The dishwasher must be secured to the cabinet. There are two brackets on top of the dishwasher that can be attached to the countertop if it is wood, laminate or other similar surfaces. If this is not possible, the brackets may be moved to the sides of the dishwasher. NOTE: Do not attach the dishwasher, this will be done later. brackets front vent model shown score line 3. Open dishwasher door and place towel over pump assembly and spray arm of dishwasher. This will prevent screws from falling into pump area when securing dishwasher to cabinet. 4. Push the plastic buttons out of the side of the tub. NOTE: Save the buttons to cover the holes after dishwasher is installed. plastic button 5. Push bracket into slot on the side of dishwasher, and bend tab in towards the side of the dishwasher so that it keeps the bracket in place. NOTE: Do not attach the dishwasher, this will be done later. bend tabs 16
-
 1
1 -
2
-
3
-
4
-
5
-
6
-
7
-
8
-
9
-
10
-
 11
11 -
 12
12 -
 13
13 -
 14
14 -
 15
15 -
 16
16 -
 17
17 -
 18
18 -
 19
19 -
 20
20 -
 21
21 -
22
-
23
-
24
-
25
-
26
-
27
-
28
-
29
-
30
-
31
-
32
-
33
-
34
-
35
-
36
-
37
-
38
-
39
-
40
-
41
-
42
-
43
-
44
 |
 |
