Kodak ESP Office 6150 Extended user guide - Page 52
Working with the phonebook, Opening the phonebook, Adding a new phonebook entry
 |
View all Kodak ESP Office 6150 manuals
Add to My Manuals
Save this manual to your list of manuals |
Page 52 highlights
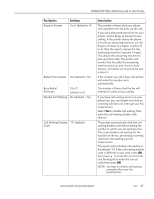
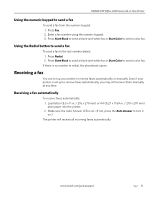
Faxing Working with the phonebook You can enter up to 60 fax numbers in the phonebook. You can create and manage the phonebook from the printer LCD, or if connected to a computer with WINDOWS OS, you can use Home Center software to create and manage the phonebook. Opening the phonebook Open the phonebook in one of several ways: • Press and hold Phonebook for one second. • Press and hold Fax for one second. • Press Home, then press to select Send Fax, then press OK. When the phonebook opens, either Edit Phonebook or Fax Options appears at the top of the menu and is selected. Adding a new phonebook entry To add a new phonebook entry: 1. Open the phonebook (see Opening the phonebook, page 46). NOTE: If Fax Options appears and is selected, press OK. 2. Make sure Edit Phonebook is selected, then press OK. 3. Select Add New Entry, then press OK. 4. Make sure Number is selected, then press OK. 5. Use the numeric keypad on the control panel to enter a fax number, then press OK. 6. Press to select Name, then press OK. The alphanumeric keypad appears on the LCD. 7. Enter a name using either the alphanumeric keypad (see Using the alphanumeric keypad on the LCD, page 48) or the numeric keypad (see Using the numeric keypad on the control panel to enter text, page 48). 8. When you are finished entering a name, press and to select DONE on the LCD, then press OK. 9. Optional: Assign a Quick Dial number. Set up your ten most frequently used fax numbers as Quick Dial numbers. You will be able to dial them quickly, and they will be displayed at the top of your phonebook. a. Press to select Quick Dial, then press OK. b. Using the numeric keypad on the control panel, enter a number from 0 to 9, then press OK 10. Press to select DONE, then press OK. 46 www.kodak.com/go/aiosupport
-
 1
1 -
2
-
3
-
4
-
5
-
6
-
7
-
8
-
9
-
10
-
11
-
12
-
13
-
14
-
15
-
16
-
17
-
18
-
19
-
20
-
21
-
22
-
23
-
24
-
25
-
26
-
27
-
28
-
29
-
30
-
31
-
32
-
33
-
34
-
35
-
36
-
37
-
38
-
39
-
40
-
41
-
42
-
43
-
44
-
45
-
46
-
 47
47 -
 48
48 -
 49
49 -
 50
50 -
 51
51 -
 52
52 -
 53
53 -
 54
54 -
 55
55 -
 56
56 -
 57
57 -
58
-
59
-
60
-
61
-
62
-
63
-
64
-
65
-
66
-
67
-
68
-
69
-
70
-
71
-
72
-
73
-
74
-
75
-
76
-
77
-
78
-
79
-
80
-
81
-
82
-
83
-
84
-
85
-
86
-
87
-
88
-
89
-
90
-
91
 |
 |