Kodak I1210 User Guide - Page 11
System requirements, Installing the scanner, Installing the Kodak Driver Software, Installing - drivers
 |
UPC - 041771012434
View all Kodak I1210 manuals
Add to My Manuals
Save this manual to your list of manuals |
Page 11 highlights
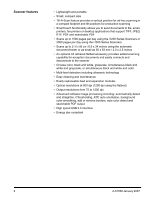
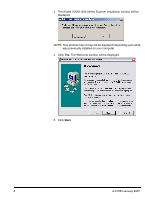
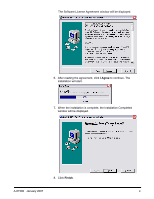
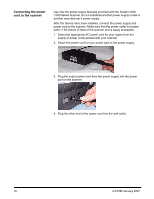
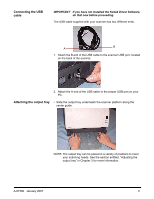
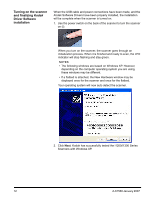
System requirements Following is the minimum recommended system configuration to run Kodak i1200/i1300 Series Scanners. • Recommended PC configuration: - For documents up to 356 mm (14 in.) long up to 400 dpi: Pentium IV, 3.2 GHz processor, 512 MB RAM - For documents up to 660 mm (26 in.) long up to 400 dpi: Pentium IV, 3.2 GHz processor, 1 GB RAM - For longer documents/higher resolutions: Pentium IV, 3.2 GHz processor, 3 GB RAM • USB port 2.0 (compatible with USB 1.1 but at slower speeds) • Microsoft Windows XP SP2, (supports USB 2.0); Windows XP 64-bit edition and Windows 2000 Professional (supports USB 2.0) • 100 MB free hard disk space • CD-ROM drive Installing the scanner Install the scanner in the following order: 1. Install the Kodak Driver Software on the PC. 2. Connect the power cord to the scanner. 3. Connect the USB cable between your scanner and PC. 4. Attach the output tray. 5. Turn on scanner power and finalize the Kodak Driver Software installation. 6. Verify your scanner installation (see Chapter 3). 7. Install other supplied scanning applications (See Chapter 3). Installing the Kodak Driver Software Install the driver software before connecting the scanner to your PC. 1. Insert the installation CD in the CD-ROM drive. The installation program starts automatically. NOTES: • If the CD does not start automatically, open the My Computer icon on your desktop. Double-click the icon for your CD-ROM drive, then double-click on Setup.exe. • The i1200 and i1300 Series Scanners have separate installation CDs. If you have both scanners in your environment, be sure to use the correct installation CD. 2. Select Install Scanner Software. A-61560 January 2007 7
-
 1
1 -
2
-
3
-
4
-
5
-
 6
6 -
 7
7 -
 8
8 -
 9
9 -
 10
10 -
 11
11 -
 12
12 -
 13
13 -
 14
14 -
 15
15 -
 16
16 -
17
-
18
-
19
-
20
-
21
-
22
-
23
-
24
-
25
-
26
-
27
-
28
-
29
-
30
-
31
-
32
-
33
-
34
-
35
-
36
-
37
-
38
-
39
-
40
-
41
-
42
-
43
-
44
-
45
-
46
-
47
-
48
-
49
-
50
-
51
-
52
-
53
-
54
-
55
-
56
-
57
-
58
-
59
-
60
-
61
-
62
-
63
-
64
-
65
-
66
-
67
-
68
-
69
-
70
-
71
-
72
-
73
-
74
-
75
-
76
-
77
-
78
-
79
-
80
-
81
-
82
-
83
-
84
-
85
-
86
-
87
-
88
-
89
-
90
-
91
-
92
-
93
-
94
-
95
-
96
-
97
-
98
-
99
-
100
-
101
-
102
-
103
-
104
-
105
-
106
-
107
-
108
-
109
-
110
-
111
-
112
-
113
-
114
-
115
-
116
-
117
-
118
-
119
-
120
-
121
-
122
-
123
-
124
-
125
-
126
-
127
-
128
-
129
-
130
 |
 |
