Konica Minolta AccurioPress 6136P AccurioPress 6136/6136P/6120 Auto Inspection
Konica Minolta AccurioPress 6136P Manual
 |
View all Konica Minolta AccurioPress 6136P manuals
Add to My Manuals
Save this manual to your list of manuals |
Konica Minolta AccurioPress 6136P manual content summary:
- Konica Minolta AccurioPress 6136P | AccurioPress 6136/6136P/6120 Auto Inspection - Page 1
- Konica Minolta AccurioPress 6136P | AccurioPress 6136/6136P/6120 Auto Inspection - Page 2
in this manual 7 CAUTION - This symbol indicates that negligence of the instructions may lead to Guide. This guide describes product names and system configurations as follows. Product name AccurioPress 6136 / 6136P / 6120 Conventions used in this guide This machine: Indicates the entire system - Konica Minolta AccurioPress 6136P | AccurioPress 6136/6136P/6120 Auto Inspection - Page 3
...5-2 6 Automatic Inspection Area 6.1 What Is the Automatic Inspection Area 6-2 Overview ...6-2 Inspection Excluding Area ...6-2 Barcode Area ...6-2 Serial No. (0-9) Area ...6-3 6.2 Setting an Inspection Area...6-3 Automatic Inspection Operation Manual Contents-1 - Konica Minolta AccurioPress 6136P | AccurioPress 6136/6136P/6120 Auto Inspection - Page 4
Area 7-14 Overview ...7-14 Procedure (Creating a Reference Image 7-14 Procedure (Setting an Inspection Area 7-14 Procedure (Decoding) ...7-16 8 Troubleshooting 8.1 If an Out-of-Range Image is Detected 8-2 Out-of-range image report status and remedy 8-2 Automatic Inspection Operation - Konica Minolta AccurioPress 6136P | AccurioPress 6136/6136P/6120 Auto Inspection - Page 5
1 Overview of Function - Konica Minolta AccurioPress 6136P | AccurioPress 6136/6136P/6120 Auto Inspection - Page 6
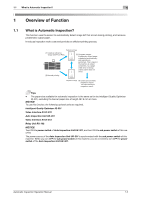
power switch of this machine, you do not need to turn OFF the power switch of the Auto Inspection Unit UK-301. Automatic Inspection Operation Manual 1-2 - Konica Minolta AccurioPress 6136P | AccurioPress 6136/6136P/6120 Auto Inspection - Page 7
of the Auto Inspection Unit UK-301. For details on the default administrator password, refer to [Safety Information] in the separate volume. Automatic Inspection Operation Manual 1-3 - Konica Minolta AccurioPress 6136P | AccurioPress 6136/6136P/6120 Auto Inspection - Page 8
2 Automatic Inspection Setting - Konica Minolta AccurioPress 6136P | AccurioPress 6136/6136P/6120 Auto Inspection - Page 9
value for the number of detected errors is set to "0", this machine will not stop even if the number of detection increases. Automatic Inspection Operation Manual 2-2 - Konica Minolta AccurioPress 6136P | AccurioPress 6136/6136P/6120 Auto Inspection - Page 10
and [Premium], for each of which you can adjust the detection standard. For details, refer to "2.1.2 [Automatic Inspection Level Setting]" in this manual. Set the automatic inspection on the Wait screen. When outputting a print job for Direct Print and such without temporarily saving it, input the - Konica Minolta AccurioPress 6136P | AccurioPress 6136/6136P/6120 Auto Inspection - Page 11
detected. [Paper Noise Removal Level] Range: 1(Strong) - 7(Weak) Adjusts the level to exclude noises originating from paper itself from the detection target. Automatic Inspection Operation Manual 2-4 - Konica Minolta AccurioPress 6136P | AccurioPress 6136/6136P/6120 Auto Inspection - Page 12
Auto Inspection Unit UK-301. Specify the line speed of the Auto Inspection Unit UK-301. Adjust to suit your network environment. Automatic Inspection Operation Manual 2-5 - Konica Minolta AccurioPress 6136P | AccurioPress 6136/6136P/6120 Auto Inspection - Page 13
unit memory. Displays the amount of available space in the main unit file system. Description Displays the amount of available space in the memory of the Auto runs out, the job may be stopped. Follow the instruction shown in [Available Capacity Recovery Method] to increase the amount of - Konica Minolta AccurioPress 6136P | AccurioPress 6136/6136P/6120 Auto Inspection - Page 14
a reference image is displayed. To enable UK HDD encryption, delete all of the reference images and uncreated automatic inspection reports in advance. Automatic Inspection Operation Manual 2-7 - Konica Minolta AccurioPress 6136P | AccurioPress 6136/6136P/6120 Auto Inspection - Page 15
below. - [Utility] - [Administrator Setting] - [Network Setting] - [NIC Settings] - [Detail Settings] - [Status Notif. Setting] - [Register Notif. Address] - [E-mail] - [ON] - [Notification Items] - [Auto Inspection] Automatic Inspection Operation Manual 2-8 - Konica Minolta AccurioPress 6136P | AccurioPress 6136/6136P/6120 Auto Inspection - Page 16
Specify whether to allow log storage when a service call occurs.To allow logs, specify whether to log storage when a service call occurs. The stored logs are used to help the service representative's work. Specify problem even if the image attracts someone's attention. Automatic Inspection Operation - Konica Minolta AccurioPress 6136P | AccurioPress 6136/6136P/6120 Auto Inspection - Page 17
reference chart. - Inspection chart: The inspection chart includes dots in the table. Tips - For details on how to obtain automatic inspection test charts, contact your service representative. Automatic Inspection Operation Manual 2-10 - Konica Minolta AccurioPress 6136P | AccurioPress 6136/6136P/6120 Auto Inspection - Page 18
, refer to "2.1 Presetting the Details of Automatic Inspection" in this manual. In this step, configure the following settings. [Automatic Reprint when Creating a New Reference Image for Automatic Inspection" in this manual. 4 Perform automatic inspection using the reference image created in - Konica Minolta AccurioPress 6136P | AccurioPress 6136/6136P/6120 Auto Inspection - Page 19
Level 2 5 Check the automatic inspection report. Check the report following the procedure described in "4.1 Confirming the Automatic Inspection Report" in this manual. Check whether the levels specified in step 2 match the values framed in red. NOTICE The result of automatic inspection may vary - Konica Minolta AccurioPress 6136P | AccurioPress 6136/6136P/6120 Auto Inspection - Page 20
3 Performing Automatic Inspection - Konica Minolta AccurioPress 6136P | AccurioPress 6136/6136P/6120 Auto Inspection - Page 21
via the printer driver, change the storage destination in the [Workflow] tab of the PS-Plugin driver. For details on how to hold a job, refer to [Job Management] in the HTML User's Guide. 2 Press [JOB window opens. 5 Set [Inspection Setting] to [ON]. Automatic Inspection Operation Manual 3-2 - Konica Minolta AccurioPress 6136P | AccurioPress 6136/6136P/6120 Auto Inspection - Page 22
on the output purpose. 8 Press [New Store] or [Overwrite]. The setting is stored, and the display returns to the [Hold Job] screen. Automatic Inspection Operation Manual 3-3 - Konica Minolta AccurioPress 6136P | AccurioPress 6136/6136P/6120 Auto Inspection - Page 23
Area], we recommend that you create a reference image in [Sample Output]. For details on the [Automatic Inspection Area], refer to "6. Automatic Inspection Area" in this manual. Then, follow the procedure described in "3.2 Selecting the Created Reference Image for Automatic Inspection" in this - Konica Minolta AccurioPress 6136P | AccurioPress 6136/6136P/6120 Auto Inspection - Page 24
3.1 Creating a New Reference Image for Automatic Inspection 3 Tips - [Auto Inspection] can also be configured using AccurioPro Print Manager. Automatic Inspection Operation Manual 3-5 - Konica Minolta AccurioPress 6136P | AccurioPress 6136/6136P/6120 Auto Inspection - Page 25
via the printer driver, change the storage destination in the [Workflow] tab of the PS-Plugin driver. For details on how to hold a job, refer to [Job Management] in the HTML User's Guide. 2 Press [JOB window opens. 5 Set [Inspection Setting] to [ON]. Automatic Inspection Operation Manual 3-6 - Konica Minolta AccurioPress 6136P | AccurioPress 6136/6136P/6120 Auto Inspection - Page 26
] when printing is finished, select [Delete at the End]. In [Inspection Level Setting], specify the desired level depending on the output purpose. Automatic Inspection Operation Manual 3-7 - Konica Minolta AccurioPress 6136P | AccurioPress 6136/6136P/6120 Auto Inspection - Page 27
the date/time stamp function, set Inspection Excluding Area by reference; you can perform automatic inspection. For details, refer to "6. Automatic Inspection Area" in this manual. Automatic Inspection Operation - Konica Minolta AccurioPress 6136P | AccurioPress 6136/6136P/6120 Auto Inspection - Page 28
3.2 Selecting the Created Reference Image for Automatic Inspection 3 Tips - The reference image can also be selected using AccurioPro Print Manager. Automatic Inspection Operation Manual 3-9 - Konica Minolta AccurioPress 6136P | AccurioPress 6136/6136P/6120 Auto Inspection - Page 29
is displayed on the control panel. % For details on the wait output procedure, refer to the HTML User's Guide. 2 Press [Create Reference Image], and enter [Number of Ref. Image Pages]. 3 Press Start on the control the inspection level setting as needed. Automatic Inspection Operation Manual 3-10 - Konica Minolta AccurioPress 6136P | AccurioPress 6136/6136P/6120 Auto Inspection - Page 30
Result]. The [Automatic Inspection Report] can be viewed on this machine or in Web Utilities of the Auto Inspection Unit UK-301. Automatic Inspection Operation Manual 3-11 - Konica Minolta AccurioPress 6136P | AccurioPress 6136/6136P/6120 Auto Inspection - Page 31
on the control panel. % For details on the wait output procedure, refer to the HTML User's Guide. 2 Press [Change Setting] under [Reference Image/Area Setting]. The [Reference Image Selection] screen is Utilities of the Auto Inspection Unit UK-301. Automatic Inspection Operation Manual 3-12 - Konica Minolta AccurioPress 6136P | AccurioPress 6136/6136P/6120 Auto Inspection - Page 32
4 Automatic Inspection Report - Konica Minolta AccurioPress 6136P | AccurioPress 6136/6136P/6120 Auto Inspection - Page 33
To create [AutoInspect.Report], enable [Create Auto Inspection Report] before performing automatic inspection. To display [AutoInspect.Report], configure [Automatic Inspection NIC Setting]. Automatic Inspection Operation Manual 4-2 - Konica Minolta AccurioPress 6136P | AccurioPress 6136/6136P/6120 Auto Inspection - Page 34
] and [Password] that are stored, press [Web Browser] on the [MACHINE] screen, select [Menu] - [Setting] - [Setting], and press [Delete] in [Machine Data 2]. Automatic Inspection Operation Manual 4-3 - Konica Minolta AccurioPress 6136P | AccurioPress 6136/6136P/6120 Auto Inspection - Page 35
Auto Inspection Unit UK-301 reaches 100%, no report is created. Select an unnecessary report, and press [Delete] to delete such a report. Automatic Inspection Operation Manual 4-4 - Konica Minolta AccurioPress 6136P | AccurioPress 6136/6136P/6120 Auto Inspection - Page 36
range] screen. % For details on Automatic Inspection Report, refer to "4.3 Viewing the report via Web Utilities of the Auto Inspection Unit UK-301" in this manual. Automatic Inspection Operation - Konica Minolta AccurioPress 6136P | AccurioPress 6136/6136P/6120 Auto Inspection - Page 37
stains are displayed. Displays the stain level (n). For details on the stain level, refer to "2.1.2 [Automatic Inspection Level Setting]" in this manual. XXX: Serial No. Indicates the total number of detected omissions. Up to 20 omissions are displayed. Displays the omission level (n). XXX: Serial - Konica Minolta AccurioPress 6136P | AccurioPress 6136/6136P/6120 Auto Inspection - Page 38
report from the machine 4 Type [Alignment error] [CSV Read Error] [Too Many Stains] Description Displayed when the system failed in alignment with the reference image. Displayed when the system failed to create a report. Displayed when many stains were detected. Automatic Inspection Operation - Konica Minolta AccurioPress 6136P | AccurioPress 6136/6136P/6120 Auto Inspection - Page 39
Web Utilities, refer to [Web Utilities] in the HTML User's Guide. 2 Enter the following URL in the address bar and press operation contents and [Extension for maintenance] of the menu for a service engineer (CE) are displayed on the top page of Web Utilities. Inspection Operation Manual 4-8 - Konica Minolta AccurioPress 6136P | AccurioPress 6136/6136P/6120 Auto Inspection - Page 40
1,000 pages can be created as a report. If the number of pages exceeds 1,000, the excess is divided into another PDF file. Automatic Inspection Operation Manual 4-9 - Konica Minolta AccurioPress 6136P | AccurioPress 6136/6136P/6120 Auto Inspection - Page 41
inspection standard. If you view a report via Web Utilities of the Auto Inspection Unit UK-301, the problem part is framed in red, and the reason is displayed. [Decoding result] Shows a report of the the inspection level. Standard Essential Premium Automatic Inspection Operation Manual 4-10 - Konica Minolta AccurioPress 6136P | AccurioPress 6136/6136P/6120 Auto Inspection - Page 42
Displays the items specified in [Automatic Inspection Level Setting]. For details, refer to "2.1.2 [Automatic Inspection Level Setting]" in this manual. Name [Stain Detection Level] [Paper Noise Removal Level] [Image Edge Detection Sensitivity] [Permission Level for Stain] Description Displays - Konica Minolta AccurioPress 6136P | AccurioPress 6136/6136P/6120 Auto Inspection - Page 43
number did not match. Displays the number of pages in which the ascending order or descending order of a number did not match. Automatic Inspection Operation Manual 4-12 - Konica Minolta AccurioPress 6136P | AccurioPress 6136/6136P/6120 Auto Inspection - Page 44
via Web Utilities of the Auto Inspection Unit UK-301 4 Out of range The part related to the problem is framed in red, and details are displayed as shown below. Name [Stain(XXX)] [Level(X)] lateral position, and "y" indicates the vertical position.) Automatic Inspection Operation Manual 4-13 - Konica Minolta AccurioPress 6136P | AccurioPress 6136/6136P/6120 Auto Inspection - Page 45
enclose image failures such as stains or omissions. Sets the color of the frame to enclose a number or bar code reading error. Automatic Inspection Operation Manual 4-14 - Konica Minolta AccurioPress 6136P | AccurioPress 6136/6136P/6120 Auto Inspection - Page 46
5 Reference Image - Konica Minolta AccurioPress 6136P | AccurioPress 6136/6136P/6120 Auto Inspection - Page 47
[InspectionAreaSet.] Specify the inspection area of the selected reference image. For details, refer to "6. Automatic Inspection Area" in this manual. [MultipleSelect] Select multiple reference images. When multiple reference images are selected, you cannot move the list or set the inspection - Konica Minolta AccurioPress 6136P | AccurioPress 6136/6136P/6120 Auto Inspection - Page 48
6 Automatic Inspection Area - Konica Minolta AccurioPress 6136P | AccurioPress 6136/6136P/6120 Auto Inspection - Page 49
[Select Area Type], sequential check can be set. For details, refer to "7.4 Performing Sequential Check for the Barcode Area or Serial No. (0-9) Area" in this manual. Automatic Inspection Operation - Konica Minolta AccurioPress 6136P | AccurioPress 6136/6136P/6120 Auto Inspection - Page 50
Type], sequential check can be set. For details, refer to "7.4 Performing Sequential Check for the Barcode Area or Serial No. (0-9) Area" in this manual. - If a space between numbers in the target area is narrow when a number is read in [Serial No. (0-9) Area], a recognition error may occur. - If - Konica Minolta AccurioPress 6136P | AccurioPress 6136/6136P/6120 Auto Inspection - Page 51
inspection area on the setting screen. Display item [Select Area Type] [Select Target Page] [Select Area] [Excluding Edge Setting] Automatic Inspection Operation Manual Description Specify the type of area to set. Select the page that is targeted for automatic inspection. There are three types of - Konica Minolta AccurioPress 6136P | AccurioPress 6136/6136P/6120 Auto Inspection - Page 52
(0-9) Area] in [Select Area Type]. This function is optional. For details, contact your service representative. 3 Press [Complete]. Tips - The sides and pages selected in [Select Target Page No.1 N Area No.1 1 Back Area No.1 2 Area No.1 3 Area No.1 N Automatic Inspection Operation Manual 6-5 - Konica Minolta AccurioPress 6136P | AccurioPress 6136/6136P/6120 Auto Inspection - Page 53
7 Output Setting - Konica Minolta AccurioPress 6136P | AccurioPress 6136/6136P/6120 Auto Inspection - Page 54
manual Image beyond standard Purge Reprint instruction UK-301 Image within Finisher standard RU-702 IQ-501 panel This example describes a system name Operating system Application Printer driver Output Option Name Windows10 Adobe Acrobat Reader DC PS Plug-in driver Intelligent Quality - Konica Minolta AccurioPress 6136P | AccurioPress 6136/6136P/6120 Auto Inspection - Page 55
[Continue Output] in [Operation after Deviation/Out of Range was Detected], and enter [Detec- tion Count] using the keypad on the screen. Automatic Inspection Operation Manual 7-3 - Konica Minolta AccurioPress 6136P | AccurioPress 6136/6136P/6120 Auto Inspection - Page 56
[Output Tray for Out of Range]. 4 Press [OK]. 5 Automatic inspection and printing are performed. For details, refer to "3. Performing Automatic Inspection" in this manual. If an error is detected during printing, the printout subject to the detected error and paper left in the machine at the same - Konica Minolta AccurioPress 6136P | AccurioPress 6136/6136P/6120 Auto Inspection - Page 57
setting is available if you want to reduce paper loss or use paper remaining in the machine at the same time. - Example shown in this manual Image beyond standard Image within standard Finisher Mixed RU-702 UK-301 IQ-501 panel In this example, a normal printout and a printout with an error - Konica Minolta AccurioPress 6136P | AccurioPress 6136/6136P/6120 Auto Inspection - Page 58
is continued even if an error is detected multiple times. 3 Select [Same as the Job] of [Output Tray for Out of Range]. Automatic Inspection Operation Manual 7-6 - Konica Minolta AccurioPress 6136P | AccurioPress 6136/6136P/6120 Auto Inspection - Page 59
to the same tray as a normal printout. 8 Check the automatic inspection report. For details, refer to "4. Automatic Inspection Report" in this manual. 9 Check the printout. Check the actual printout based on the information in the automatic inspection report, and take the appropriate action as - Konica Minolta AccurioPress 6136P | AccurioPress 6136/6136P/6120 Auto Inspection - Page 60
method. Intended environment Item name Operating system Application Printer driver Output Option Name Windows10 Adobe Acrobat Reader DC PS Plug-in driver Intelligent Quality Optimizer IQ-501 Auto ] screen. The [IQ Function Setting] screen is displayed. Automatic Inspection Operation Manual 7-8 - Konica Minolta AccurioPress 6136P | AccurioPress 6136/6136P/6120 Auto Inspection - Page 61
on the number of job sheets. % When printing via the printer driver, change the storage destination in the [Workflow] tab of the PS Plug-in driver. % For details on how to hold a job, refer to [Job Management] in the HTML User's Guide. 4 Press [JOB LIST] on the [MACHINE] screen to display the [Hold - Konica Minolta AccurioPress 6136P | AccurioPress 6136/6136P/6120 Auto Inspection - Page 62
in [Reference Image Management] - [Reference Image List 1] on the [MACHINE] screen. For details, refer to "5.1. Managing Reference Images" in this manual. % If you want to recreate a reference image as the result of checking the contents, execute steps 1 to 7 again. Automatic Inspection Operation - Konica Minolta AccurioPress 6136P | AccurioPress 6136/6136P/6120 Auto Inspection - Page 63
]. % Enter the numeric value, or use the mouse to drag the inspection area to set it. 7 Press [Enter]. [Area Setting] is completed. Automatic Inspection Operation Manual 7-11 - Konica Minolta AccurioPress 6136P | AccurioPress 6136/6136P/6120 Auto Inspection - Page 64
(Setting an Inspection Area)". % For details on the procedure, refer to "3.2. Selecting the Created Reference Image for Automatic Inspection" in this manual. 5 Press [Output]. 6 Press [Normal] in [Output Method], and press [OK]. Printing starts, and data in the inspection area is decoded from - Konica Minolta AccurioPress 6136P | AccurioPress 6136/6136P/6120 Auto Inspection - Page 65
to 5 in "4.3 Viewing the Report via Web Utilities of the Auto Inspection Unit UK-301" in this manual. 8 Click [Report] of the printed job, and click the file name of [Decoding result] on the the inspection target is within the range of specifications. Automatic Inspection Operation Manual 7-13 - Konica Minolta AccurioPress 6136P | AccurioPress 6136/6136P/6120 Auto Inspection - Page 66
name Operating system Application Printer driver Output Option Name Windows10 Adobe Acrobat Reader DC PS Plug-in driver Intelligent the Barcode Area or Serial No. (0-9) Area to Check the Contents" in this manual. Procedure (Setting an Inspection Area) 1 Set the inspection area, referring to steps - Konica Minolta AccurioPress 6136P | AccurioPress 6136/6136P/6120 Auto Inspection - Page 67
(only within the same area)] Check whether the number set in each area No. has been changed correctly between pages. 3 Press [Complete]. Automatic Inspection Operation Manual 7-15 - Konica Minolta AccurioPress 6136P | AccurioPress 6136/6136P/6120 Auto Inspection - Page 68
102, 103", so there is no problem. % If an error is found in [Sequential Check], check the decoding results and the original data (print data). Also, check whether the inspection area or the sequential check setting is within the range of specifications. Automatic Inspection Operation Manual 7-16 - Konica Minolta AccurioPress 6136P | AccurioPress 6136/6136P/6120 Auto Inspection - Page 69
8 Troubleshooting - Konica Minolta AccurioPress 6136P | AccurioPress 6136/6136P/6120 Auto Inspection - Page 70
8 8 Troubleshooting 8.1 If actual [Machine Management] in the HTML printouts. User's Guide. 2 A comment marked by a The inspection accuracy specifications. or serial No. (0-9) area is set based on the specifications. For details, refer to "6. Automatic In- spection Area" in this manual - Konica Minolta AccurioPress 6136P | AccurioPress 6136/6136P/6120 Auto Inspection - Page 71
specific im- age, set the entire target page to an ex- cluding area in [Inspection Excluding Area]. For details, refer to "6. Automatic In- spection Area" in this manual reference image. If no problems are identified, create a red circle is User's Guide. not displayed.) 7 Message "Inspection - Konica Minolta AccurioPress 6136P | AccurioPress 6136/6136P/6120 Auto Inspection - Page 72
8.1 If an Out-of-Range Image is Detected 8 Automatic Inspection Operation Manual 8-4 - Konica Minolta AccurioPress 6136P | AccurioPress 6136/6136P/6120 Auto Inspection - Page 73
- Konica Minolta AccurioPress 6136P | AccurioPress 6136/6136P/6120 Auto Inspection - Page 74
A9JT-IQ-E-00 © 2020 2020. 3
-
 1
1 -
 2
2 -
 3
3 -
 4
4 -
 5
5 -
 6
6 -
 7
7 -
8
-
9
-
10
-
11
-
12
-
13
-
14
-
15
-
16
-
17
-
18
-
19
-
20
-
21
-
22
-
23
-
24
-
25
-
26
-
27
-
28
-
29
-
30
-
31
-
32
-
33
-
34
-
35
-
36
-
37
-
38
-
39
-
40
-
41
-
42
-
43
-
44
-
45
-
46
-
47
-
48
-
49
-
50
-
51
-
52
-
53
-
54
-
55
-
56
-
57
-
58
-
59
-
60
-
61
-
62
-
63
-
64
-
65
-
66
-
67
-
68
-
69
-
70
-
71
-
72
-
73
-
74
 |
 |