Konica Minolta bizhub 20P bizhub 20P Quick Guide - Page 19
For Wired Network Interface Cable Users - driver mac
 |
View all Konica Minolta bizhub 20P manuals
Add to My Manuals
Save this manual to your list of manuals |
Page 19 highlights
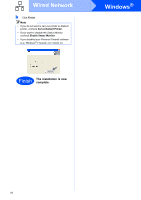
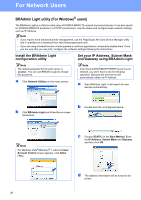
Wired Network Macintosh For Wired Network Interface Cable Users 6 Connect the printer to your Macintosh and install the driver a Connect the network interface cable to the LAN connector marked with a symbol and then connect it to a free port on your hub. f Choose the printer you wish to connect, and then click OK. b Make sure the printer power switch is on. c Turn on your Macintosh. Put the supplied CD/DVD-ROM into your CD/DVD-ROM drive. Note • If there is more than one of the same printer model connected on your network, the MAC Address (Ethernet Address) will be displayed after the model name.You can also confirm your IP Address by scrolling to the right. • You can find your printer's MAC Address (Ethernet Address) and the IP Address by printing out the Printer Settings Page. See Print the Printer Settings Page on page 22. g When this screen appears, click OK. d Double-click bizhub 20P icon on your desktop. Double-click the Start Here icon. Follow the on-screen instructions. Finish The installation is now complete. Windows® Macintosh Wired Network e The KONICA MINOLTA software will search for the KONICA MINOLTA printer. During this time the following screen will appear. 19
-
 1
1 -
2
-
3
-
4
-
5
-
6
-
7
-
8
-
9
-
10
-
11
-
12
-
13
-
 14
14 -
 15
15 -
 16
16 -
 17
17 -
 18
18 -
 19
19 -
 20
20 -
 21
21 -
 22
22 -
 23
23 -
 24
24 -
25
-
26
-
27
-
28
-
29
-
30
-
31
-
32
-
33
 |
 |
