Konica Minolta bizhub C3110 bizhub C3110 Scan Functions User Guide - Page 8
Specify Save to HDD, Save to USB Memory, or WS Scan storage des
 |
View all Konica Minolta bizhub C3110 manuals
Add to My Manuals
Save this manual to your list of manuals |
Page 8 highlights
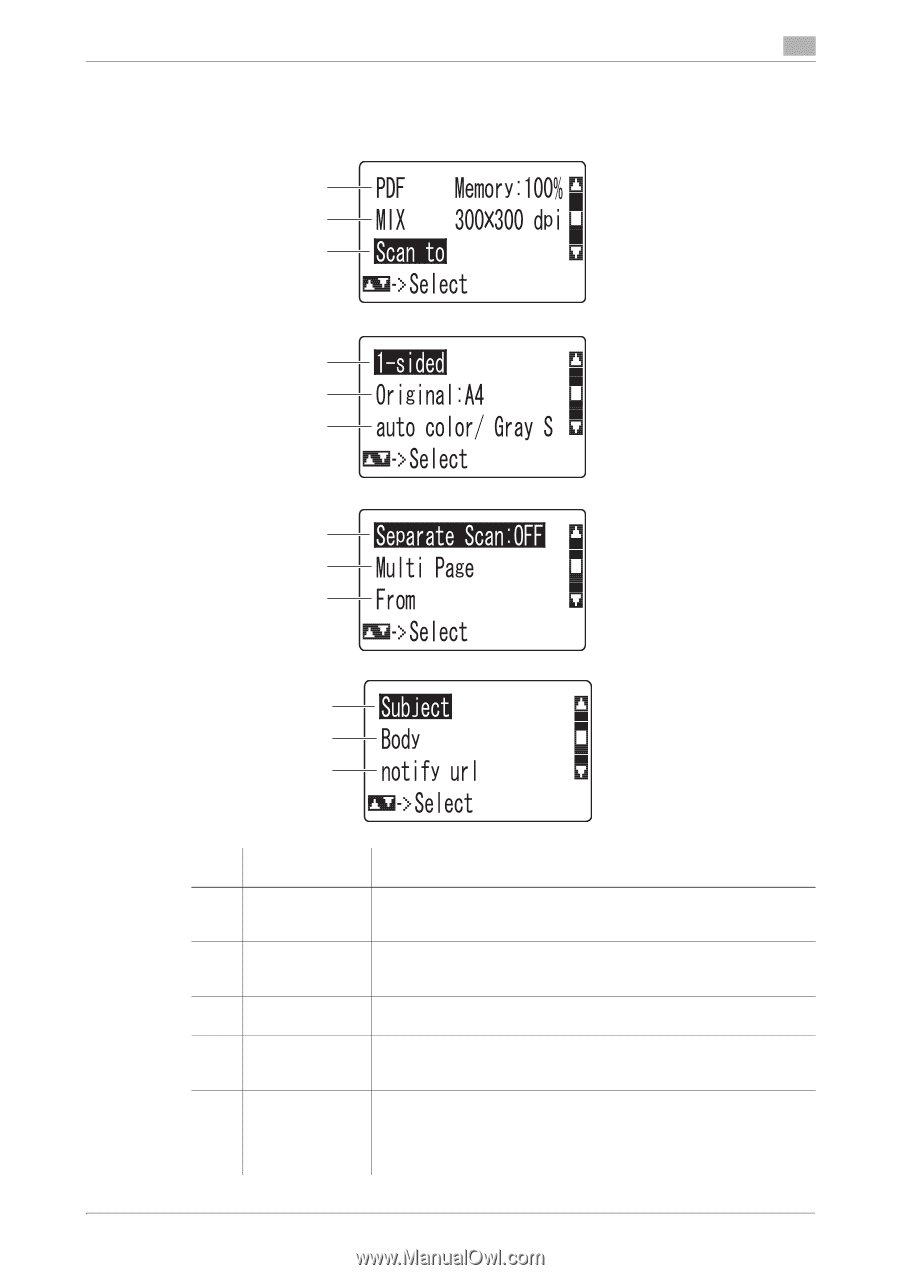
1.2 How to scan 1 4 Specify scan transmission options. % On the main screen (Scan mode), press the + or , key to select the setting you want to change. For details on scan settings, refer to the respective columns of the following table. 1 2 3 4 5 6 7 8 9 10 11 12 No. Settings 1 [IMAGE FOR- MAT] 2 [QUALITY] 3 [SCAN TO] 4 [SIMPLEX/DU- PLEX] 5 [Original Size] Purpose Select the file type used for saving the scanned data. For details, refer to page 1-10. Adjust the image quality of the original ([Original Type], [RESOLUTION], [DENSITY], [Background Removal], or [Sharpness]) to scan the original. For details, refer to page 1-11. Specify Save to HDD, Save to USB Memory, or WS Scan storage destination. Select the surface of the original to be scanned. For details, refer to page 1-13. Select the size of the original to be scanned. Before scanning the original on this machine, specify the size of the original to be scanned. If you fail to set the original size correctly, the image may be cut off. For details on how to specify the original size, refer to page 1-10. [Scan Functions] 1-4
-
 1
1 -
2
-
 3
3 -
 4
4 -
 5
5 -
 6
6 -
 7
7 -
 8
8 -
 9
9 -
 10
10 -
 11
11 -
 12
12 -
 13
13 -
14
-
15
-
16
-
17
-
18
-
19
-
20
-
21
-
22
-
23
-
24
-
25
-
26
-
27
-
28
-
29
-
30
-
31
-
32
-
33
-
34
-
35
-
36
-
37
-
38
-
39
-
40
-
41
-
42
-
43
-
44
-
45
-
46
-
47
-
48
-
49
-
50
-
51
-
52
-
53
-
54
-
55
-
56
-
57
-
58
-
59
-
60
-
61
-
62
-
63
-
64
-
65
-
66
-
67
-
68
-
69
-
70
-
71
-
72
-
73
-
74
-
75
-
76
-
77
 |
 |