Konica Minolta bizhub PRESS C6000 IC-601 Color Centro User Guide - Page 29
Screens of Color Centro - controller not connected
 |
View all Konica Minolta bizhub PRESS C6000 manuals
Add to My Manuals
Save this manual to your list of manuals |
Page 29 highlights
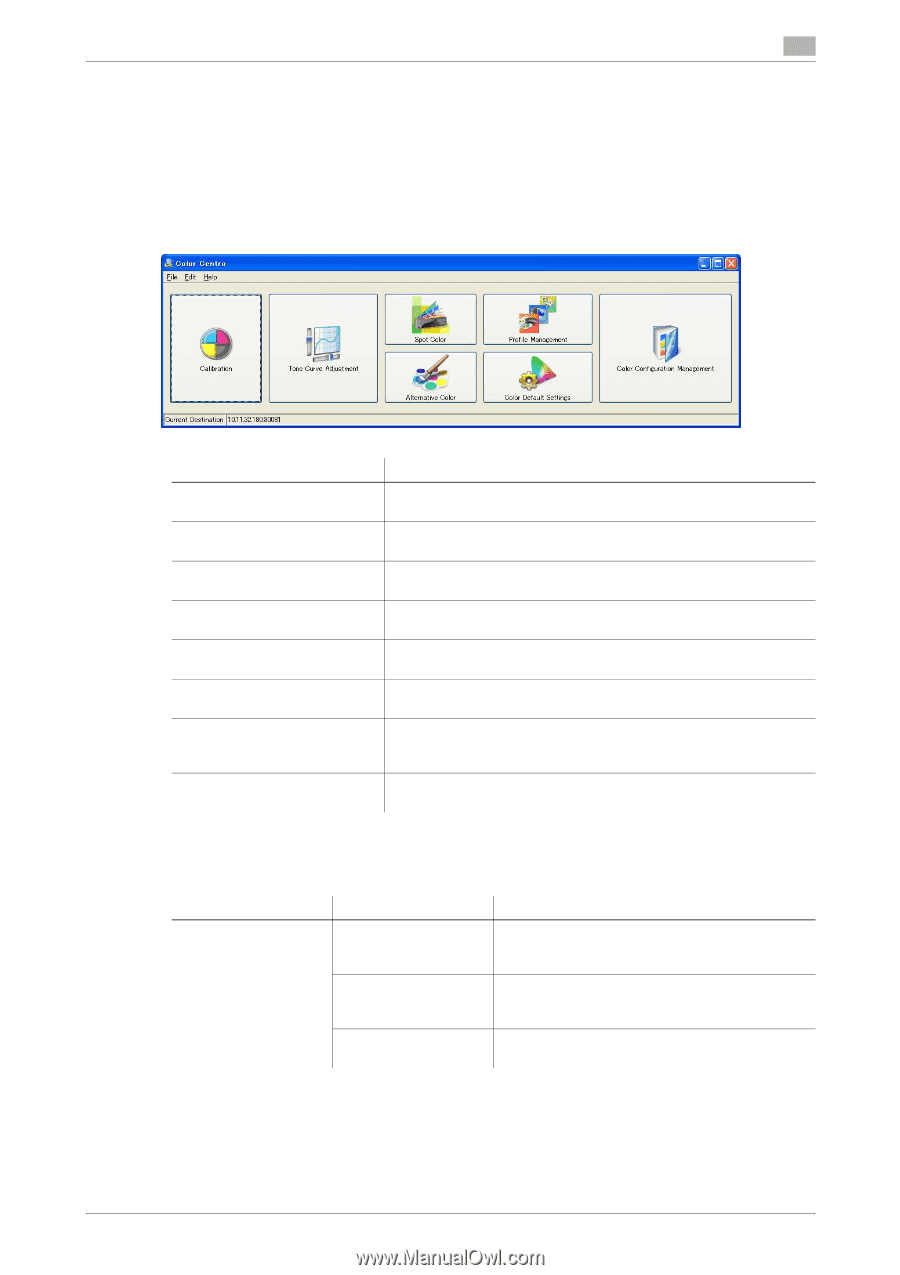
5.2 Screens of Color Centro 5 5.2 Screens of Color Centro This section describes the screens of Color Centro. 5.2.1 [Launcher] screen This section describes [Launcher] screen which appears after launching Color Centro. [Launcher] screen is the top screen which displays the screen to use the functions of Color Centro. Item [Calibration] [Tone Curve Adjustment] [Spot Color] [Alternative Color] [Profile Management] [Color Default Settings] [Color Configuration Management] Status bar Description When you click, [Calibration] screen to execute the calibration appears. For how to operate it, refer to page 7-2. When you click, [Tone Curve Adjustment] screen to adjust the tone curve appears. For how to operate it, refer to page 8-2. When you click, [Spot Color] screen to adjust the spot color appears. For how to operate it, refer to page 9-2. When you click, [Alternative Color Management] screen to adjust the alternative color appears. For how to operate it, refer to page 10-2. When you click, [Profile Management] screen to manage the profiles appears. For how to operate it, refer to page 11-2. When you click, [Color Default Settings] screen to set the color default settings appears. For how to operate it, refer to page 12-2. When you click, [Color Configuration Management] screen to manage the Color Configuration appears. For how to operate it, refer to page 13-2. Displays the IP address and the port number of the image controller connected currently. Menu of [Launcher] screen The menu items of the [Launcher] screen are as follows; Menu [File] Menu Items [Login] [Print Set Up Information] [Exit] Description Displays [Login] screen. You can connect to the image controller which is different from the image controller currently connected. You can print the settings of the image controller currently connected. For how to operate it, refer to page 14-4. Close Color Centro. For how to operate it, refer to page 5-10. IC-601 5-4
-
 1
1 -
2
-
3
-
4
-
5
-
6
-
7
-
8
-
9
-
10
-
11
-
12
-
13
-
14
-
15
-
16
-
17
-
18
-
19
-
20
-
21
-
22
-
23
-
 24
24 -
 25
25 -
 26
26 -
 27
27 -
 28
28 -
 29
29 -
 30
30 -
 31
31 -
 32
32 -
 33
33 -
 34
34 -
35
-
36
-
37
-
38
-
39
-
40
-
41
-
42
-
43
-
44
-
45
-
46
-
47
-
48
-
49
-
50
-
51
-
52
-
53
-
54
-
55
-
56
-
57
-
58
-
59
-
60
-
61
-
62
-
63
-
64
-
65
-
66
-
67
-
68
-
69
-
70
-
71
-
72
-
73
-
74
-
75
-
76
-
77
-
78
-
79
-
80
-
81
-
82
-
83
-
84
-
85
-
86
-
87
-
88
-
89
-
90
-
91
-
92
-
93
-
94
-
95
-
96
-
97
-
98
-
99
-
100
-
101
-
102
-
103
-
104
-
105
-
106
-
107
-
108
-
109
-
110
-
111
-
112
-
113
-
114
-
115
-
116
-
117
-
118
-
119
-
120
-
121
-
122
-
123
-
124
-
125
-
126
-
127
-
128
-
129
-
130
-
131
-
132
-
133
-
134
-
135
-
136
-
137
-
138
-
139
-
140
-
141
-
142
-
143
-
144
-
145
-
146
-
147
-
148
-
149
-
150
-
151
-
152
-
153
-
154
-
155
-
156
-
157
-
158
-
159
-
160
-
161
-
162
-
163
-
164
-
165
-
166
-
167
-
168
-
169
-
170
-
171
-
172
-
173
-
174
-
175
-
176
-
177
-
178
-
179
-
180
-
181
-
182
-
183
-
184
-
185
-
186
-
187
-
188
-
189
-
190
-
191
-
192
-
193
-
194
-
195
-
196
-
197
-
198
-
199
-
200
-
201
-
202
-
203
-
204
-
205
-
206
-
207
-
208
-
209
-
210
-
211
-
212
-
213
-
214
-
215
-
216
-
217
-
218
-
219
-
220
-
221
-
222
-
223
-
224
-
225
-
226
-
227
-
228
-
229
-
230
-
231
-
232
-
233
-
234
-
235
-
236
-
237
-
238
-
239
-
240
-
241
-
242
-
243
-
244
-
245
-
246
-
247
-
248
-
249
-
250
-
251
-
252
-
253
-
254
-
255
-
256
-
257
-
258
-
259
-
260
-
261
-
262
-
263
-
264
-
265
-
266
-
267
-
268
-
269
-
270
-
271
-
272
-
273
-
274
-
275
-
276
-
277
-
278
-
279
 |
 |