Kyocera ECOSYS FS-1370DN FS-1370DN Installation Instructions - Page 2
Loading Paper, Connecting Cables, Selecting the Message Language - driver
 |
View all Kyocera ECOSYS FS-1370DN manuals
Add to My Manuals
Save this manual to your list of manuals |
Page 2 highlights
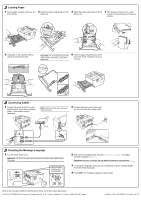
3 Loading Paper 1 Pull the paper cassette all the way out of the printer. 2 Adjust the paper length guide to fit the paper size. 3 Adjust the paper width guides to fit the paper size. 4 Fan the paper, then tap it on a level surface to avoid media jams or skewed printing. 5 Load paper in the cassette, with the side to be printed downward. Important: Do not exceed the upper limit of the cassette. Otherwise, it may cause paper jams. 6 Insert the paper cassette into the slot in the printer. Push it straight in as far as it will go. 4 Connecting Cables 1 Connect the printer to the PC or your network device. Use shielded interface cables. These cables are sold separately. Note: Remove the cap, when using the network interface. 2 Connect the power cord to the printer and the other end into a power outlet. 5 Selecting the Message Language 1 Turn the power switch on (|). Important: The printer will begin replenishing the toner; this will take approximately 15 minutes. 2 Wait until the message display indicates Message Language. The default message language is English. Important: Message Language may not appear according to the destination. 3 To change the language, press [U] or [V] repeatedly until the message display shows the desired language. 4 Press [OK]. The message language will be changed. Refer to the Operation Guide to install the printer driver and to set network parameters. © 2010 by KYOCERA MITA Corporation All rights reserved. 2-28, 1-Chome, Tamatsukuri, Chuo-ku, Osaka 540-8585, Japan Printed in China 302L056020 First edition 2010.3
-
 1
1 -
 2
2
 |
 |
