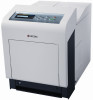
Kyocera FS-C5350DN FS-C5350DN Installation Instructions - Page 1
Kyocera FS-C5350DN Manual
 |
View all Kyocera FS-C5350DN manuals
Add to My Manuals
Save this manual to your list of manuals |
Page 1 highlights
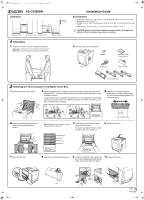
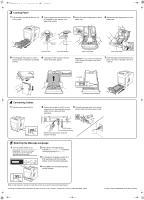
FS-C5300DN_IG_EN.fm 1 Clearance FS-C5350DN 400 mm (15-3/4") 400 mm (15-3/4") 250 mm (9-13/16") 200 mm (7-7/8") 600 mm (23-5/8") 1 Unpacking 1 Unpack the printer and all its included components. Important: The printer must be carried by two persons. Installation Guide Environment • Temperature: 10 to 32.5 °C (50 to 90.5 °F) The humidity should be 70 % or less when the temperature is 32.5 °C (90.5 °F) • Humidity: 15 to 80 %RH The temperature should be 30 °C (86 °F) or less when the humidity is 80 % • Power Supply: 120 V AC, 60 Hz, 9.2 A / 220 to 240 V AC, 50/60 Hz, 4.7 A CAUTION: Be sure to provide enough space around printer. Prolonged use without sufficient clearance may cause overheating. 2 Check the parts and components. CD-ROM Manuals and Other Printed Materials Printer Power Cord Waste Toner Box Toner Containers (4) 2 Installing the Toner Container and Waste Toner Box 1 Open the top cover until it stops. 2 Before installing the toner container, open the slide lever (yellow-colored) on the developer unit. The toner container cannot be installed until the slide lever is open. Proceed as follows: To open the slide lever, squeeze and hold the lever (1), and slide the lever all the way toward the direction of the arrow indicated (2) on the lever. When the slide lever is open, install the toner container. 3 Hold the toner container with the upside down markings (caution notes, etc.) facing downward and shake it 5 or 6 times as shown. (1) (2) 4 Place the new toner container in the printer with the markings facing upward. Toner Supply Opening Note: Ensure the toner container is in the correct location for that color. 5 Push down on the container until it clicks firmly into place. Follow the procedure above to install the other color toner containers. 6 Close the top cover. Magenta (M) Cyan (C) Yellow (Y) Black (K) 7 Open the left cover. 8 Open the cap of the waste toner box. 9 Position the bottom of the waste toner box in the receptacle and push the box down until it snaps firmly into place. 10 Close the left cover. Cap
-
 1
1 -
 2
2
 |
 |
