Kyocera KM-2050 1650/2050/2550 Operation Guide Rev-4 (Basic) - Page 28
Operation Panel - light copies
 |
View all Kyocera KM-2050 manuals
Add to My Manuals
Save this manual to your list of manuals |
Page 28 highlights
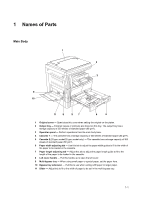
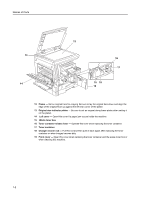
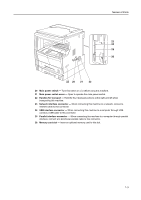
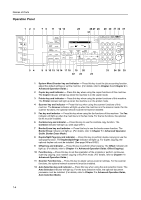
Names of Parts Operation Panel 1 23 7 6 11 12 13 25 28 27 26 29 30 31 32 37 21 Ready to copy. Auto 100% Auto 1 54 8 9 10 15 16 14 17 18 19 20 22 23 24 33 34 36 35 1 System Menu/Counter key and indicator - Press this key to set the job accounting function, adjust the default settings or set the machine. (For details, refer to Chapter 3 and Chapter 4 in Advanced Operation Guide.) 2 Copier key and indicator - Press this key when using the copier functions of this machine. The Copier indicator will light up when the machine is in the copier mode. 3 Printer key and indicator - Press this key when using the printer functions of this machine. The Printer indicator will light up when the machine is in the printer mode. 4 Scanner key and indicator - Press this key when using the scanner functions of this machine. The Scanner indicator will light up when the machine is in the scanner mode. For the scanner functions, the optional network scanner kit must be installed. 5 Fax key and indicator - Press this key when using the fax functions of this machine. The Fax indicator will light up when the machine is in the fax mode. For the fax functions, the optional fax kit must be installed. 6 Combine key and indicator - Press this key to use the combine copy function. The Combine indicator will light up. (See page 3-17.) 7 Border Erase key and indicator - Press this key to use the border erase function. The Border Erase indicator will light up. (For details, refer to Chapter 1 in Advanced Operation Guide, Border Erase Mode.) 8 Duplex/Split Page key and indicator - Press this key to perform duplex copying or use the split page function. The Duplex/Split Page indicator will light up. For duplex copying, the optional duplex unit must be installed. (See page 3-9 and 3-12.) 9 Offset key and indicator - Press this key to perform offset copying. The Offset indicator will light up. (For details, refer to Chapter 1 in Advanced Operation Guide, Offset Copying.) 10 Function key - Press this key to set the orientation of the originals or perform continuous scanning copying, auto rotation copying or EcoPrint mode. (For details, refer to Chapter 1 in Advanced Operation Guide.) 11 Scanner Function key - Press this key to adjust various scanner settings. For the scanner functions, the optional network scanner kit must be installed. 12 Auto Selection key and indicator - Press this key when using the auto selection mode. The Auto Selection indicator will light up. For the auto selection mode, the optional document processor must be installed. (For details, refer to Chapter 1 in Advanced Operation Guide, Auto Selection Mode.) 1-4
-
 1
1 -
2
-
3
-
4
-
5
-
6
-
7
-
8
-
9
-
10
-
11
-
12
-
13
-
14
-
15
-
16
-
17
-
18
-
19
-
20
-
21
-
22
-
 23
23 -
 24
24 -
 25
25 -
 26
26 -
 27
27 -
 28
28 -
 29
29 -
 30
30 -
 31
31 -
 32
32 -
 33
33 -
34
-
35
-
36
-
37
-
38
-
39
-
40
-
41
-
42
-
43
-
44
-
45
-
46
-
47
-
48
-
49
-
50
-
51
-
52
-
53
-
54
-
55
-
56
-
57
-
58
-
59
-
60
-
61
-
62
-
63
-
64
-
65
-
66
-
67
-
68
-
69
-
70
-
71
-
72
-
73
-
74
-
75
-
76
-
77
-
78
-
79
-
80
-
81
-
82
-
83
-
84
-
85
-
86
-
87
-
88
-
89
-
90
-
91
-
92
-
93
-
94
-
95
-
96
-
97
-
98
-
99
-
100
-
101
-
102
-
103
-
104
-
105
-
106
-
107
-
108
-
109
-
110
-
111
-
112
-
113
-
114
-
115
-
116
-
117
-
118
-
119
-
120
-
121
-
122
-
123
-
124
-
125
-
126
-
127
-
128
-
129
-
130
-
131
-
132
-
133
-
134
-
135
-
136
-
137
-
138
-
139
-
140
 |
 |
