Kyocera KM-3035 Scan System Operation Guide (Functions Edition) Rev-9 - Page 24
(1) Scanner Utilities,
 |
View all Kyocera KM-3035 manuals
Add to My Manuals
Save this manual to your list of manuals |
Page 24 highlights
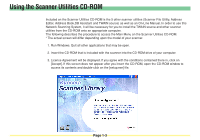
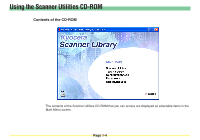
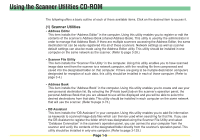
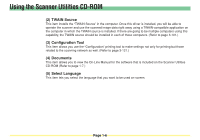
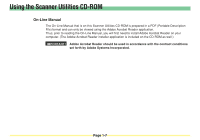
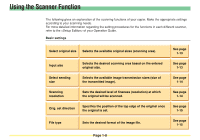
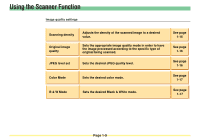
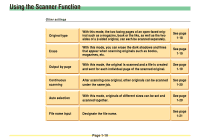
Using the Scanner Utilities CD-ROM The following offers a basic outline of each of these available items. Click on the desired item to access it. (1) Scanner Utilities • Address Editor This item installs the "Address Editor" in the computer. Using this utility enables you to register or edit the contents of the scanner's Address Book (shared Address Book). This utility is used by the administrator in order to manage that Address Book. If there are multiple scanners accessing the Address Editor, the same destination list can be easily registered into all of these scanners. Network settings as well as scanner default settings can also be made using the Address Editor utility. This utility should be installed in one computer on the same network as the scanner. (Refer to page 3-28.) • Scanner File Utility This item installs the "Scanner File Utility" in the computer. Using this utility enables you to have scanned image data sent from the scanner to a network computer, with the resulting file then compressed and saved into the designated folder on that computer. If there are going to be multiple destination computers designated for reception of such data, this utility should be installed in each of those computer. (Refer to page 3-4.) • Address Book This item installs the "Address Book" in the computer. Using this utility enables you to create and use your own personal destination list. By selecting the [Private book] tab on the scanner's operation panel, the personal Address Book that you are allowed to use will be displayed and you will be able to select the desired destinations from that data. This utility should be installed in each computer on the same network that will use the scanner. (Refer to page 3-73.) • DB Assistant This item installs the "DB Assistant" in your computer. Using this utility enables you to add file information as keywords to scanned image data files which can then be used when searching for that file. If you use the DB Assistant to register the folder which was designated using the Scanner File Utility and select "Database Connection" in the scanner's operation panel, you can connect to your computer from the scanner and verify the contents of the designated folder directly from the scanner's operation panel. This utility should be installed in only one computer. (Refer to page 3-129.) Page 1-5
-
 1
1 -
2
-
3
-
4
-
5
-
6
-
7
-
8
-
9
-
10
-
11
-
12
-
13
-
14
-
15
-
16
-
17
-
18
-
 19
19 -
 20
20 -
 21
21 -
 22
22 -
 23
23 -
 24
24 -
 25
25 -
 26
26 -
 27
27 -
 28
28 -
 29
29 -
30
-
31
-
32
-
33
-
34
-
35
-
36
-
37
-
38
-
39
-
40
-
41
-
42
-
43
-
44
-
45
-
46
-
47
-
48
-
49
-
50
-
51
-
52
-
53
-
54
-
55
-
56
-
57
-
58
-
59
-
60
-
61
-
62
-
63
-
64
-
65
-
66
-
67
-
68
-
69
-
70
-
71
-
72
-
73
-
74
-
75
-
76
-
77
-
78
-
79
-
80
-
81
-
82
-
83
-
84
-
85
-
86
-
87
-
88
-
89
-
90
-
91
-
92
-
93
-
94
-
95
-
96
-
97
-
98
-
99
-
100
-
101
-
102
-
103
-
104
-
105
-
106
-
107
-
108
-
109
-
110
-
111
-
112
-
113
-
114
-
115
-
116
-
117
-
118
-
119
-
120
-
121
-
122
-
123
-
124
-
125
-
126
-
127
-
128
-
129
-
130
-
131
-
132
-
133
-
134
-
135
-
136
-
137
-
138
-
139
-
140
-
141
-
142
-
143
-
144
-
145
-
146
-
147
-
148
-
149
-
150
-
151
-
152
-
153
-
154
-
155
-
156
-
157
-
158
-
159
-
160
-
161
-
162
-
163
-
164
-
165
-
166
-
167
-
168
-
169
-
170
-
171
-
172
-
173
-
174
-
175
-
176
-
177
-
178
-
179
-
180
-
181
-
182
-
183
-
184
-
185
-
186
-
187
-
188
-
189
-
190
-
191
-
192
-
193
-
194
-
195
-
196
-
197
-
198
-
199
-
200
-
201
-
202
-
203
-
204
-
205
-
206
-
207
-
208
-
209
-
210
-
211
-
212
-
213
-
214
-
215
-
216
-
217
-
218
-
219
-
220
-
221
-
222
-
223
-
224
-
225
-
226
-
227
-
228
-
229
-
230
-
231
-
232
-
233
-
234
-
235
-
236
-
237
-
238
-
239
-
240
-
241
-
242
-
243
-
244
-
245
-
246
-
247
-
248
-
249
-
250
-
251
-
252
-
253
-
254
-
255
-
256
-
257
-
258
-
259
-
260
 |
 |