Kyocera KM-3035 iTag Specification/Setup/Operation Guide Ver. 8.0 - Page 75
Adding Scan to PC & Send to E-Mail Addresses, MFP
 |
View all Kyocera KM-3035 manuals
Add to My Manuals
Save this manual to your list of manuals |
Page 75 highlights
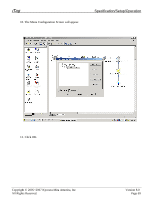
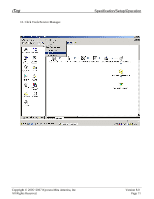
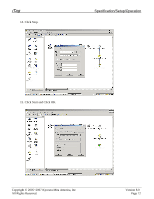
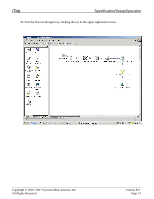
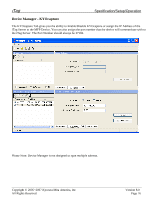
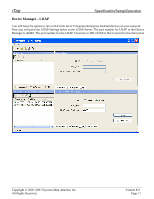
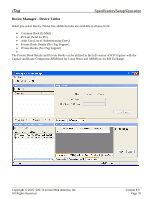
iTag Adding Scan to PC & Send to E-Mail Addresses Specification/Setup/Operation This section was created to help configure the Device for use with iTag, set up "Scan to PC", "Send to EMail" and Authentication after you enable KYOcapture\Enterprise Mode. Enterprise Mode is the official name of Simulation 510 on the Kyocera MFP. Enterprise Mode enables the use of KYOcapture\iTag with Kyocera MFP Devices. Once Enterprise Mode is enabled you will lose the ability to enter your Scan to PC and Scan to E-Mail addresses directly from the Web Interface of the Network Card. Although, you lose the interface of the NIC Card for this task, using Device Manager you gain more entries and the ability to add Authentication to the MFP, Import E-Mail Addresses and Scan To PC Locations. When you use Device Manager you increase the amount of Scan To PC locations to 100,000 Entries and Scan To E-Mail to 200,000 Entries and you add the ability to have up to 100,000 Authenticated Users. Download Device Manager from KYOsolutions.com or KYOcapture.com and install on any networked computer that is on the same local network subnet as your Kyocera MFP. We suggest that you install Device Manager directly on the iTag Server. Once installed you can Click the Start Button - > Kyocera -> Device Manager -> KYOcapture Device Manager To Launch the application. Once the application is open you will see Four Panes, the top two are for Groups and the lower two are for individual devices. Please note that if your Kyocera MFP is not in KYOcapture/Enterprise Mode the device will not be displayed in the device window. In the image below I have two KYOcapture / Enterprise Mode Devices. For the purpose of this document we will focus on the lower panes. In the Image below you will notice there were two devices found on the immediate network and there are four tabs for you to select from (Authentication, KYOcapture, LDAP and Device Tables). Let's review the tabs one at a time. Copyright © 2005~2007 Kyocera Mita America, Inc All Rights Reserved. Version 8.0 Page 74
-
 1
1 -
2
-
3
-
4
-
5
-
6
-
7
-
8
-
9
-
10
-
11
-
12
-
13
-
14
-
15
-
16
-
17
-
18
-
19
-
20
-
21
-
22
-
23
-
24
-
25
-
26
-
27
-
28
-
29
-
30
-
31
-
32
-
33
-
34
-
35
-
36
-
37
-
38
-
39
-
40
-
41
-
42
-
43
-
44
-
45
-
46
-
47
-
48
-
49
-
50
-
51
-
52
-
53
-
54
-
55
-
56
-
57
-
58
-
59
-
60
-
61
-
62
-
63
-
64
-
65
-
66
-
67
-
68
-
69
-
 70
70 -
 71
71 -
 72
72 -
 73
73 -
 74
74 -
 75
75 -
 76
76 -
 77
77 -
 78
78 -
 79
79 -
 80
80 -
81
-
82
-
83
-
84
-
85
-
86
-
87
-
88
-
89
-
90
-
91
-
92
-
93
-
94
-
95
-
96
 |
 |