Kyocera KM-3050 Scan System Operation Guide (Functions Edition) Rev-9 - Page 5
Adding File Information to Scanned Image Data - scanner file utility
 |
View all Kyocera KM-3050 manuals
Add to My Manuals
Save this manual to your list of manuals |
Page 5 highlights
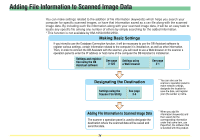
Adding File Information to Scanned Image Data You can make settings related to the addition of file information (keywords) which helps you search your computer for specific scanned images, or have that information saved as a csv file along with the scanned image data. By including such file information along with your scanned image data, it will be an easy task to locate any specific file among any number of others by simply searching for the added information. * This function is not available by KM-1650/2050/2550. Making Basic Settings If you intend to use the Database Connection function, it will be necessary to use the DB Assistant software to register various settings, certain information related to the computer it is installed on, as well as other information. Then, in order to connect the DB Assistant with the scanner, you will need to use a Web browser or the scanner s operation panel to enter the IP address or host name of the computer the DB Assistant is installed on. Settings and registration using the DB Assistant software See page 3-129 Settings using a Web browser See page 2-1 Designating the Destination Settings using the Scanner File Utility See page 3-4 * You can also use the scanner s operation panel to make network settings, designate the location to save the data, and register your (the sender s) name. Adding File Information to Scanned Image Data The scanner s operation panel is used to designate the destination where the scanned data will be saved and send that data. iv * When you add file information (keywords) and then search for the corresponding information under that same item, use PaperPort, the software that is bundled with this product.
-
 1
1 -
 2
2 -
 3
3 -
 4
4 -
 5
5 -
 6
6 -
 7
7 -
 8
8 -
 9
9 -
 10
10 -
 11
11 -
12
-
13
-
14
-
15
-
16
-
17
-
18
-
19
-
20
-
21
-
22
-
23
-
24
-
25
-
26
-
27
-
28
-
29
-
30
-
31
-
32
-
33
-
34
-
35
-
36
-
37
-
38
-
39
-
40
-
41
-
42
-
43
-
44
-
45
-
46
-
47
-
48
-
49
-
50
-
51
-
52
-
53
-
54
-
55
-
56
-
57
-
58
-
59
-
60
-
61
-
62
-
63
-
64
-
65
-
66
-
67
-
68
-
69
-
70
-
71
-
72
-
73
-
74
-
75
-
76
-
77
-
78
-
79
-
80
-
81
-
82
-
83
-
84
-
85
-
86
-
87
-
88
-
89
-
90
-
91
-
92
-
93
-
94
-
95
-
96
-
97
-
98
-
99
-
100
-
101
-
102
-
103
-
104
-
105
-
106
-
107
-
108
-
109
-
110
-
111
-
112
-
113
-
114
-
115
-
116
-
117
-
118
-
119
-
120
-
121
-
122
-
123
-
124
-
125
-
126
-
127
-
128
-
129
-
130
-
131
-
132
-
133
-
134
-
135
-
136
-
137
-
138
-
139
-
140
-
141
-
142
-
143
-
144
-
145
-
146
-
147
-
148
-
149
-
150
-
151
-
152
-
153
-
154
-
155
-
156
-
157
-
158
-
159
-
160
-
161
-
162
-
163
-
164
-
165
-
166
-
167
-
168
-
169
-
170
-
171
-
172
-
173
-
174
-
175
-
176
-
177
-
178
-
179
-
180
-
181
-
182
-
183
-
184
-
185
-
186
-
187
-
188
-
189
-
190
-
191
-
192
-
193
-
194
-
195
-
196
-
197
-
198
-
199
-
200
-
201
-
202
-
203
-
204
-
205
-
206
-
207
-
208
-
209
-
210
-
211
-
212
-
213
-
214
-
215
-
216
-
217
-
218
-
219
-
220
-
221
-
222
-
223
-
224
-
225
-
226
-
227
-
228
-
229
-
230
-
231
-
232
-
233
-
234
-
235
-
236
-
237
-
238
-
239
-
240
-
241
-
242
-
243
-
244
-
245
-
246
-
247
-
248
-
249
-
250
-
251
-
252
-
253
-
254
-
255
-
256
-
257
-
258
-
259
-
260
 |
 |
