Kyocera KM-6330 Printing System (R) Operation Guide (Functions Edition) - Page 85
Staple, Notes, Offset, Punch, When the Multi Finisher is installed
 |
View all Kyocera KM-6330 manuals
Add to My Manuals
Save this manual to your list of manuals |
Page 85 highlights
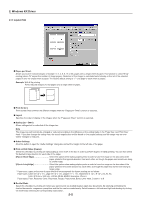
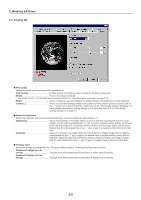
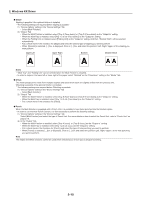
2. Windows KX Driver I Staple Stapling is possible if the optional finisher is installed. * The following settings are required before stapling is possible: (1) "Device Options" setting in the "Device Settings" Tab • Select [Multi Finisher]. (2) "Output" Tab • When the Multi Finisher is installed, select [Tray A (Face-down)] or [Tray B (Face-down)] as the "Output to" setting. • When the Multi Tray is installed, select [Tray 1,2,3,4,5 (Face-down)] as the "Output to" setting. • When the Folding Unit is installed, select [Folding Unit] as the "Output to" setting. And then, "Booklet Stitch" will be selected automatically. • Put a check mark in the checkbox for [Staple] and select the desired type of stapling you want to perform. • When [Booklet] is selected, [...] box is displayed. Click on [...] box and select the position (Left, Right, Upper) of the stapling you want perform. Upper Left Upper Right Booklet Booklet Stitch Notes • "Multi Tray" and "Folding Unit" can be selected when the Multi Finisher is installed. • In order to staple in the lower left or lower right of the paper, select "Rotated" as the "Orientation" setting in the "Media" Tab. I Offset This mode groups prints made from multiple originals and ejects them each one slightly shifted from the precious one. Offsetting is possible if the optional finisher is installed. * The following settings are required before Offsetting is possible: (1) "Device Options" setting in the "Device Settings" Tab • Select [Multi Finisher]. (2) "Output" Tab • When the Multi Finisher is installed, select [Tray A (Face-down)] or [Tray B (Face-down)] as the "Output to" setting. • When the Multi Tray is installed, select [Tray 1,2,3,4,5 (Face-down)] as the "Output to" setting. • Put a check mark in the checkbox for [Offset]. I Punch When the Multi Finisher is equipped with a Punch Unit, it is possible to have holes punched into the finished copies. * In order to use the Hole Punch function, it is first necessary to perform the following settings. (1) "Device Options" setting in the "Device Settings" Tab Select [Multi Finisher] and select the type of Punch Unit. For more details on how to select the Punch Unit, refer to "Punch Unit" on page 2-16. (2) In the "Output" Tab • When the Multi Finisher is installed, select [Tray A (xxxx)] or [Tray B (xxxx)] as the "Output to" setting. • When the Multi Tray is installed, select [Tray 1,2,3,4,5 (xxxx)] as the "Output to" setting. • Put a check mark in the checkbox for [Punch] and select the type of hole punching you want to perform. • When [Punch] is selected, [...]box is displayed. Click on [...] box and select the position (Left, Right, Upper) of the hole punching you want to perform. Note The Staple and Offset functions cannot be used when selected [xxxx (Face-up)] as [Output to] setting. 2-10
-
 1
1 -
2
-
3
-
4
-
5
-
6
-
7
-
8
-
9
-
10
-
11
-
12
-
13
-
14
-
15
-
16
-
17
-
18
-
19
-
20
-
21
-
22
-
23
-
24
-
25
-
26
-
27
-
28
-
29
-
30
-
31
-
32
-
33
-
34
-
35
-
36
-
37
-
38
-
39
-
40
-
41
-
42
-
43
-
44
-
45
-
46
-
47
-
48
-
49
-
50
-
51
-
52
-
53
-
54
-
55
-
56
-
57
-
58
-
59
-
60
-
61
-
62
-
63
-
64
-
65
-
66
-
67
-
68
-
69
-
70
-
71
-
72
-
73
-
74
-
75
-
76
-
77
-
78
-
79
-
 80
80 -
 81
81 -
 82
82 -
 83
83 -
 84
84 -
 85
85 -
 86
86 -
 87
87 -
 88
88 -
 89
89 -
 90
90 -
91
-
92
-
93
-
94
-
95
-
96
-
97
 |
 |
