Kyocera TASKalfa 4551ci Printing System (11),(12),(13),(14) Color Reference G - Page 31
Saving files from Photoshop, Choosing a file format
 |
View all Kyocera TASKalfa 4551ci manuals
Add to My Manuals
Save this manual to your list of manuals |
Page 31 highlights
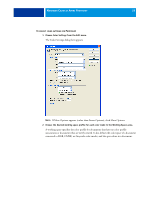
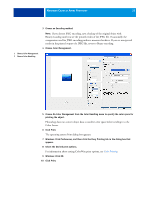
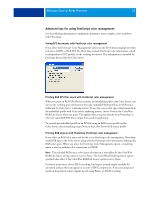
MANAGING COLOR IN ADOBE PHOTOSHOP 31 6 Clear the Desaturate Monitor Colors By and Blend RGB Colors Using Gamma options in the Advanced Controls area. Clearing these options helps to ensure a match between your monitor display and the printed output. 7 Click Save to save the current group of color settings. The Save dialog box appears. 8 Name the settings file, accept the default saved location, and then click Save. Switch to your saved settings at any time by choosing the group name from the Settings menu at the top of the Color Settings dialog box. NOTE: You can apply the saved color settings in other Adobe Creative Suite applications. You can also apply the saved color settings to all Adobe Creative Suite applications at once using Adobe Bridge. 9 Click OK to apply the settings and close the Color Settings dialog box. Saving files from Photoshop Before saving a file from Photoshop, perform any necessary rotating, cropping, and resizing. This speeds processing when printing from the application in which the object is placed. When saving a document, you have the option to embed a color profile in the document. If you will send the document to the Color Server, we recommend that you disable this option. Choosing a file format We recommend that you use EPS or TIFF file formats to save RGB objects that will be imported into other documents and printed to the Color Server. You can import EPS and TIFF files into virtually all page layout applications. NOTE: Although TIFF files generally display better when imported into other applications, their color and resolution characteristics may be altered by the application into which they are imported. EPS files are not modified by the applications into which they are imported.
-
 1
1 -
2
-
3
-
4
-
5
-
6
-
7
-
8
-
9
-
10
-
11
-
12
-
13
-
14
-
15
-
16
-
17
-
18
-
19
-
20
-
21
-
22
-
23
-
24
-
25
-
 26
26 -
 27
27 -
 28
28 -
 29
29 -
 30
30 -
 31
31 -
 32
32 -
 33
33 -
 34
34 -
 35
35 -
 36
36 -
37
-
38
-
39
-
40
-
41
-
42
-
43
-
44
-
45
-
46
-
47
-
48
-
49
-
50
-
51
-
52
-
53
-
54
-
55
-
56
-
57
-
58
-
59
-
60
-
61
-
62
-
63
-
64
-
65
-
66
-
67
-
68
-
69
-
70
-
71
-
72
-
73
-
74
-
75
-
76
-
77
-
78
-
79
-
80
-
81
-
82
-
83
-
84
-
85
-
86
-
87
-
88
-
89
-
90
-
91
 |
 |
