Kyocera TASKalfa 5500i Fax System (V) Operation Guide - Page 175
Changing and Deleting Permit ID No., Setting Send Restriction, Clear, System Menu
 |
View all Kyocera TASKalfa 5500i manuals
Add to My Manuals
Save this manual to your list of manuals |
Page 175 highlights
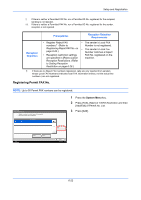
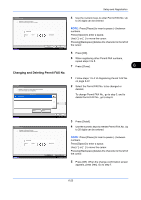
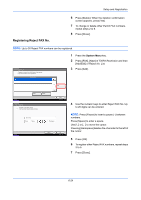
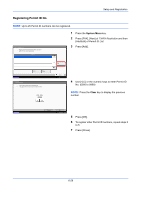
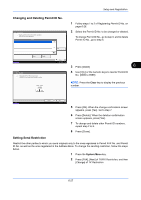
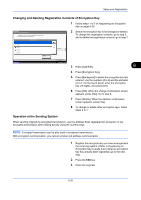
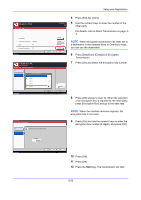
Setup and Registration Changing and Deleting Permit ID No. FAX - Permit ID List Register an ID from which faxes will be accepted. (Up to 25 IDs can be registered.) 12345678 FAX ID 1/1 Add 1 Follow steps 1 to 2 of Registering Permit ID No. on page 6-26. 2 Select the Permit ID No. to be changed or deleted. To change Permit ID No., go to step 3, and to delete Permit ID No., go to step 6. Status Detail Delete FAX - Permit ID Add or edit a Permit ID for transmissions. Use [-]/[+] or the numeric keys to enter a number. (0000 - 9999) Close 10/10/2010 10:10 3 Press [Detail]. 6 4 Use [+]/[-] or the numeric keys to reenter Permit ID No. (0000 to 9999) NOTE: Press the Clear key to display the previous number. Status Cancel OK 10/10/2010 10:10 5 Press [OK]. When the change confirmation screen appears, press [Yes]. Go to step 7. 6 Press [Delete]. When the deletion confirmation screen appears, press [Yes]. 7 To change and delete other Permit ID numbers, repeat step 2 to 6. 8 Press [Close]. Setting Send Restriction Restrict the other parties to which you send originals only to the ones registered in Permit FAX No. and Permit ID No. as well as the ones registered in the Address Book. To change the sending restriction, follow the steps below. 1 Press the System Menu key. 2 Press [FAX], [Next] of TX/RX Restriction, and then [Change] of TX Restriction. 6-27
-
 1
1 -
2
-
3
-
4
-
5
-
6
-
7
-
8
-
9
-
10
-
11
-
12
-
13
-
14
-
15
-
16
-
17
-
18
-
19
-
20
-
21
-
22
-
23
-
24
-
25
-
26
-
27
-
28
-
29
-
30
-
31
-
32
-
33
-
34
-
35
-
36
-
37
-
38
-
39
-
40
-
41
-
42
-
43
-
44
-
45
-
46
-
47
-
48
-
49
-
50
-
51
-
52
-
53
-
54
-
55
-
56
-
57
-
58
-
59
-
60
-
61
-
62
-
63
-
64
-
65
-
66
-
67
-
68
-
69
-
70
-
71
-
72
-
73
-
74
-
75
-
76
-
77
-
78
-
79
-
80
-
81
-
82
-
83
-
84
-
85
-
86
-
87
-
88
-
89
-
90
-
91
-
92
-
93
-
94
-
95
-
96
-
97
-
98
-
99
-
100
-
101
-
102
-
103
-
104
-
105
-
106
-
107
-
108
-
109
-
110
-
111
-
112
-
113
-
114
-
115
-
116
-
117
-
118
-
119
-
120
-
121
-
122
-
123
-
124
-
125
-
126
-
127
-
128
-
129
-
130
-
131
-
132
-
133
-
134
-
135
-
136
-
137
-
138
-
139
-
140
-
141
-
142
-
143
-
144
-
145
-
146
-
147
-
148
-
149
-
150
-
151
-
152
-
153
-
154
-
155
-
156
-
157
-
158
-
159
-
160
-
161
-
162
-
163
-
164
-
165
-
166
-
167
-
168
-
169
-
 170
170 -
 171
171 -
 172
172 -
 173
173 -
 174
174 -
 175
175 -
 176
176 -
 177
177 -
 178
178 -
 179
179 -
 180
180 -
181
-
182
-
183
-
184
-
185
-
186
-
187
-
188
-
189
-
190
-
191
-
192
-
193
-
194
-
195
-
196
-
197
-
198
-
199
-
200
-
201
-
202
-
203
-
204
-
205
-
206
-
207
-
208
-
209
-
210
-
211
-
212
-
213
-
214
-
215
-
216
-
217
-
218
-
219
-
220
-
221
-
222
-
223
-
224
-
225
-
226
-
227
-
228
-
229
-
230
-
231
-
232
-
233
-
234
-
235
-
236
-
237
-
238
-
239
-
240
-
241
-
242
-
243
-
244
-
245
-
246
-
247
-
248
-
249
-
250
-
251
-
252
 |
 |
