LG 42CQ610H Setup Guide - Page 13
Note: You MUST select Execute Auto Search and press OK
 |
View all LG 42CQ610H manuals
Add to My Manuals
Save this manual to your list of manuals |
Page 13 highlights
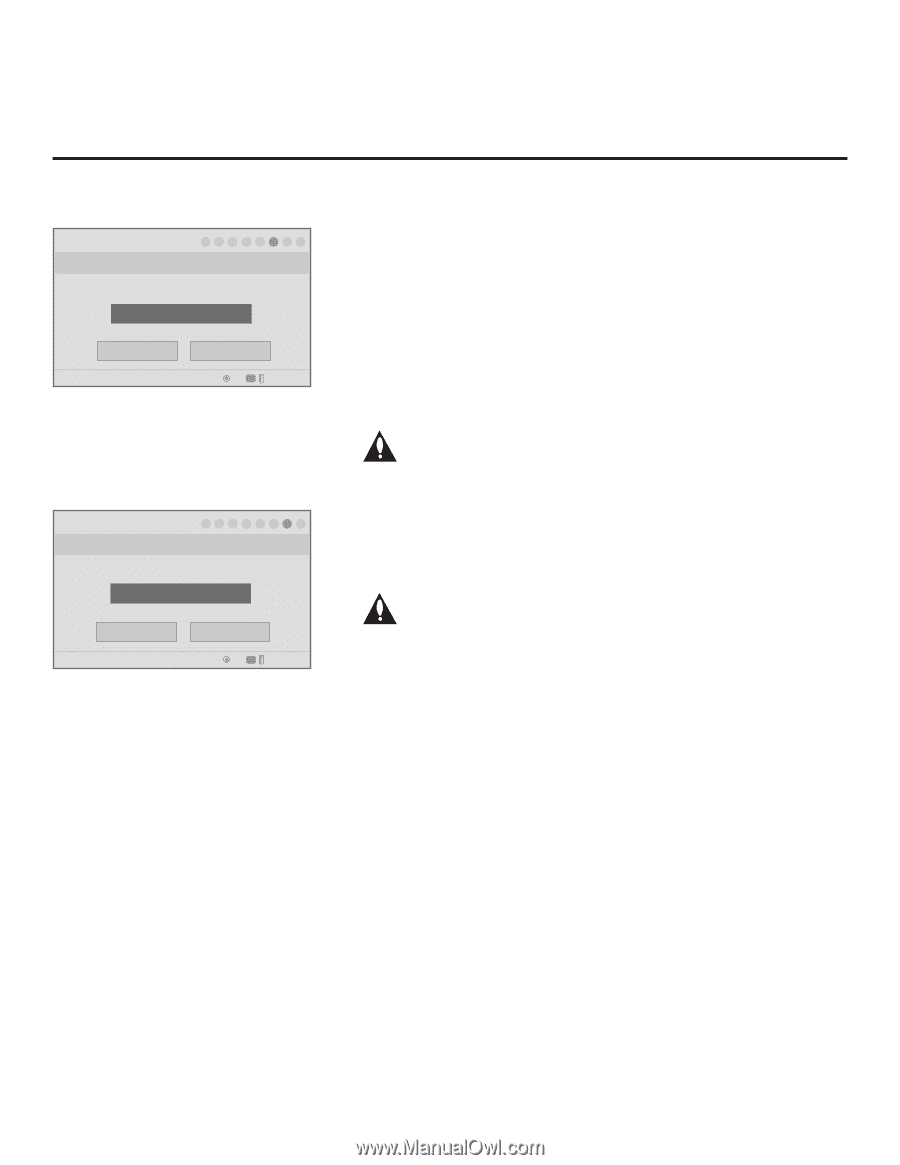
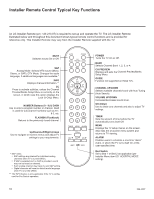
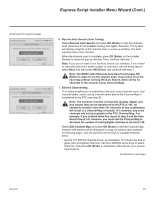
Express Script Installer Menu Wizard (Cont.) (Continued from previous page) Installer Menu Wizard 1 ► 2 ► 3 ► 4 ► 5 ► 6 ► 7 ► 8 Step 6. Auto Search Would you like to scan for available channels? Execute Auto Search Back PTC: V1.00.013 CPU: V03.07.00.01 ASIC: D279 Next OK CC Exit Express Script Installer Menu Wizard 1 ► 2 ► 3 ► 4 ► 5 ► 6 ► 7 ► 8 Step 7. Channel Map Edit Would you like to edit channel map and icons? Edit Channel Map. Back PTC: V1.00.013 CPU: V03.07.00.01 ASIC: D279 Next OK CC Exit Express Script 6. Run the Auto Search (Auto Tuning). Select Execute Auto Search and press OK (Enter) to start the channel scan (searches for all available analog and digital channels). The system will display progress of the channel scan in a pop-up window. The scan typically takes a few minutes. When the channel scan is complete, press OK (Enter) on the Installer Remote to close the pop-up window. Then, continue with step 7. Note: If you do not want to run the Auto Search (for example, if you intend to manually add only a small number of channels), use the arrow keys to select Next, and then press OK (Enter), and continue with step 7. Note: You MUST select Execute Auto Search and press OK (Enter) in order to run the channel scan. If you move on to the next step without running the Auto Search, there will be no channels in the channel lineup (Channel Map). 7. Edit the Channel Map. This option enables you to add/delete channels, select channel icons, add channel labels, and/or set up channel banks before the Channel Map is transferred to the PTC (see step 8). Note: The maximum number of channels (analog, digital, and Aux inputs) that can be transferred to the PTC is 141. An attempt to transfer more than 141 channels of any combination will result in a Channel Map of exactly 141 channels; any extra channels will not be available in the PTC Channel Map. For example, if you enabled three Aux inputs in step 2 and the Auto Search found 141 channels, you must edit the Channel Map to decrease the number of analog/digital channels to (at most) 138. Select Edit Channel Map and press OK (Enter) to edit the Channel Map. Channel edit options will be displayed in a pop-up window (see example on following page). Use the Up/Down arrow keys to navigate between fields: • Input & CH: Edit the channel lineup, as necessary, to include only free to guest (non-encrypted) channels. Use the Left/Right arrow keys to select channels, and press OK (Enter) to add/delete channels per your system requirements. (Continued on next page) 206-4207 13
-
 1
1 -
2
-
3
-
4
-
5
-
6
-
7
-
 8
8 -
 9
9 -
 10
10 -
 11
11 -
 12
12 -
 13
13 -
 14
14 -
 15
15 -
 16
16 -
 17
17 -
 18
18 -
19
-
20
-
21
-
22
-
23
-
24
-
25
-
26
-
27
-
28
-
29
-
30
-
31
-
32
-
33
-
34
-
35
-
36
-
37
-
38
-
39
-
40
-
41
-
42
-
43
-
44
-
45
-
46
-
47
-
48
-
49
-
50
-
51
-
52
-
53
-
54
-
55
-
56
-
57
-
58
-
59
-
60
-
61
-
62
-
63
-
64
-
65
-
66
-
67
-
68
-
69
-
70
-
71
-
72
-
73
-
74
-
75
 |
 |