LG 60PA6550 Owners Manual - Page 18
Mounting on a wall - dimensions
 |
View all LG 60PA6550 manuals
Add to My Manuals
Save this manual to your list of manuals |
Page 18 highlights
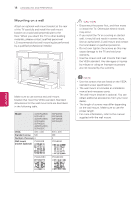
18 ASSEMBLING AND PREPARING Mounting on a wall Attach an optional wall mount bracket at the rear of the TV carefully and install the wall mount bracket on a solid wall perpendicular to the floor. When you attach the TV to other building materials, please contact qualified personnel. LG recommends that wall mounting be performed by a qualified professional installer. 10 cm 10 cm (4 inch) 10 cm 10 cm Make sure to use screws and wall mount bracket that meet the VESA standard. Standard dimensions for the wall mount kits are described in the following table. Model 42/50PA4500, 50PA4510, 42/50PA4900, 50PA5500, 50PA6500, 42/50PA450C, 50PA550C VESA 400 x 400 Standard screw M6 Number of screws 4 Wall mount PSW400B bracket (optional) 60PA5500, 60PA6500, 60PA6550, 60PA550C 600 x 400 M8 4 PSW600B Caution yyDisconnect the power first, and then move or install the TV. Otherwise electric shock may occur. yyIf you install the TV on a ceiling or slanted wall, it may fall and result in severe injury. Use an authorized LG wall mount and contact the local dealer or qualified personnel. yyDo not over tighten the screws as this may cause damage to the TV and void your warranty. yyUse the screws and wall mounts that meet the VESA standard. Any damages or injuries by misuse or using an improper accessory are not covered by the warranty. Note yyUse the screws that are listed on the VESA standard screw specifications. yyThe wall mount kit includes an installation manual and necessary parts. yyThe wall mount bracket is optional. You can obtain additional accessories from your local dealer. yyThe length of screws may differ depending on the wall mount. Make sure to use the proper length. yyFor more information, refer to the manual supplied with the wall mount. ENEGNLGISH PSW420BX PSW620BX
-
 1
1 -
2
-
3
-
4
-
5
-
6
-
7
-
8
-
9
-
10
-
11
-
12
-
 13
13 -
 14
14 -
 15
15 -
 16
16 -
 17
17 -
 18
18 -
 19
19 -
 20
20 -
 21
21 -
 22
22 -
 23
23 -
24
-
25
-
26
-
27
-
28
-
29
-
30
-
31
-
32
-
33
-
34
-
35
-
36
-
37
-
38
-
39
-
40
-
41
-
42
-
43
-
44
-
45
-
46
-
47
-
48
-
49
-
50
-
51
-
52
 |
 |
