LG CRD-8482B Owners Manual - Page 8
A When using a Primary IDE port, B When using a Secondary IDE port - jumper settings
 |
View all LG CRD-8482B manuals
Add to My Manuals
Save this manual to your list of manuals |
Page 8 highlights
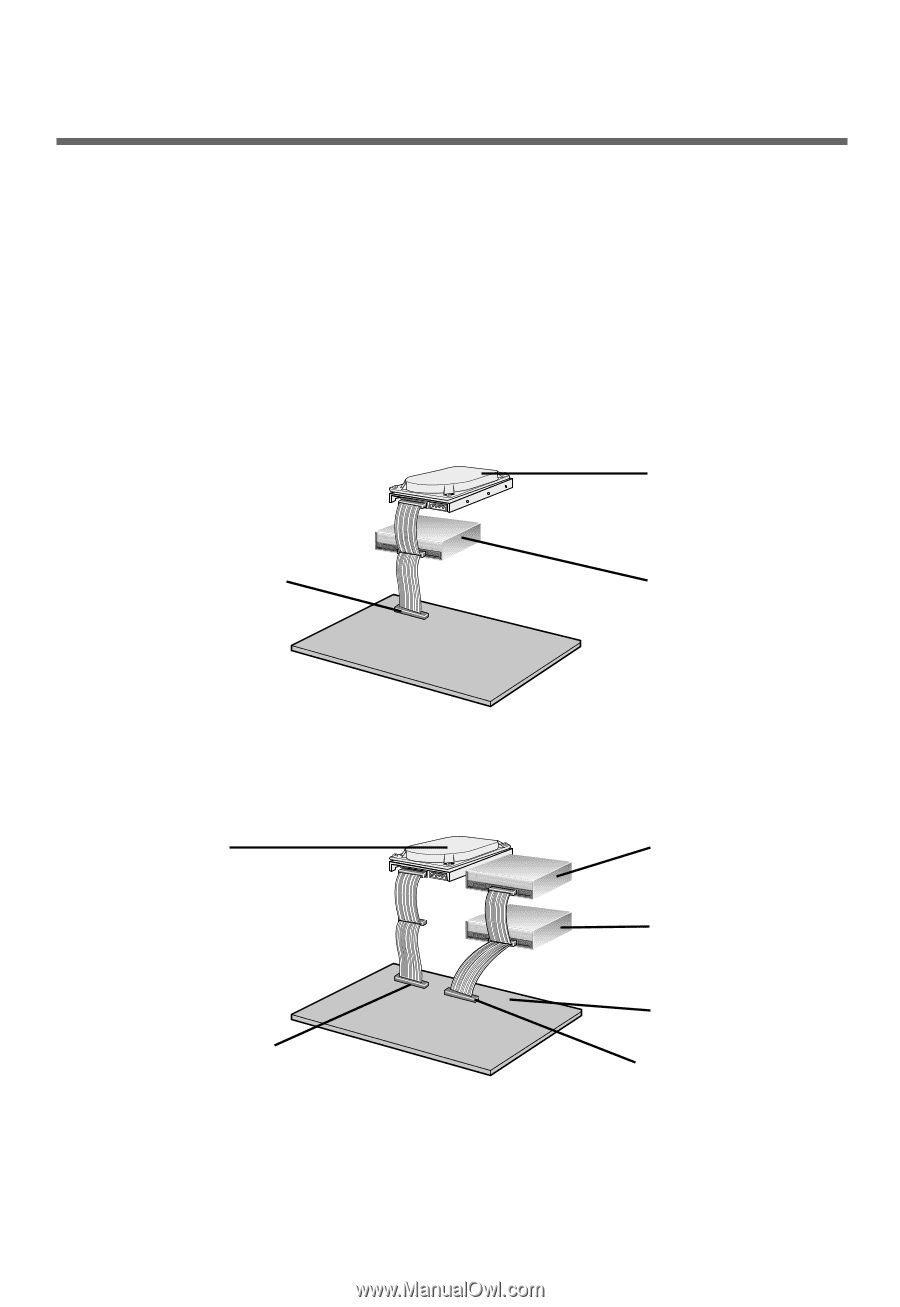
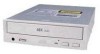
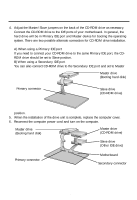
4. Adjust the Master/Slave jumpers on the back of the CD-ROM drive as necessary. Connect the CD-ROM drive to the IDE ports of your motherboard. In general, the hard drive will be in Primary IDE port and Master device for booting the operating system. There are two possible alternate connection for CD-ROM drive installation. A) When using a Primary IDE port If you need to connect your CD-ROM drive to the same Primary IDE port, the CDROM drive should be set to Slave position. B) When using a Secondary IDE port You can also connect CD-ROM drive to the Secondary IDE port and set to Master Primary connector DAIGUDITIAOL AANUADLIOOG DG R G L CS M S LA 39 40 INTERFACE POWER 1 2 +5 GND +12 Master drive (Booting hard disk) Slave drive (CD-ROM drive) position. 5. When the installation of the drive unit is complete, replace the computer cover. 6. Reconnect the computer power cord and turn on the computer. Master drive (Booting hard disk) DAIGUDITIAOL AANUADLIOOG DG R G L CS M S LA 39 40 INTERFACE POWER 1 2 +5 GND +12 DAIGUDITIAOL AANUADLIOOG DG R G L CS M S LA 39 40 INTERFACE POWER 1 2 +5 GND +12 Master drive (CD-ROM drive) Slave drive (Other IDE drive) Primary connector Motherboard Secondary connector E-8
-
 1
1 -
2
-
 3
3 -
 4
4 -
 5
5 -
 6
6 -
 7
7 -
 8
8 -
 9
9 -
 10
10 -
 11
11 -
 12
12 -
 13
13 -
14
 |
 |