LG DLG5932S User Guide - Page 8
Warning - dryer
 |
View all LG DLG5932S manuals
Add to My Manuals
Save this manual to your list of manuals |
Page 8 highlights
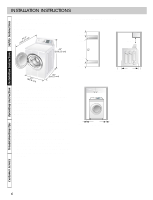
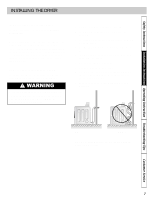
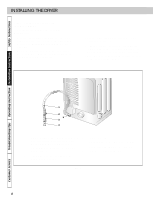
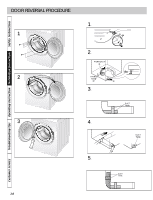
Safety Instructions Installation Instructions Operating Instruction Troubleshooting Tips INSTALLING THE DRYER Step 1 : Position and Level the Dryer For further assistance refer to section on Location Requirements. Place the dryer in position, and adjust the legs until the dryer is level from side to side and front to back. Level floor : Maximum slope under entire dryer should not be more than 2.5cm (1 inch). If slope is greater than 2.5 cm (1inch), clothes may not tumble properly and automatic sensor cycles may not operate correctly if dryer is not level. Step 2 : Connect Dryer Exhaust System For further assistance refer to sections on Location Requirements and Dryer Exhaust Requirements. WARNING A clothes dryer produces combustible lint. To reduce the risk of fire and combustion gas accumulation the dryer MUST be exhausted to the outdoors. q DO NOT use plastic or thin foil ducting. q Locate dryer so exhaust duct is as short as possible. q Be certain old ducts are cleaned before installing your new dryer. q Use 4" (10.2 cm) diameter rigid or flexible metal duct. q The male end of each section of duct must point away from the dryer. q Use as few elbows as possible. q Use duct tape on all duct joints. q Ductwork that runs through unheated areas must be insulated to help reduce condensation and lint build-up on pipe walls. q Failure to exhaust dryer properly will void warranty. DO DON'T NOTE : Venting materials are not supplied with the dryer (obtain locally). Customer Service 7
-
 1
1 -
2
-
 3
3 -
 4
4 -
 5
5 -
 6
6 -
 7
7 -
 8
8 -
 9
9 -
 10
10 -
 11
11 -
 12
12 -
 13
13 -
14
-
15
-
16
-
17
-
18
-
19
-
20
-
21
-
22
-
23
-
24
-
25
-
26
-
27
-
28
-
29
-
30
-
31
-
32
 |
 |
