LG LP120CED1 Owners Manual - Page 21
MaintenanceandService
 |
View all LG LP120CED1 manuals
Add to My Manuals
Save this manual to your list of manuals |
Page 21 highlights
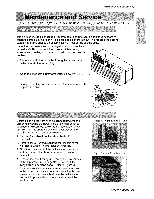
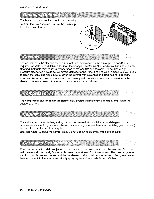
Maintenanceand Service TURN THE AIR CONDITIONER OFF AND REMOVE THE PLUG FROM THE POWER OUTLET The air fluter should _ checked at least twice a month to _e if cleaning is neces_ry_ Trap,_d particles in the fii'ter will build up and bfock the .aid]ow. This redu_s the cooling capacity and a_so causes .an a.ccumulatio, n of frost on the cooling coils. If the filter _mes turn or damaged you should replace immediately. Replacement riflers are available from your saJes_rson, dealer, and the authoriz_ customer servi_ centers. t. Remove the _r filter from the front griBe as_mbly by p,uHin9 the air rifler up sBghtly. 2 Wash the rifler usingi _ukew_m water below 40°C (104 ° F) 3:. Ge_iy shake the excess water from the fillter completely. Replace the filter. Before c_eaning the vent rifler, disconnect [_wer to the unit _ unplugging the power cord at the wall] outlet or subbase,, or disconnect power at the fuse box or circuit breaker. If unit is operated with vent _or c]o,_d, the vent filter does. not need to be c_eaned. 1. Remove the cabinet front as d,escribe,d in Front Rem,oiv_, 2, Remove the six screws secudng the chassis to the waJ] sleeve w_h a Phillips-Head screwdriver. 3.. Slide the chassis out of the w_l sleeve far enough so that the vent fiffer is a_essiNe as. shown [in Rgure A_ 4, Remove the, vent fiffer _ unscrewir_ the two screws at the top of the f[ffer _d gently pulling the rifler away _om the partition _ne], Refer to, Figure B, 5. Clean and replace the fi_ter by rea_aching the hook to the bottom of the vent door and replacing the two _r.ews, slide the chassis [back into the waB sleeve, _ure it in p_ace with six screws and reinstall the front canner. Figure A Vent (Left side of unit:) Figure B = Vent Fi_terRemoval Owne s Maniua[ 21
-
 1
1 -
2
-
3
-
4
-
5
-
6
-
7
-
8
-
9
-
10
-
11
-
12
-
13
-
14
-
15
-
 16
16 -
 17
17 -
 18
18 -
 19
19 -
 20
20 -
 21
21 -
 22
22 -
 23
23 -
 24
24 -
 25
25 -
 26
26 -
27
 |
 |
