LG LRSDS2706S Owners Manual - Page 27
In-Door Ice Bin
 |
View all LG LRSDS2706S manuals
Add to My Manuals
Save this manual to your list of manuals |
Page 27 highlights
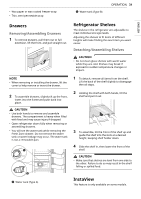
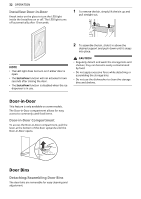
ENGLISH Cleaning the Dispenser Tray Wipe the entire area with a damp cloth. The dispenser tray may become wet easily due to spilled ice or water. Locking the Ice and Water Dispenser Press and hold the Lock button for three seconds to lock the dispenser and all the control panel functions. Follow the same instructions to unlock. OPERATION 27 the passage with a rubber spatula. Dispensing cubed ice can also help prevent frost buildup. Detaching/Assembling the In-Door Ice Bin CAUTION • Only qualified service personnel from an LG Electronics service center should disassemble or repair the icemaker. • When handling the ice bin, keep hands away from the icemaker tray area to avoid personal injury. • Avoid touching the auto shutoff (feeler arm) when replacing the ice bin. In-Door Ice Bin Before Using the In-Door Ice Bin The icemaker stops producing ice when the indoor ice bin is full. To make room for additional ice, empty the ice bin into another location in the freezer compartment. During use, the ice may stack unevenly in the bin, causing the icemaker to misread the number of ice cubes and stop producing ice. Shaking the ice bin to level the ice within it can reduce this problem. CAUTION • Keep hands and tools out of the in-door ice bin and dispenser chute. Failure to do so may result in damage or personal injury. • When handling the ice bin, keep hands away from the icemaker tray area to avoid personal injury. • Storing cans or other items in the ice bin will damage the icemaker. • Never use thin crystal glasses or containers to collect ice. Such containers may chip or break resulting in glass fragments in the ice. To prevent ice cubes from melting and leaking from the dispenser, ALWAYS empty the ice bin when the icemaker is turned OFF for more than a few hours. The ice passage may become blocked with frost if only crushed ice is used. Remove the frost that accumulates by removing the ice bin and clearing 1 To detach, lift the ice storage bin slightly and pull it out as shown in the figure. NOTE • Use both hands to remove the ice bin to avoid dropping it. 2 To assemble, carefully insert the in-door ice bin, slanting the top slightly to fit it under the icemaker.
-
 1
1 -
2
-
3
-
4
-
5
-
6
-
7
-
8
-
9
-
10
-
11
-
12
-
13
-
14
-
15
-
16
-
17
-
18
-
19
-
20
-
21
-
 22
22 -
 23
23 -
 24
24 -
 25
25 -
 26
26 -
 27
27 -
 28
28 -
 29
29 -
 30
30 -
 31
31 -
 32
32 -
33
-
34
-
35
-
36
-
37
-
38
-
39
-
40
-
41
-
42
-
43
-
44
-
45
-
46
-
47
-
48
-
49
-
50
-
51
-
52
-
53
-
54
-
55
-
56
-
57
-
58
-
59
-
60
-
61
-
62
-
63
-
64
 |
 |
