LG LSC27925SW Owner's Manual - Page 11
Flush Out The Tubing, Connect The Tubing To The Refrigerator, Notes, Caution, Plug In - water filter
 |
View all LG LSC27925SW manuals
Add to My Manuals
Save this manual to your list of manuals |
Page 11 highlights
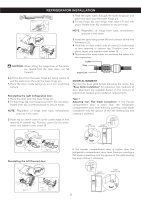
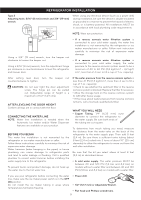
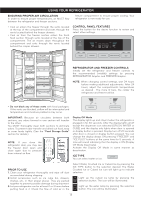
Saddle-Type Shutoff Valve Packing Nut Outlet Valve REFRIGERATOR INSTALLATION Back of refrigerator Compression Nut Tubing Clamp 1/4" (6,35 mm) Compression Nut 1/4" (6,35 mm) Tubing Ferrule (sleeve) Ferrule (sleeve) Figure 1 Refrigerator Connection NOTE: Commonwealth of Massachusetts Plumbing Codes 248CMR shall be adhered to. Saddle valves are illegal and use is not permitted in Massachusetts. Consult with your licensed plumber. Fasten the tubing into the tubing clamp attached to the back of the refrigerator. First, loosen the screw fastening the clamp. Next, insert the tubing in the groove. Finally, re-fasten the screw. 8. FLUSH OUT THE TUBING Turn the main water supply on and flush out the tubing until the water is clear. Shut the water off at the water valve after about one quart (1 L) of water has been flushed through the tubing. 10. PLUG IN THE REFRIGERATOR Arrange the coil of tubing so that it does not vibrate against the back of the refrigerator or against the wall. Push the refrigerator back to the wall. 9. CONNECT THE TUBING TO THE REFRIGERATOR NOTES: • Before making the connection to the refrigerator, be sure the refrigerator power cord is not plugged into the wall outlet. • If your refrigerator does not have a water filter, we recommend installing one. If your water supply has sand or particles that could clog the screen of the refrigerator's water valve, install the filter in the water line near the refrigerator. • Do not uses old hoses; only use new hoses provided by the manufacturer. 1. Remove the plastic flexible cap from the refrigerator connection. 2.Place the compression nut and ferrule (sleeve) onto the end of the tubing. (See figure 1). 3.Insert the end of the tubing into the connection as far as possible. While holding the tubing, tighten the fitting. 11. START THE ICE MAKER Set the ice maker power switch to the ON (I) position. The ice maker will not begin to operate until it reaches its operating temperature of 15 °F (-9 °C) or below. It will then begin operation automatically if the ice maker power switch is in the ON (I) position. CAUTION: Check to make sure that leaks are not occurring in the water line. 11
-
 1
1 -
2
-
3
-
4
-
5
-
 6
6 -
 7
7 -
 8
8 -
 9
9 -
 10
10 -
 11
11 -
 12
12 -
 13
13 -
 14
14 -
 15
15 -
 16
16 -
17
-
18
-
19
-
20
-
21
-
22
-
23
-
24
-
25
-
26
-
27
 |
 |
