LG LT1210C Owners Manual - Page 14
Bprocedure
 |
UPC - 048231353335
View all LG LT1210C manuals
Add to My Manuals
Save this manual to your list of manuals |
Page 14 highlights
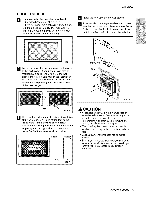
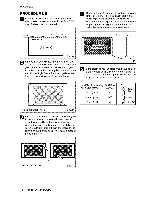
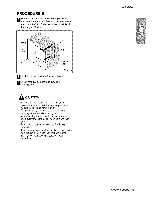
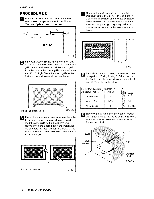
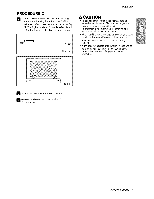
Installation PROCEDURE B _ edirect the lieuvers al Me back ol the wall sleeve to 60 '_ angle as shown in 'the FiG 8. The use o! pliers is re¢4_mmende¢ D Remove the b_cking from tlhe Vertical Insulation strip 159.'_ x 1s,,'8x 1s,,_and attach 1hat to the inside rigN of the sleeve as shown below Remove the backing from the Around hsulation strip 67% x lS_ x =%z and attach that to the inside front ,d the slee*ve as; shown below. Rear Louvers (Top View) l;nd_ Outdoor I1 HG, 8 lf the wallll sleeve a#eady has a rear gdHe, skip to step 4. If the walll slieeve does not have a rear gHHe or iouvered panel install the ptastic grille f[o,m the kiL ,Cut the plastic _il[e to 25ol/2 '' wide and ! 5ol/4 '° high. Place the plastic grille to the inside of the wall sli@_ at the rear flank, FIG. 1t If the depth ol your existing walI _ee.ve is. less than or equal to 18i"_ skiip to slep 6. Otherwi_, cut the _lfles ,and the support b_ocks, according t,o length, "A '' in the tab,_e below. wall sleeve (inches} 18
-
 1
1 -
2
-
3
-
4
-
5
-
6
-
7
-
8
-
 9
9 -
 10
10 -
 11
11 -
 12
12 -
 13
13 -
 14
14 -
 15
15 -
 16
16 -
 17
17 -
 18
18 -
 19
19 -
20
-
21
-
22
-
23
-
24
-
25
-
26
-
27
-
28
-
29
-
30
-
31
-
32
-
33
-
34
-
35
-
36
-
37
-
38
-
39
-
40
-
41
-
42
-
43
-
44
-
45
-
46
-
47
-
48
 |
 |
