LG M2400HR Service Manual - Page 14
Air handling parts
 |
View all LG M2400HR manuals
Add to My Manuals
Save this manual to your list of manuals |
Page 14 highlights
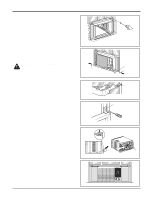
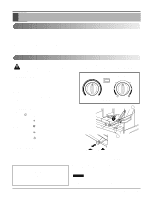
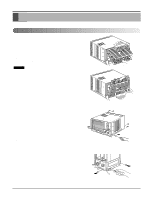
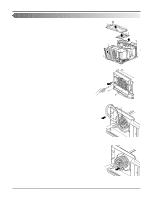
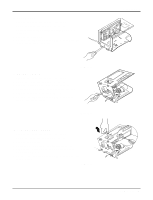
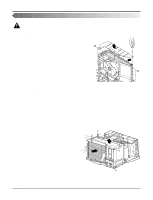
Disassembly Air handling parts 4. Cover (at the top) 1. Remove the front grille. (Refer to section 1) 2. Remove the cabinet. (Refer to section 2) 3. Remove 11 screws which fasten the brace and covers. 4. Remove the covers and the brace. (See Fig. 19) 5. Re-install the components by referring to the removal pro- cedure, above. Figure 19 Thermostat Auto Swing Off On Fan Operation Off Warmer Low Heat Cooler WBaeiftoTrehrReeesMtainrtuintegs High Heat Fan Low Cool High Cool 5. Blower 1. Remove the cover. (Refer to section 4) 2. Remove the 3 screws which fasten the evaporator at the left side and the top side.(See Fig. 19) 3. Move the evaporator sideward carefully. 4. Remove the 2 terminals carefully(See Fig. 20). 5. Remove the 3 screws which fasten the Heater Cover. (See Fig. 20) 6. Remove the Heater Cover.(See Fig. 20) 7. Remove the orifice from the air guide carefully. (See Fig. 21) 8. Remove the clamp which secures the blower with plier. (See Fig. 21) 9. Remove the blower with plier or your hand without touching blades. (See Fig. 22) 10. Re-install the components by referring to the removal procedure, above. Figure 20 Figure 21 14 Room Air Conditioner Figure 22
-
 1
1 -
2
-
3
-
4
-
5
-
6
-
7
-
8
-
 9
9 -
 10
10 -
 11
11 -
 12
12 -
 13
13 -
 14
14 -
 15
15 -
 16
16 -
 17
17 -
 18
18 -
 19
19 -
20
-
21
-
22
-
23
-
24
-
25
-
26
-
27
-
28
-
29
-
30
-
31
-
32
-
33
-
34
-
35
-
36
 |
 |
