LG M2762D-PM Owner's Manual - Page 11
Positioning Your Display, Location - vesa
 |
View all LG M2762D-PM manuals
Add to My Manuals
Save this manual to your list of manuals |
Page 11 highlights
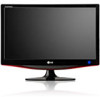
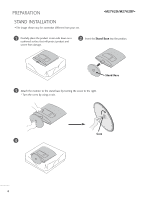
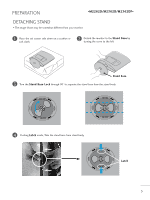
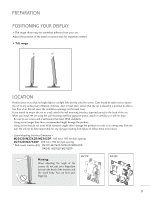
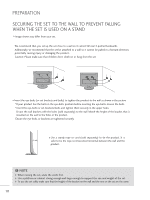
PREPARATION POSITIONING YOUR DISPLAY I The image shown may be somewhat different from your set. Adjust the position of the panel in various ways for maximum comfort. • Tilt range -5° 15° LOCATION Position your set so that no bright light or sunlight falls directly onto the screen. Care should be taken not to expose the set to any unnecessary vibration, moisture, dust or heat. Also, ensure that the set is placed in a position to allow a free flow of air. Do not cover the ventilation openings on the back cover. If you intend to mount the set to a wall, attach the wall mounting interface (optional parts) to the back of the set. When you install the set using the wall mounting interface (optional parts), attach it carefully so it will not drop. - Be sure to use screws and a wall mount that meet VESA standards. - Using screws longer than those recommended might damage the product. - Using screws that do not meet VESA standards might either damage the product or result in it coming away from the wall. We will not be held responsible for any damage resulting from failure to follow these instructions. < Screw Mounting Interface Dimension > M2262D/M2362D/M2362DP : 100 mm x 100 mm hole spacing M2762D/M2762DP : 200 mm x 100 mm hole spacing * Wall mount interface(LG) : RW120 RW240 Warning: When adjusting the angle of the screen, do not put your finger(s)in between the head of the monitor and the stand body. You can hurt your finger(s). RW120 RW240 9
-
 1
1 -
2
-
3
-
4
-
5
-
 6
6 -
 7
7 -
 8
8 -
 9
9 -
 10
10 -
 11
11 -
 12
12 -
 13
13 -
 14
14 -
 15
15 -
 16
16 -
17
-
18
-
19
-
20
-
21
-
22
-
23
-
24
-
25
-
26
-
27
-
28
-
29
-
30
-
31
-
32
-
33
-
34
-
35
-
36
-
37
-
38
-
39
-
40
-
41
-
42
-
43
-
44
-
45
-
46
-
47
-
48
-
49
-
50
-
51
-
52
-
53
-
54
-
55
-
56
-
57
-
58
-
59
-
60
-
61
-
62
-
63
-
64
-
65
-
66
-
67
-
68
-
69
-
70
-
71
-
72
-
73
-
74
-
75
-
76
-
77
-
78
-
79
-
80
-
81
-
82
-
83
-
84
-
85
-
86
-
87
-
88
-
89
-
90
-
91
-
92
-
93
-
94
-
95
-
96
-
97
 |
 |