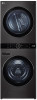
LG WKHC202HBA Owners Manual - Page 81
Connecting the Water Inlet Hoses, Hoses
 |
View all LG WKHC202HBA manuals
Add to My Manuals
Save this manual to your list of manuals |
Page 81 highlights
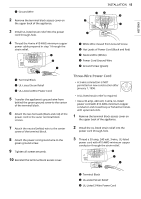
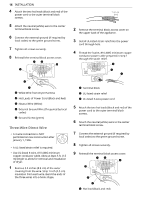
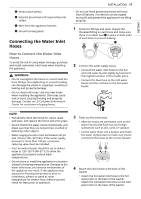
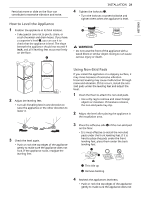
ENGLISH b Neutral wire (white) c External ground wire (if required by local codes) d Wire from the appliance harness e Ground screw (green) Connecting the Water Inlet Hoses How to Connect the Water Inlet Hoses To avoid the risk of costly water damage, purchase and install new water inlet hoses when installing the appliance. WARNING • Do not overtighten the hoses or cross-thread the hose fittings. Overtightening or cross-threading can damage the valves or couplings, resulting in leaking and property damage. • Do not reuse old hoses. Use only new hoses when installing the appliance. Old hoses could leak or burst causing flooding and property damage. Contact an LG Customer Information Center for assistance in buying hoses. INSTALLATION 17 • Do not use flood-preventing hoses with auto shut off devices. The devices can be tripped during fill and prevent the appliance from filling properly. 1 Check the fittings and seals. Inspect the threaded fitting on each hose and make sure there is a rubber seal a in place in both ends of each hose to prevent leaking. 2 Connect the water supply hoses. • Connect the water inlet hoses to the hot and cold water faucets tightly by hand and then tighten another 2/3 turn with pliers. • Connect the blue hose to the cold water faucet and the red hose to the hot water faucet. NOTE • Periodically check the hoses for cracks, leaks, and wear, and replace the hoses every five years. • Do not stretch the water hoses intentionally, and make sure that they are not pinched, crushed or kinked by other objects. • Water supply pressure must be between 20 psi and 120 psi (138 - 827 kPa). If the water supply pressure is more than 120 psi, a pressure reducing valve must be installed. • Your hot water heater should be set to deliver water at 120-135 ℉ (48-57 ℃) to allow the appliance to properly control wash temperatures. • Do not store or install the appliance in a location subject to freezing temperatures. Damage to the water inlet hoses and internal mechanisms of the appliance can result. If the appliance was exposed to freezing temperatures prior to installation, allow it to stand at room temperature for several hours before use and check for leaks prior to operation. 3 Flush out the inlet hoses. • After the hoses are connected, turn on the water faucets and flush out any foreign substances such as dirt, sand, or sawdust. • Let the water drain into a bucket, and check the water temperature to make sure you've connected the hoses to the correct faucets. 4 Attach the inlet hoses to the back of the washer. • Attach the hot water inlet hose to the hot water inlet on the back of the washer. Attach the cold water inlet hose to the cold water inlet on the back of the washer.
-
 1
1 -
2
-
3
-
4
-
5
-
6
-
7
-
8
-
9
-
10
-
11
-
12
-
13
-
14
-
15
-
16
-
17
-
18
-
19
-
20
-
21
-
22
-
23
-
24
-
25
-
26
-
27
-
28
-
29
-
30
-
31
-
32
-
33
-
34
-
35
-
36
-
37
-
38
-
39
-
40
-
41
-
42
-
43
-
44
-
45
-
46
-
47
-
48
-
49
-
50
-
51
-
52
-
53
-
54
-
55
-
56
-
57
-
58
-
59
-
60
-
61
-
62
-
63
-
64
-
65
-
66
-
67
-
68
-
69
-
70
-
71
-
72
-
73
-
74
-
75
-
 76
76 -
 77
77 -
 78
78 -
 79
79 -
 80
80 -
 81
81 -
 82
82 -
 83
83 -
 84
84 -
 85
85 -
 86
86 -
87
-
88
-
89
-
90
-
91
-
92
 |
 |
