LG WM3400CW Owners Manual - Page 11
Unpacking and Removing, Shipping Material - stacking kit
 |
View all LG WM3400CW manuals
Add to My Manuals
Save this manual to your list of manuals |
Page 11 highlights
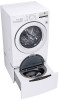
ENGLISH Dimensions and Clearances F 27'' (70 cm) G 1/4'' (0.5 cm) Stacking or Pedestal Installation The washer can be stacked under a dryer or on top of a pedestal or pedestal washer. F E INSTALLATION 11 Unpacking Shipping Material * This feature is only available on some models. Lift the washer off the foam base. • After removing the carton and shipping material, lift the washer off the foam base. • Make sure the plastic drum support a* comes off with the base and is not stuck to the bottom of the washer. • If you must lay the washer down to remove the carton base b, always protect the side of the washer and lay it carefully on its side. Do not lay the washer on its front or back. A BC D C Dimensions and Clearances A 30 1/4" (77 cm) B 4'' (10 cm) C 1'' (0.5 cm) D 27'' (70 cm) E 77 1/2'' (196.8 cm) F 1/4'' (0.5 cm) NOTE • Refer to the instructions packaged with the optional pedestal kit before stacking appliance on pedestal. • Do not use a drain pan with a pedestal or pedestal washer installation as it can block the drawer. Using a drain pan may result in increased vibration and noise during operation. * Removing Shipping Material 1 Remove the bolt assemblies. • Starting with the bottom two shipping bolts c , use the included wrench to fully loosen all 4 shipping bolts by turning them counterclockwise. • Remove the bolt assemblies (bolts and retainers) by wiggling them slightly while pulling them out. Unpacking and Removing Shipping Material Remove all shipping materials from the washer for proper operation and inspect it for shipping damage. CAUTION • Failure to remove shipping materials can cause excessive noise and vibration. 2 Install the hole caps. • Locate the hole caps d included in the accessory pack or attached to the back of
-
 1
1 -
2
-
3
-
4
-
5
-
 6
6 -
 7
7 -
 8
8 -
 9
9 -
 10
10 -
 11
11 -
 12
12 -
 13
13 -
 14
14 -
 15
15 -
 16
16 -
17
-
18
-
19
-
20
-
21
-
22
-
23
-
24
-
25
-
26
-
27
-
28
-
29
-
30
-
31
-
32
-
33
-
34
-
35
-
36
-
37
-
38
-
39
-
40
-
41
-
42
-
43
-
44
-
45
-
46
-
47
-
48
-
49
-
50
-
51
-
52
-
53
-
54
-
55
-
56
-
57
-
58
-
59
-
60
-
61
-
62
-
63
-
64
-
65
-
66
-
67
-
68
-
69
-
70
-
71
-
72
-
73
-
74
-
75
-
76
-
77
-
78
-
79
-
80
-
81
-
82
-
83
-
84
-
85
-
86
-
87
-
88
-
89
-
90
-
91
-
92
-
93
-
94
-
95
-
96
-
97
-
98
-
99
-
100
-
101
-
102
-
103
-
104
-
105
-
106
-
107
-
108
-
109
-
110
-
111
-
112
-
113
-
114
-
115
-
116
-
117
-
118
-
119
-
120
-
121
-
122
-
123
-
124
-
125
-
126
-
127
-
128
-
129
-
130
-
131
-
132
-
133
-
134
-
135
-
136
-
137
-
138
-
139
-
140
-
141
-
142
-
143
-
144
-
145
-
146
-
147
-
148
-
149
-
150
-
151
-
152
-
153
-
154
-
155
-
156
-
157
-
158
-
159
-
160
-
161
-
162
-
163
-
164
 |
 |
