Lacie 300760U User Manual - Page 17
Ejecting Discs, 3.4. Emergency Ejection of Discs, Windows Users, Mac Users
 |
UPC - 093053618285
View all Lacie 300760U manuals
Add to My Manuals
Save this manual to your list of manuals |
Page 17 highlights
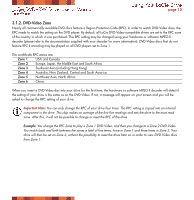
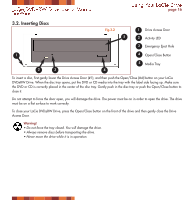
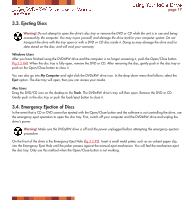
LaCie DVD±RW Drive User's Manual FireWire Using Your laCie Drive page 17 3.3. Ejecting Discs Warning! Do not attempt to open the drive's disc tray or remove the DVD or CD while the unit is in use and being accessed by the computer. You may injure yourself, and damage the drive and/or your computer system. Do not transport the drive with the tray open or with a DVD or CD disc inside it. Doing so may damage the drive and/or data stored on the disc, and will void your warranty. Windows Users After you have finished using the DVD±RW drive and the computer is no longer accessing it, push the Open/Close button (fig.3.2 #4). When the disc tray is fully open, remove the DVD or CD. After removing the disc, gently push in the disc tray or push on the Open/Close button to close it. You can also go into My Computer and right-click the DVD±RW drive icon. In the drop-down menu that follows, select the Eject option. The disc tray will open, then you can access your media. Mac Users Drag the DVD/CD icon on the desktop to the Trash. The DVD±RW drive's tray will then open. Remove the DVD or CD. Gently push in the disc tray or push the load/eject button to close it. 3.4. Emergency Ejection of Discs In the event that a CD or DVD cannot be ejected with the Open/Close button and the software is not controlling the drive, use the emergency eject operation to open the disc tray. First, switch off your computer and the DVD±RW drive and unplug the drive's power. Warning! Make sure the DVD±RW drive is off and the power unplugged before attempting the emergency ejection procedure. On the front of the drive is the Emergency Eject Hole (fig.3.2 #3). Insert a small metal poker, such as an unbent paper clip, into the Emergency Eject Hole until the poker presses against the manual eject mechanism. You will feel the mechanism eject the disc tray. Only use this method when the Open/Close button is not working.
-
 1
1 -
2
-
3
-
4
-
5
-
6
-
7
-
8
-
9
-
10
-
11
-
 12
12 -
 13
13 -
 14
14 -
 15
15 -
 16
16 -
 17
17 -
 18
18 -
 19
19 -
 20
20 -
 21
21 -
 22
22 -
23
-
24
-
25
-
26
-
27
-
28
-
29
-
30
-
31
-
32
 |
 |
