Lantronix Spider Lantronix Spider - Quick Start Guide - Page 4
Ethernet and Cascade Ports - default login
 |
View all Lantronix Spider manuals
Add to My Manuals
Save this manual to your list of manuals |
Page 4 highlights
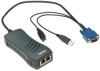
Quick Start Guide SecureLinx Spider INSTALLATION AND NETWORK SETTINGS CONTINUED... Ethernet and Cascade Ports Ethernet Port(RJ45) Cascade Port (RJ45) LEDs Pwr1 Pwr2 SysOK Video Unit ID Color Blue Blue Green Green Orange Description Power Good indicates adequate power from source 1 (USB1) Power Good indicates adequate power from source 2 (USB2 or PS/2) Blinks upon bootup. Steady when up and healthy Video is coming from target server (Vsync present) Optionally lit to assist in finding unit 4 INSTALLATION AND NETWORK SETTINGS CONTINUED... 1. Plug the RJ45 end of the included serial cable into the Spider's serial port. Plug the DB9F end into the serial (COM) port of a PC/laptop running a terminal emulation (e.g. HyperTerminal). The default serial port settings are 9600 bits per second, 8 data bits, no parity, 1 stop bit, no flow control. 2. The Spider is typically powered by the attached server. Plug the Spider video, USB, and PS/2 keyboard/mouse (if applicable) cables into the target computer (this is required for the device to boot up). The two blue power LEDs will illuminate and the green system OK LED flashes to indicate that it is booting up. Bootup is complete within approximately one minute. The system OK LED stops flashing and remains illuminated. 3. Upon bootup, the terminal window displays the login prompt. To change the default IP auto configuration from DHCP to a static IP address, type config and press Enter. 4. At the IP autoconfiguration prompt, type none and press Enter. WWW.LANTRONIX.COM 5
-
 1
1 -
 2
2 -
 3
3 -
 4
4 -
 5
5 -
 6
6 -
 7
7 -
 8
8
 |
 |
