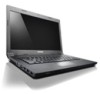
Lenovo B4400 Laptop (English) User Guide - Page 44
Replacing the Mini PCI Express Card, Remove the screw that secures the Mini PCI Express Card
 |
View all Lenovo B4400 Laptop manuals
Add to My Manuals
Save this manual to your list of manuals |
Page 44 highlights
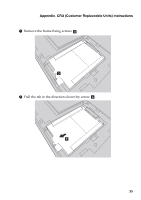
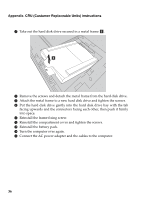
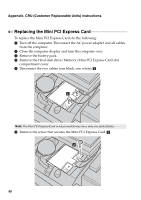
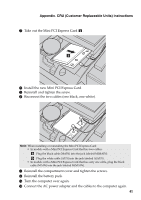
Appendix. CRU (Customer Replaceable Units) instructions Replacing the Mini PCI Express Card To replace the Mini PCI Express Card, do the following: 1 Turn off the computer. Disconnect the AC power adapter and all cables from the computer. 2 Close the computer display and turn the computer over. 3 Remove the battery pack. 4 Remove the Hard disk drive/Memory/Mini PCI Express Card slot compartment cover. 5 Disconnect the two cables (one black, one white) a . a Note: The Mini PCI Express Card in select models may have only one cable (black). 6 Remove the screw that secures the Mini PCI Express Card b . b 40
-
 1
1 -
2
-
3
-
4
-
5
-
6
-
7
-
8
-
9
-
10
-
11
-
12
-
13
-
14
-
15
-
16
-
17
-
18
-
19
-
20
-
21
-
22
-
23
-
24
-
25
-
26
-
27
-
28
-
29
-
30
-
31
-
32
-
33
-
34
-
35
-
36
-
37
-
38
-
 39
39 -
 40
40 -
 41
41 -
 42
42 -
 43
43 -
 44
44 -
 45
45 -
 46
46 -
 47
47 -
 48
48 -
 49
49 -
50
 |
 |

40
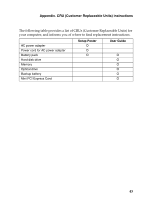
Appendix. CRU (Customer Replaceable Units) instructions
Replacing the Mini PCI Express Card
- - - - - - - - - - - - - - - - - - - - - - - - - - - - - - - - - - - - - - -
To replace the Mini PCI Express Card, do the following:
1
Turn off the computer. Disconnect the AC power adapter and all cables
from the computer.
2
Close the computer display and turn the computer over.
3
Remove the battery pack.
4
Remove the Hard disk drive/Memory/Mini PCI Express Card slot
compartment cover.
5
Disconnect the two cables (one black, one white)
.
6
Remove the screw that secures the Mini PCI Express Card
.
Note:
The Mini PCI Express Card in select models may have only one cable (black).
a
a
b
b