Lenovo Beacon (English) Beacon User Guide - Page 1
Lenovo Beacon Manual
|
View all Lenovo Beacon manuals
Add to My Manuals
Save this manual to your list of manuals |
Page 1 highlights
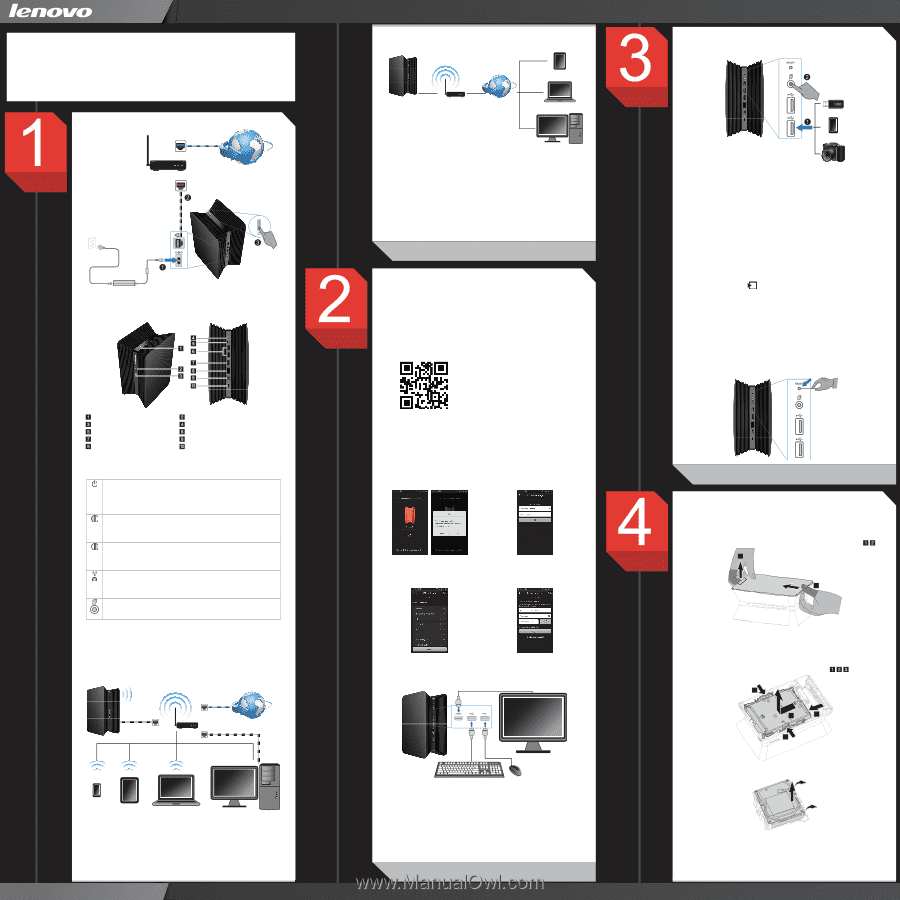
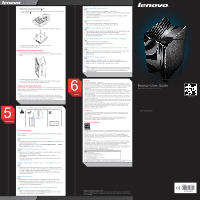
Important Safety Information Before using this manual, it is important that you read and understand all of the related safety information for this product. Refer to the Safety and Warranty Guide that you received with this product for the latest safety information. Reading and understanding this safety information reduces the risk of personal injury or product damage. Note: Product color and other graphics in this User Guide are for reference only and may not match the actual product. Turning on Beacon Getting started Router Internet Overview Front View and Rear View Beacon Power button*/Status indicator Hard disk drive (HDD) indicators (2) Wi-Fi status indicator Reset button USB copy button HDMI connector USB connectors (2) Ethernet connector Power connector Security cable slot * The power LED blinks slowly when the Beacon is in sleep mode. Press the power button to wake it. LED Indicators Power LED Power On/Off: Blinking white Working: Solid white System error: Solid red Sleep mode: Blinking white slowly Left HDD LED Shows the status of the left-hand side HDD. Data transmission: Blinking white System error: Solid red Right HDD LED Shows the status of the right-hand side HDD. Data transmission: Blinking white System error: Solid red Wi-Fi Connection LED Connected with router: Solid white Data transmission: Blinking white Wi-Fi connection failed: Solid red USB copy button LED Read/write USB data: Blinking white USB device mounted: Solid white Connecting Beacon to the network 1. Example Local Area Network (LAN). Important: • Make sure Beacon and client devices connect to the same Local Area Network (LAN) environment. • Wireless compatibility: Beacon can connect wirelessly with your router. However, the first time you connect Beacon to your router, you must use an Ethernet cable. OR Beacon Router Internet Phone Tablet Laptop Desktop 2. Example Wide Area Network (WAN). Important: In a WAN environment, you must control Beacon by logging in with a Lenovo ID. Tablet Beacon Router Internet Laptop Desktop Notes: • If Beacon is connected over LAN, the client must connect to the same LAN. If they are connected to the same LAN but Beacon cannot be detected, check your firewall settings to make sure the Beacon application is not blocked. • When connecting to Beacon over WLAN using a Lenovo ID, make sure the same ID is used to log in to both Beacon and the client. Note: • Online services may require separate agreements with selected third party service providers, which are subject to the credit approval and applicable service agreements or terms, rate plans and coverage maps of that provider. Service is available in select metropolitan areas, but may not be available everywhere. The service provider is solely responsible for the service. Lenovo customers may be contacted after purchasing this product to activate this service. A network connection, third-party software and/or additional hardware may be required. Additional restrictions may apply. Initial setup Setting up your Beacon Important: • Client device system requirements: Windows 8.1, Windows 8, Windows 7 or Android version 3.0 and above. • Account settings: Used to log in to Beacon and manage its contents. The default account name is "admin" (cannot be changed). Please enter a password and your email address. If you have Administrator permissions, you can create new accounts. • Lenovo ID: Bind your Lenovo ID to connect your device with Beacon through the Internet. Method 1: Using a Windows or Android client device. Note: You must first download and install the Beacon client app from: http://www.lenovo. com/support. This app allows you to control Beacon and to carry out initial setup. OneKey USB copy Use OneKey to upload the contents of connected USB devices to Beacon. Note: Press and hold the USB copy button for over 1 second. Main functions USB Phone Camera System upgrade Connect Beacon to the TV, then select System Administration → System Set → System Upgrade. Data management You can connect client devices to Beacon for convenient management of personal or multimedia files, such as backing up data, sharing, synchronizing and downloading. Remote access You can access data on Beacon over the internet. Use your Lenovo ID to quickly find Beacon and remotely access and manage your data. Note: Remote access is affected by network stability. Other environmental factors may affect operation and the quality of the user experience. "Play to" function You can use client devices and applications to play multimedia files on your Beacon to your TV, tablet, or other connected devices. You can also browse or play multimedia files on Beacon directly from your TV. Restore factory settings System settings recovery: When Beacon is on, press and hold the Reset button for at least 3 seconds to restore factory settings. Operating system recovery: Turn off the Beacon. Simultaneously press down the Reset button and Power button for over 3 seconds to restore the operating system. Note: You can use this procedure to restore the default password if you forget your account password. Android app (Scan this code with your Android client device) a. Install the Windows or Android app on a client device in the same LAN. (The steps below show initial setup on Android.) b. Find the app icon on your device and c. A new dialog box will pop up. The launch it. Find the Beacon device on default account name and password your network and follow the prompts. are "admin". Enter your e-mail address and click OK to finish setting up the account. d. In the next dialog box, select the Wi-Fi network that the Beacon is connected to. e. Register a new Lenovo ID to finish the initial setup procedure. (This step can be skipped by clicking the Finish button.) Hard disk drive installation Removing the cover Note: It helps to lay the device on a soft flat surface for this procedure. Lenovo recommends that you use a blanket, towel, or other soft cloth to protect the cover surface from scratches or other damage. 1. Lift up the top cover from the notch then slide the cover out as shown. 1 2 Method 2: Connect Beacon to a TV or a monitor with a High Definition Multimedia Interface (HDMI) connector, then connect a keyboard and mouse to Beacon to perform the initial setup. Beacon TV or Monitor Keyboard Mouse Follow the prompts to set up Beacon. There is no need to install any client applications. Note: All the peripherals and HDMI cable need to be purchased separately. 2. To reattach the cover: Align the cover with the chassis, then slide the cover back into position. Replacing the hard disk drive 1. Remove the cover(s). Refer to "Removing the cover". 2. Detach the hard disk drive from the connector as shown. 1 3 2 1 3. Push the edge of the bracket outward to release the hard disk drive, then slide out the hard disk drive. 4. Install a new 3.5 inch hard disk drive as follows: 1) Line up the new hard disk drive with the bracket and secure it with the pins. 2) Slide the hard disk drive and bracket back into position. 3) Slide the cover back into position.
-
 1
1 -
 2
2
 |
 |