Lenovo Beacon (English) Beacon User Guide - Page 2
Beacon User Guide - for sale
|
View all Lenovo Beacon manuals
Add to My Manuals
Save this manual to your list of manuals |
Page 2 highlights
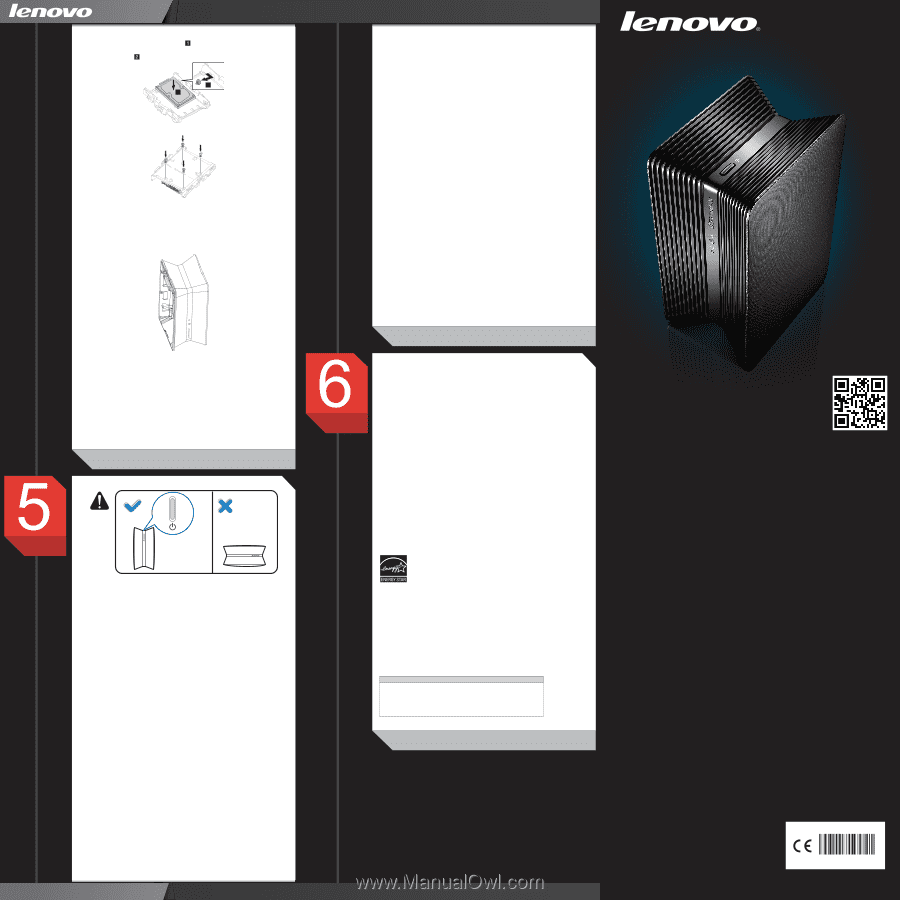
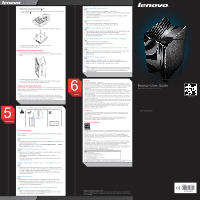
5. Install a new 2.5 inch hard disk drive as follows: 1) Remove the top-right pin as shown. 2) Line up the holes on the 2.5 inch hard disk drive with the four mounting holes on the bracket. 1 2 3) Secure the 2.5 inch hard disk drive to the bracket with the four screws. 4) Slide the hard disk drive and bracket back into position. 5) Slide the cover back into position. Replacing the middle assembly 1. Remove the two covers. Refer to "Removing the cover". 2. Remove the hard disk drive(s) and brackets. Refer to "Replacing the hard disk drive". 3. To install the new middle assembly: 1) Line up the hard disk drive(s) and brackets, then slide them into position. 2) Attach the two covers to the new middle assembly. Adding a new hard disk drive Follow the steps in "Replacing the hard disk drive" to install a new hard disk drive. After doing so, a pop-up dialog box will tell you to back up your data and format the hard disk. Please follow the prompts. Caution: • Adding a new hard disk drive or changing the disk settings may result in data on the original and new hard disk drive being damaged or lost. Back up the data on the original hard disk before adding a new hard disk or changing the RAID settings. Do not assemble or disassemble the hard disk in the boot state. This will corrupt data. Important: Beacon can only be placed vertically. Make sure the power button is at the top. Troubleshooting Troubleshooting Please check these tips to see if they can resolve your problem before contacting Lenovo Service. Problem: Overscan on the TV when the Beacon is connected. Tips: • Adjust the TV display settings. These will vary by manufacturer, so please follow the instructions for your model. • After connecting Beacon to the TV, select System Administration → System Set → Overscan to adjust the scan rate. Problem: No response when you turn on the device. Tips: • Make sure the AC adapter is connected to the device and the power cord is plugged into a working electrical outlet. • Make sure the device power is on. (Press the power button again for confirmation.) • If you have checked the points above and the problem still persists, please contact Lenovo Service. Problem: The hard disk drive indicators are off or solid red after turning on the device. Tips: • Unplug the power cable and open the cover (refer to "Replacing the hard disk drive") and check if the HDD is securely installed. If the device still does not work, try using a different HDD or resetting to factory settings. • If you have checked the points above and the problem still persists, please contact Lenovo Service. Problem: Initial setup fails. Tips: • Make sure the router is connected to the internet and is transmitting data. • Make sure the client and device are connected to the same router. • If using wireless equipment for the initial setup, make sure it is connected to the router and then try the initial setup again. Problem: Client devices connected to the router cannot detect Beacon. Tips: • Make sure the client devices are connected to the router. • Check your firewall settings to ensure the Beacon application is not blocked. • Make sure the client device is close to Beacon. Problem: Power LED indicator is solid red. Tips: • Press the power button to turn off Beacon, then restart it. • If the power LED is still solid red after restarting, try restoring factory settings (see "Restore factory settings"). • If you have checked the points above and the problem still persists, please contact Lenovo Service. Problem: Power lost while restoring the system. Tips: • Reconnect the power cable and restore the system again. • If the device cannot be turned on, contact Lenovo Service. Problem: The client application cannot start up. Tips: • Restart the client device, reconnect to the internet and start the application again. • Uninstall the application, then download it and install it again. • Make sure that your antivirus software or system protection program is not blocking the client application. Problem: Nothing appears on the TV or monitor when Beacon is connected. Tips: • Make sure the TV or monitor is turned on. • Make sure the HDMI cable is properly connected. • Check if Beacon is turned on. Problem: Data cannot be synchronised after a client device connects to Beacon. Tips: • Make sure that all client devices and Beacon are connected to the same router. • Make sure that synchronization is turned on for the client device. • Restart Beacon. Problem: "Play to" function does not work. Tips: • Check if Beacon is connected to the TV or monitor and turned on. • Make sure the Media Library is open so the "Play to" signal can be received. • Make sure that the multimedia file is present and not corrupt. Caution: • Keep in mind that Beacon is meant for file-sharing and media playback. Any devices that connect to Beacon can access shared folders and files. Do not store private data in shared folders or files, and do not place anyone else's private data or personal information in shared files or folders. Appendix Notices Thank you for choosing this Lenovo product. Carefully read all documents shipped with your device before you install and use the product for the first time. Lenovo is not responsible for any loss except when caused by installation and operations performed by Lenovo professional service personnel. You are responsible if you fail to operate the product according to instructions and requirements in the manuals included with your device, or operate the product inappropriately. This User Guide could include technical inaccuracies or typographical errors. Changes are made periodically to the information herein; these changes will be incorporated in new editions of the publication. To provide better service, Lenovo reserves the right to improve and/or modify the products and software programs described in the manuals included with your device, and the content of the manual, at any time without additional notice. The manuals included with your device are provided to help you use Lenovo's products appropriately. For the configuration of the product, refer to the related contract (if any) or product packing list, or consult the distributor for the product sales. The content of the manuals included with your device is protected by copyright law. None of the manuals included with your device may be reproduced or transcribed by any means or translated into any language without prior written permission of Lenovo. The software interface, functionality, and hardware configuration described in the manuals included with your device might not match exactly the actual configuration of the device that you purchase.You are welcome to contact us about the manuals included with your device. For the latest information or any questions or comments, contact or visit the Lenovo: Service Web site: http://support.lenovo.com Trademarks Lenovo and the Lenovo logo are trademarks of Lenovo in the United States, other countries, or both. Other company, product, or service names referred to herein or in other Lenovo publications may be trademarks or service marks of others. All rights reserved. Names or marks of certain companies mentioned in the manuals included with your device or this document do not necessarily indicate that related software or hardware is included. The actual configuration of the product depends on the packing list description. Energy Star Statement Beacon User Guide Product images in this guide are for reference only. Machine Type: 10165/90AN ENERGY STAR® is a joint program of the U.S. Environmental Protection Agency and the U.S. Department of Energy aimed at saving money and protecting the environment through energy efficient products and practices. Lenovo is proud to offer our customers products with an ENERGY STAR compliant designation. The following machine types have been designed and tested to conform to the ENERGY STAR program requirement for devices at the time of manufacture. For more information about ENERGY STAR ratings for Lenovo devices, go to http://www.lenovo.com. • 10165/90AN By using ENERGY STAR compliant products and taking advantage of the power-management features of your device, you reduce the consumption of electricity. Reduced electrical consumption contributes to potential financial sayings, a cleaner environment, and the reduction of greenhouse gas emissions. For more information about ENERGY STAR, go to: http://www.energystar.gov. Lenovo encourages you to make efficient use of energy an integral part of your day-to-day operations. To help in this endeavor, Lenovo has preset the following power-management features to take effect when your device has been inactive for a specified duration: ENERGY STAR power-management features, by operating system. Linux Power plan: Balanced • Turn off the display: After 5 minutes • Put the device to sleep: After 30 minutes • Advanced power settings: - Turn off hard disk drives: After 10 minutes - Hibernate: no support To awaken your device from a Sleep or System Standby mode, press any key on your keyboard. For more information about these settings, refer to your Windows Help and Support information system. © Copyright Lenovo 2014. All rights reserved. LIMITED AND RESTRICTED RIGHTS NOTICE: If data or software is delivered pursuant a General Services Administration "GSA" contract, use, reproduction, or disclosure is subject to restrictions set forth in Contract No. GS-35F-05925. Android app Version 2.0 2014.04 SP40G36809
-
 1
1 -
 2
2
 |
 |