Lenovo H520e Lenovo H520e Hardware Maintenance Manual
Lenovo H520e Manual
 |
View all Lenovo H520e manuals
Add to My Manuals
Save this manual to your list of manuals |
Lenovo H520e manual content summary:
- Lenovo H520e | Lenovo H520e Hardware Maintenance Manual - Page 1
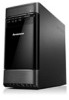
Lenovo H520e Hardware Maintenance Manual ideaideaideaCentreidea Machine Types: 90AM - Lenovo H520e | Lenovo H520e Hardware Maintenance Manual - Page 2
product it supports, be sure to read and understand Chapter 2 "Safety information" on page 3 and Appendix A "Notices" on page 101. First Edition (January 2013) © Copyright Lenovo 2013. LIMITED AND RESTRICTED RIGHTS NOTICE: If data or software is delivered pursuant a General Services Administration - Lenovo H520e | Lenovo H520e Hardware Maintenance Manual - Page 3
Specifications 29 Lenovo Support Web site 30 Chapter 4. General checkout . . . . . 31 Problem determination tips 31 Chapter 5. Troubleshooting and diagnostics 33 Basic troubleshooting 33 Accessing Control Panel on the Windows 8 operating system 34 Troubleshooting procedure 34 Troubleshooting - Lenovo H520e | Lenovo H520e Hardware Maintenance Manual - Page 4
BIOS update failure 99 Power management 100 Advanced Configuration and Power Interface (ACPI) BIOS 100 Automatic Power-on features 100 Appendix A. Notices 101 Television output notice 102 European conformance CE mark 102 Trademarks 102 Index 103 ii Lenovo H520e Hardware Maintenance Manual - Lenovo H520e | Lenovo H520e Hardware Maintenance Manual - Page 5
11 "Additional service information" on page 97 are not specific to any machine type. These chapters are applicable to all Lenovo H520g computers. For major FRU locations and Customer Replaceable Unit (CRU) identification, see Chapter 8 "Locations" on page 65. For FRU replacement instructions, see - Lenovo H520e | Lenovo H520e Hardware Maintenance Manual - Page 6
2 Lenovo H520e Hardware Maintenance Manual - Lenovo H520e | Lenovo H520e Hardware Maintenance Manual - Page 7
servicing a computer that other service representatives and personnel, while you are servicing the machine. • Keep After service, reinstall power cords, telecommunication systems, networks, and modems before you open the centre covers, unless instructed otherwise in the installation and configuration - Lenovo H520e | Lenovo H520e Hardware Maintenance Manual - Page 8
Power supply units - Pumps - Blowers and fans - Motor generators and similar units. (This practice ensures correct grounding of the units.) • If an electrical accident occurs: - Use caution; do not become a victim yourself. - Switch off power. - Send another person to get medical aid. 4 Lenovo H520e - Lenovo H520e | Lenovo H520e Hardware Maintenance Manual - Page 9
computer was originally purchased. • If your computer has a voltage-selection switch, do not connect the computer protect users and service personnel from injury. This guide addresses problem. Consider these conditions and the safety hazards they present: • Electrical hazards, especially primary power - Lenovo H520e | Lenovo H520e Hardware Maintenance Manual - Page 10
power-supply cover fasteners (screws or rivets) have not been removed or tampered with. Handling electrostatic discharge-sensitive devices Any computer below, to provide protection that meets the specific service requirement. Note: The use of a grounding 6 Lenovo H520e Hardware Maintenance Manual - Lenovo H520e | Lenovo H520e Hardware Maintenance Manual - Page 11
of fire, water, or structural damage. • Disconnect the attached power cords, telecommunications systems, networks, and modems before you open the device covers, unless instructed otherwise in the installation and configuration procedures. • Connect and disconnect cables as described in the following - Lenovo H520e | Lenovo H520e Hardware Maintenance Manual - Page 12
no serviceable power switch on the power supply do not turn off the electrical current supplied to the device. The device also might have more than one power cord. To remove all electrical current from the device, ensure that all power cords are disconnected from the power source. 2 1 8 Lenovo H520e - Lenovo H520e | Lenovo H520e Hardware Maintenance Manual - Page 13
Chapter 2. Safety information 9 - Lenovo H520e | Lenovo H520e Hardware Maintenance Manual - Page 14
≥18 kg (37 lbs) ≥32 kg (70.5 lbs) ≥55 kg (121.2 lbs) 2 1 PERIGO A corrente elétrica proveniente de cabos de alimentação, de telefone e de comunicações é perigosa. 10 Lenovo H520e Hardware Maintenance Manual - Lenovo H520e | Lenovo H520e Hardware Maintenance Manual - Page 15
Para evitar risco de choque elétrico: • Não conecte nem desconecte nenhum cabo ou execute instalação, manutenção ou reconfiguração deste produto durante uma tempestade com raios. • Conecte todos os cabos de alimentação a tomadas elétricas corretamente instaladas e aterradas. • Todo equipamento que - Lenovo H520e | Lenovo H520e Hardware Maintenance Manual - Page 16
cabo de alimentação. Para remover toda a corrente elétrica do dispositivo, assegure que todos os cabos de alimentação estejam desconectados da fonte de alimentação. 2 1 12 Lenovo H520e Hardware Maintenance Manual - Lenovo H520e | Lenovo H520e Hardware Maintenance Manual - Page 17
Chapter 2. Safety information 13 - Lenovo H520e | Lenovo H520e Hardware Maintenance Manual - Page 18
2 1 14 Lenovo H520e Hardware Maintenance Manual - Lenovo H520e | Lenovo H520e Hardware Maintenance Manual - Page 19
2 1 Chapter 2. Safety information 15 - Lenovo H520e | Lenovo H520e Hardware Maintenance Manual - Page 20
aux systèmes de télécommunication et aux modems (sauf instruction contraire mentionnée dans les procédures d'installation et de configuration). • Lorsque vous installez, que vous déplacez, ou la mise au rebut, se reporter à la réglementation en vigueur. 16 Lenovo H520e Hardware Maintenance Manual - Lenovo H520e | Lenovo H520e Hardware Maintenance Manual - Page 21
ATTENTION: Si des produits à laser (tels que des unités de CD-ROM, de DVD-ROM, des unités à fibres optiques, ou des émetteurs) sont installés, prenez connaissance des informations suivantes : • Ne retirez pas le carter. En ouvrant l'unité de CD-ROM ou de DVD-ROM, vous vous exposez au rayonnement - Lenovo H520e | Lenovo H520e Hardware Maintenance Manual - Page 22
enthalten sind. • Zum Installieren, Transportieren und Öffnen der Abdeckungen des Computers oder der angeschlossenen Einheiten die Kabel gemäß der folgenden Tabelle anschließen Entsorgung explodieren. Die Batterie nicht: • mit Wasser in Berührung bringen. 18 Lenovo H520e Hardware Maintenance Manual - Lenovo H520e | Lenovo H520e Hardware Maintenance Manual - Page 23
• über 100 C erhitzen. • reparieren oder zerlegen. Die örtlichen Bestimmungen für die Entsorgung von Sondermüll beachten. ACHTUNG: Bei der Installation von Lasergeräten (wie CD-ROM-Laufwerken, DVD- aufwerken, Einheiten mit Lichtwellenleitertechnik oder Sendern) Folgendes beachten: • Die Abdeckungen - Lenovo H520e | Lenovo H520e Hardware Maintenance Manual - Page 24
2 1 20 Lenovo H520e Hardware Maintenance Manual - Lenovo H520e | Lenovo H520e Hardware Maintenance Manual - Page 25
2 1 Chapter 2. Safety information 21 - Lenovo H520e | Lenovo H520e Hardware Maintenance Manual - Page 26
gradi F) • Smontarla, ricaricarla o tentare di ripararla Le batterie usate vanno smaltite in accordo alla normativa in vigore (DPR 915/82 e successive disposizioni e disposizioni locali). 22 Lenovo H520e Hardware Maintenance Manual - Lenovo H520e | Lenovo H520e Hardware Maintenance Manual - Page 27
vi sono parti su cui effettuare l'assistenza tecnica. • L'utilizzo di controlli, regolazioni o l'esecuzione di procedure non descritti nel presente manuale possono provocare l'esposizione a radiazioni pericolose. PERICOLO Alcune unità laser contengono un diodo laser di Classe 3A o Classe 3B. Tener - Lenovo H520e | Lenovo H520e Hardware Maintenance Manual - Page 28
24 Lenovo H520e Hardware Maintenance Manual - Lenovo H520e | Lenovo H520e Hardware Maintenance Manual - Page 29
2 1 PELIGRO La corriente eléctrica procedente de cables de alimentación, teléfonos y cables de comunicación puede ser peligrosa. Para evitar el riesgo de descarga eléctrica: • No conecte ni desconecte los cables ni realice ninguna tarea de instalación, mantenimiento o reconfiguración de este - Lenovo H520e | Lenovo H520e Hardware Maintenance Manual - Page 30
existe ninguna pieza que requiera servicio técnico. • Si usa controles o ajustes o realiza procedimientos que no sean los especificados aquí, podría exponerse a radiaciones peligrosas. PELIGRO 26 Lenovo H520e Hardware Maintenance Manual - Lenovo H520e | Lenovo H520e Hardware Maintenance Manual - Page 31
Algunos productos láser tienen incorporado un diodo láser de clase 3A o clase 3B. Tenga en cuenta lo siguiente: Cuando se abre, queda expuesto a radiación láser. No mire directamente al rayo láser, ni siquiera con instrumentos ópticos, y evite exponerse directamente al rayo láser. ≥18 kg ≥32 kg - Lenovo H520e | Lenovo H520e Hardware Maintenance Manual - Page 32
28 Lenovo H520e Hardware Maintenance Manual - Lenovo H520e | Lenovo H520e Hardware Maintenance Manual - Page 33
supported by this manual. Specifications This section lists the physical specifications for your computer. Dimensions Width: 160 mm (6.3 inches) Height: 375.3 mm (14.78 inches) Depth: 422.5 mm (16.63 inches) Weight Maximum configuration -selection switch setting: 230 V ac © Copyright Lenovo 2013 29 - Lenovo H520e | Lenovo H520e Hardware Maintenance Manual - Page 34
.lenovo.com/support This Web site is updated with the latest support information such as the following: • Drivers and software • Diagnostic solutions • Product and service warranty • Product and parts details • User guides and manuals • Knowledge base and frequently asked questions 30 Lenovo H520e - Lenovo H520e | Lenovo H520e Hardware Maintenance Manual - Page 35
following information to assist you in problem determination. If possible, have this information available when requesting assistance from Service Support and Engineering functions. • Machine type and model • Processor or hard disk drive upgrades • Failure symptom - Do diagnostics indicate a failure - Lenovo H520e | Lenovo H520e Hardware Maintenance Manual - Page 36
(version) 7. Have the same configuration options set in the system 8. Have the same setup for operating-system-controlled files Comparing the configuration and software set-up between "working and non-working" systems will often lead to problem resolution. 32 Lenovo H520e Hardware Maintenance Manual - Lenovo H520e | Lenovo H520e Hardware Maintenance Manual - Page 37
information to help you troubleshoot your computer problems. Note: If you cannot correct the problem, have the computer serviced. For a list of service and support telephone numbers, refer to the Safety, Warranty, and Setup Guide that comes with your computer or go to the Lenovo Support Web site at - Lenovo H520e | Lenovo H520e Hardware Maintenance Manual - Page 38
enabled in the BIOS settings of your computer. For more information about accessing and changing the BIOS settings, refer to your Chapter 6 "Using the Setup Utility program" on page 53. 4. Go to the "Troubleshooting" on page 35 and follow the instructions for the type of problem you are experiencing - Lenovo H520e | Lenovo H520e Hardware Maintenance Manual - Page 39
these actions solve the problem, seek technical assistance. See "Lenovo Support Web site" on page 30 for more information. Troubleshooting Use the troubleshooting information to find solutions to problems that have definite symptoms. If the symptom your computer is experiencing occurred immediately - Lenovo H520e | Lenovo H520e Hardware Maintenance Manual - Page 40
audio device drivers are correctly installed. See Microsoft Windows help system for more information. If these actions do not correct the problem, run the diagnostic programs (see "Lenovo Solution Center" on page 51 for instructions). If you need technical assistance, see "Lenovo Support Web site - Lenovo H520e | Lenovo H520e Hardware Maintenance Manual - Page 41
is permanently set and cannot be changed. If these actions do not correct the problem, run the diagnostic programs (see "Lenovo Solution Center" on page 51 for instructions). If you need technical assistance, see "Lenovo Support Web site" on page 30. Chapter 5. Troubleshooting and diagnostics 37 - Lenovo H520e | Lenovo H520e Hardware Maintenance Manual - Page 42
51 for instructions). If you need technical assistance, see "Lenovo Support Web site" on page 30. Playback is very slow or choppy Symptom: Playback is very slow or choppy. Actions: • Disable any background programs, such as AntiVirus or Desktop Themes. 38 Lenovo H520e Hardware Maintenance Manual - Lenovo H520e | Lenovo H520e Hardware Maintenance Manual - Page 43
LSI MegaRAID SAS adapter is installed. If these actions do not correct the problem, run the diagnostic program Lenovo Solution Center. See "Lenovo Solution Center" on page 51. If you need technical assistance, see "Lenovo Support Web site" on page 30. Chapter 5. Troubleshooting and diagnostics 39 - Lenovo H520e | Lenovo H520e Hardware Maintenance Manual - Page 44
- On the Windows 8 operating system, do the following: 1. Open Control Panel. 2. Click Hardware and Sound. 3. Click Devices and Printers. 4. Double-click USB Enhanced Performance Keyboard. The USB Enhanced Performance Keyboard Customization program starts. 40 Lenovo H520e Hardware Maintenance Manual - Lenovo H520e | Lenovo H520e Hardware Maintenance Manual - Page 45
If these actions do not correct the problem, have the computer and keyboard serviced. See "Lenovo Support Web site" on page 30 for details. The mouse or pointing device does not work Symptom: The mouse or pointing device does not work. Actions: • - Lenovo H520e | Lenovo H520e Hardware Maintenance Manual - Page 46
. If these actions do not correct the problem, run the diagnostic programs (see "Lenovo Solution Center" on page 51 for instructions). If you need technical assistance, see "Lenovo Support Web site" on page 30. The monitor works when you turn on the computer, but goes blank when you start some - Lenovo H520e | Lenovo H520e Hardware Maintenance Manual - Page 47
On the Windows 7 operating Lenovo Support Web site" on page 30. Ethernet problems For Ethernet problems, select your symptom from the following list: • "Your computer cannot connect to the network" on page 44 • "The adapter stops working for no apparent reason" on page 44 Chapter 5. Troubleshooting - Lenovo H520e | Lenovo H520e Hardware Maintenance Manual - Page 48
is not enabled. To update the driver, right-click the highlighted adapter. 5. Click Update Driver Software, and then follow the instructions on the screen. • The switch port and the adapter have the same duplex setting. If you configured the adapter for full duplex, ensure that the switch port - Lenovo H520e | Lenovo H520e Hardware Maintenance Manual - Page 49
case-sensitive information. A wireless WAN problem Message: Unauthorized WAN card is plugged in - Power off and remove the WAN card. Action: The WAN card is not supported on this computer. Remove it. Note: Some computer models do not have a wireless WAN. Chapter 5. Troubleshooting and diagnostics 45 - Lenovo H520e | Lenovo H520e Hardware Maintenance Manual - Page 50
the installation instructions supplied with the option and the installation instructions provided with your computer, and all option files (such as device drivers, if required) are installed correctly. • You have not loosened other installed options or cables. • If the option is an adapter, you have - Lenovo H520e | Lenovo H520e Hardware Maintenance Manual - Page 51
that the option and any required device drivers are installed correctly. If these actions do not correct the problem, run the diagnostic programs (see "Lenovo Solution Center" on page 51 for instructions). If you need technical assistance, see "Lenovo Support Web site" on page 30. Performance and - Lenovo H520e | Lenovo H520e Hardware Maintenance Manual - Page 52
running and close any open windows. 2. Open the Windows Explorer and click Computer. 3. Right-click your C drive entry and then click Properties. 4. Click the Tools tab. 5. Click Optimize. 6. Click Optimize again to start a disk-defragmentation process. 48 Lenovo H520e Hardware Maintenance Manual - Lenovo H520e | Lenovo H520e Hardware Maintenance Manual - Page 53
in the documentation that comes with your printer. If you cannot correct the problem, have the computer serviced. See "Lenovo Support Web site" on page 30. Serial port problems Use this information to troubleshoot the serial port and devices attached to the serial port. Symptom: Serial port - Lenovo H520e | Lenovo H520e Hardware Maintenance Manual - Page 54
the Windows Start menu. • To determine if problems are caused by newly installed software, verify that: - Your computer has the minimum memory requirements needed to use the software. See the information supplied with the software to verify memory requirements. (If you just installed an adapter or - Lenovo H520e | Lenovo H520e Hardware Maintenance Manual - Page 55
paper is loaded correctly. • Make sure any device drivers or other software supplied with the USB device is correctly installed. Refer to the Lenovo technical support representative. Lenovo Solution Center The Lenovo Solution Center program enables you to troubleshoot and resolve computer problems - Lenovo H520e | Lenovo H520e Hardware Maintenance Manual - Page 56
52 Lenovo H520e Hardware Maintenance Manual - Lenovo H520e | Lenovo H520e Hardware Maintenance Manual - Page 57
of passwords are available: • Power-On Password • Administrator Password • Hard Disk Password You do not have to set any passwords to use your computer. However, using passwords improves computing security. If you decide to set any passwords, read the following sections. © Copyright Lenovo 2013 53 - Lenovo H520e | Lenovo H520e Hardware Maintenance Manual - Page 58
Utility program main menu, select Security. 3. Depending on the password type, select Set Power-On Password, Set Administrator Password, or Hard Disk Password. 4. Follow the instructions on the right side of the screen to set, change, or delete a password. 54 Lenovo H520e Hardware Maintenance Manual - Lenovo H520e | Lenovo H520e Hardware Maintenance Manual - Page 59
) This section provides instructions on how to erase lost or forgotten passwords, such as a user password. To erase a lost or forgotten password, do the following: 1. Remove all media from the drives and turn off all attached devices and the computer. Then, disconnect all power cords from electrical - Lenovo H520e | Lenovo H520e Hardware Maintenance Manual - Page 60
The after power loss feature enables your computer to wake up when the power supply resumes after a sudden loss of electricity. To enable the after power loss feature, do the following: 1. Start the Setup Utility program. See "Starting the Setup Utility program" on page 53. 56 Lenovo H520e Hardware - Lenovo H520e | Lenovo H520e Hardware Maintenance Manual - Page 61
Power ➙ After Power Loss, and press Enter. 3. Select Power On and press Enter. 4. Press F10 to save changes and exit the Setup Utility program. Press Enter when prompted to confirm the exit. Changing the BIOS press Enter. When the Reset Without Saving window opens, select Yes, and then press Enter - Lenovo H520e | Lenovo H520e Hardware Maintenance Manual - Page 62
58 Lenovo H520e Hardware Maintenance Manual - Lenovo H520e | Lenovo H520e Hardware Maintenance Manual - Page 63
checkout" on page 31. You can use this index to help you decide which FRUs are needed when servicing a computer. If you are unable to correct the problem using this index, go to "Undetermined problems" on page 63. Notes: 1. If you have both an error message and an incorrect audio response, diagnose - Lenovo H520e | Lenovo H520e Hardware Maintenance Manual - Page 64
from a POST and BIOS update failure" on Each time you power-on the system problem. This error message is displayed when the memory size has decreased. Press F1 to enter the Setup Utility program. Then press F10 to save and exit the Setup Utility program. 60 Lenovo H520e Hardware Maintenance Manual - Lenovo H520e | Lenovo H520e Hardware Maintenance Manual - Page 65
1762 Configuration change has Utility program. More than one external fingerprint reader is attached. Power off and remove all but the reader that you set up system has been tampered with This error message is displayed when the computer is turned on with the cover open or removed. 0189 System - Lenovo H520e | Lenovo H520e Hardware Maintenance Manual - Page 66
new MAC address) Computer will not perform a Wake on LAN (if applicable) 1. Check power supply and signal cable connections to network adapter 2. Ensure that the operating system settings are set to enable Wake on LAN 3. Ensure Wake on LAN feature is enabled in Setup/Configuration (see "Starting - Lenovo H520e | Lenovo H520e Hardware Maintenance Manual - Page 67
System Board Undetermined problems If you encounter undetermined problems, do the following: 1. Turn off the computer and the power. 2. Remove or disconnect the following components (if installed) one at a time. a. External devices (modem, printer, or mouse) b. Any adapter cards c. Memory modules - Lenovo H520e | Lenovo H520e Hardware Maintenance Manual - Page 68
drive 3. Turn on the power and the computer to re-test the system. 4. Repeat steps 1 through 3 until you find the failing device or adapter cards. If all devices and adapter cards have been removed, and the problem continues, replace the system board. 64 Lenovo H520e Hardware Maintenance Manual - Lenovo H520e | Lenovo H520e Hardware Maintenance Manual - Page 69
(available on some models) 2 Power cord connector 3 DVI monitor connector 4 VGA monitor connector 5 USB connectors (USB ports 3 to 6) 6 Microphone connector 7 Audio line-out connector 8 Audio line-in connector 9 PCI Express x16 graphics card slot 10 PCI Express x1 card slots (2) 11 Integrated cable - Lenovo H520e | Lenovo H520e Hardware Maintenance Manual - Page 70
and fan assembly Memory modules Front bezel Hard disk drive PCI card (installed in some models) PCI Express x16 graphics card slot System board Power supply assembly Self-service CRU No Yes Yes No Yes Yes No No Optional-service CRU Yes No No Yes No NO No Yes 66 Lenovo H520e Hardware Maintenance - Lenovo H520e | Lenovo H520e Hardware Maintenance Manual - Page 71
7 24-pin power connector 8 Power fan connector 9 SATA connectors (3) 10 Front panel connector (for connecting LED indicators and power switch) 11 Front card slots (2) 20 PCI Express x16 graphics card slot 21 System fan connector Locating internal drives Internal drives are devices that your computer - Lenovo H520e | Lenovo H520e Hardware Maintenance Manual - Page 72
drive installed on some models) 2 Bay 2 - Primary hard disk drive bay (with a 3.5-inch SATA hard disk drive installed) 3 Bay 3 - Secondary hard disk drive bay 68 Lenovo H520e Hardware Maintenance Manual - Lenovo H520e | Lenovo H520e Hardware Maintenance Manual - Page 73
"Important safety information" in the User Guide. To obtain a copy of the User Guide, go to: http://www.lenovo.com/ThinkCentreUserGuides Notes: 1. Use only computer parts provided by Lenovo. 2. When installing or replacing an option, use the appropriate instructions in this section along with the - Lenovo H520e | Lenovo H520e Hardware Maintenance Manual - Page 74
and understanding the "Important safety information" in the User Guide. To obtain a copy of the User Guide, go to: http://www.lenovo.com/ThinkCentreUserGuides This section provides instructions on how to remove the computer cover. CAUTION: Turn off the computer and wait three to five minutes to let - Lenovo H520e | Lenovo H520e Hardware Maintenance Manual - Page 75
the User Guide. To obtain a copy of the User Guide, go to: http://www.lenovo.com/ThinkCentreUserGuides This section provides instructions on how to remove and reinstall the front bezel. To remove and reinstall the front bezel, do the following: 1. Turn off the computer and disconnect all power cords - Lenovo H520e | Lenovo H520e Hardware Maintenance Manual - Page 76
information" in the User Guide. To obtain a copy of the User Guide, go to: http://www.lenovo.com/ThinkCentreUserGuides This section provides instructions on how to install or replace a PCI card. Your computer has two PCI Express x1 card slots and one PCI Express x16 graphics card slot. To install - Lenovo H520e | Lenovo H520e Hardware Maintenance Manual - Page 77
3. At the rear of the computer, remove the screw that secures the PCI card latch. Figure 9. Removing the screw that secures the PCI card latch 4. Depending on whether you are installing or replacing a PCI card, do one of the following: • If you are installing a PCI card, remove the appropriate metal - Lenovo H520e | Lenovo H520e Hardware Maintenance Manual - Page 78
on the system board" on page 67. Note: If you are installing a PCI Express x16 graphics card, make sure the memory slot retaining clips are closed before you install the graphics card. 7. Pivot the card latch to the closed position to secure the PCI card. 74 Lenovo H520e Hardware Maintenance Manual - Lenovo H520e | Lenovo H520e Hardware Maintenance Manual - Page 79
information" in the User Guide. To obtain a copy of the User Guide, go to: http://www.lenovo.com/ThinkCentreUserGuides Your computer has a special type of memory that maintains the date, time, and settings for built-in features, such as parallel-port assignments (configuration). A battery keeps this - Lenovo H520e | Lenovo H520e Hardware Maintenance Manual - Page 80
on your computer model, you might need to remove the PCI Express x16 graphics card for easier access to the memory slots. See "Installing or replacing a PCI card" on page 72. 6. Depending on whether you are installing or replacing a memory module, do one of the following: 76 Lenovo H520e Hardware - Lenovo H520e | Lenovo H520e Hardware Maintenance Manual - Page 81
• If you are replacing an old memory module, open the retaining clips and gently pull the memory module out of the memory slot. Figure 14. Removing a memory module • If you are installing a memory module, open the retaining clips of the memory slot into which you want to install the memory module. - Lenovo H520e | Lenovo H520e Hardware Maintenance Manual - Page 82
User Guide, go to: http://www.lenovo.com/ThinkCentreUserGuides This section provides instructions on how to install or replace the optical drive. Note: The optical drive is only available in some models. To replace an optical drive, do the following: 1. Turn off the computer and disconnect all power - Lenovo H520e | Lenovo H520e Hardware Maintenance Manual - Page 83
Figure 17. Removing the optical drive 5. Slide the new optical drive into the drive bay from the front and align the screw holes in the new optical drive with the corresponding holes in the drive bay. Then, install the three screws to secure the new optical drive in place. Figure 18. Installing the - Lenovo H520e | Lenovo H520e Hardware Maintenance Manual - Page 84
safety information" in the User Guide. To obtain a copy of the User Guide, go to: http://www.lenovo.com/ThinkCentreUserGuides This section provides instructions on how to replace the heat sink and fan assembly. DANGER Attention/Caution/Danger icon, warning users and servicers of a hot surface nearby - Lenovo H520e | Lenovo H520e Hardware Maintenance Manual - Page 85
6. Follow this sequence to remove the four screws that secure the heat sink and fan assembly to the system board: a. Partially remove screw 1 , then fully remove screw 2 , and then fully remove screw 1 . b. Partially remove screw 3 , then fully remove screw 4 , and then fully remove screw 3 . Note: - Lenovo H520e | Lenovo H520e Hardware Maintenance Manual - Page 86
safety information" in the User Guide. To obtain a copy of the User Guide, go to: http://www.lenovo.com/ThinkCentreUserGuides This section provides instructions on how to replace the power supply assembly. Although there are no moving parts in your computer after the power cord has been disconnected - Lenovo H520e | Lenovo H520e Hardware Maintenance Manual - Page 87
Attention: Do not open your computer or attempt any repair before reading and understanding the "Important safety information" in the User Guide. To obtain a copy of the User Guide, go to: http://www.lenovo.com/ThinkCentreUserGuides This section provides instructions on how to replace the - Lenovo H520e | Lenovo H520e Hardware Maintenance Manual - Page 88
and align the small triangle on one corner of the new microprocessor with the corresponding small triangle on one corner of the microprocessor socket. 84 Lenovo H520e Hardware Maintenance Manual - Lenovo H520e | Lenovo H520e Hardware Maintenance Manual - Page 89
Attention: Do not open your computer or attempt any repair before reading and understanding the "Important safety information" in the User Guide. To obtain a copy of the User Guide, go to: http://www.lenovo.com/ThinkCentreUserGuides This section provides instructions on how to replace the system - Lenovo H520e | Lenovo H520e Hardware Maintenance Manual - Page 90
Replacing the heat sink and fan assembly" on page 80. 13. Install all memory modules and PCI cards removed from the failing system board on the new system board. See "Installing or replacing a memory module the microprocessor socket cover, do the following: 86 Lenovo H520e Hardware Maintenance Manual - Lenovo H520e | Lenovo H520e Hardware Maintenance Manual - Page 91
the User Guide. To obtain a copy of the User Guide, go to: http://www.lenovo.com/ThinkCentreUserGuides This section provides instructions on how to replace the primary hard disk drive. To replace the primary hard disk drive, do the following: 1. Turn off the computer and disconnect all power cords - Lenovo H520e | Lenovo H520e Hardware Maintenance Manual - Page 92
to an available SATA connector on the system board. See "Locating parts on the system board" on page 67. Then, locate an available five-wire power connector and connect it to the rear of the new hard disk drive. 88 Lenovo H520e Hardware Maintenance Manual - Lenovo H520e | Lenovo H520e Hardware Maintenance Manual - Page 93
User Guide. To obtain a copy of the User Guide, go to: http://www.lenovo.com/ThinkCentreUserGuides This section provides instructions on how to replace the front audio and USB assembly. To replace the front audio and USB assembly, do the following: 1. Turn off the computer and disconnect all power - Lenovo H520e | Lenovo H520e Hardware Maintenance Manual - Page 94
are routed correctly. Keep cables clear of the hinges and sides of the computer chassis to avoid interference with closing the computer cover. 3. If you have removed the front bezel, reinstall it. See "Removing and reinstalling the front bezel" on page 71. 90 Lenovo H520e Hardware Maintenance Manual - Lenovo H520e | Lenovo H520e Hardware Maintenance Manual - Page 95
. 7. Reconnect the external cables and power cords to the computer. See "Locating connectors on the rear of your computer" on page 65. 8. To update your configuration, refer to Chapter 6 "Using the Setup Utility program" on page 53. Note: In most areas of the world, Lenovo requires the return of the - Lenovo H520e | Lenovo H520e Hardware Maintenance Manual - Page 96
92 Lenovo H520e Hardware Maintenance Manual - Lenovo H520e | Lenovo H520e Hardware Maintenance Manual - Page 97
) for Lenovo desktop computer. Attention: to be replaced by the customer. Description Motherboard Intel H61 IVB DDR3 mATX(GA Level i5-3570S Ivy Bridge 6MB LGA 3.10GHz 65W i5-3470S Ivy Bridge 6MB LGA 2.9GHz 65W i3-3240 55W Ivy Bridge 3.4GHz 3MB 2C LGA i3 7200RPM / 3Gb / 8M Service part number (FRU) - Lenovo H520e | Lenovo H520e Hardware Maintenance Manual - Page 98
Rambo 8 - SATA 12XRAM WRITE for DOS DVD Recorder Rambo 8 - SATA 12XRAM WRITE for DOS 94 Lenovo H520e Hardware Maintenance Manual 45K0408 2 45K0408 2 45K0408 2 03T7039 2 03T7039 2 45K0627 2 03T7039 2 45K0410 2 45K0410 2 45K0410 2 45K0410 2 03T7041 2 03T7041 2 45K0630 - Lenovo H520e | Lenovo H520e Hardware Maintenance Manual - Page 99
DVI+DP WIN8 ATX Video Card DVI_I(M)-VGA(F) adpater Keyboard Lenovo Slim New F5 USB Keyboard-WIN8 Lenovo Slim New F5 USB Keyboard-WIN8 Mouse Lenovo Enhanced Optical USB Mouse Lenovo Enhanced Optical USB Mouse Power Cord C13 Power Cord C13 Power Cord C13 Power Cord Power Supply Tower PS3 180W for WW - Lenovo H520e | Lenovo H520e Hardware Maintenance Manual - Page 100
,MB_RUBBER_02,Sumba 20L Front main FRU Front I_O cable FRU SATA CABLE FRU SATA CABLE 03T9960 N 03T9982 N 03T9983 N 03T9984 N 03T9985 N 41R6206 N 54Y8274 N 54Y9929 N 54Y9948 N 96 Lenovo H520e Hardware Maintenance Manual - Lenovo H520e | Lenovo H520e Hardware Maintenance Manual - Page 101
computer, and where to obtain the latest level of BIOS. • To determine the current Level of BIOS: - Start the Setup Utility. - Select Standard CMOS Features. • Sources for obtaining the latest level BIOS available 1. Lenovo support web site: http://www.lenovo.com/support/ 2. Lenovo Customer Support - Lenovo H520e | Lenovo H520e Hardware Maintenance Manual - Page 102
-update disc. Go to http://www.lenovo.com/support. To update (flash) the BIOS from a disc on the Windows 8 (64-bit) operating system, instructions on the screen to complete the update. After the update is completed, remove the disc from the optical drive. 98 Lenovo H520e Hardware Maintenance Manual - Lenovo H520e | Lenovo H520e Hardware Maintenance Manual - Page 103
BIOS from your operating system, do the following: 1. Go to http://www.lenovo.com/support. 2. Do the following to locate the downloadable files for your machine type: a. Click Download & Drivers. b. In the left pane, click Downloads and drivers. c. From the Brand drop-down list box, select Desktops - Lenovo H520e | Lenovo H520e Hardware Maintenance Manual - Page 104
: If the computer has a properly configured token-ring or Ethernet LAN adapter card that is Wake on LAN-enabled and there is remote network management software, you can use the Wake on LAN feature. When you set Wake on LAN to Enabled, the computer will turn on when it receives a specific signal from - Lenovo H520e | Lenovo H520e Hardware Maintenance Manual - Page 105
are not intended for use in implantation or other life support applications where malfunction may result in injury or death to persons. The information contained in this document does not affect or change Lenovo product specifications or warranties. Nothing in this document shall operate as an - Lenovo H520e | Lenovo H520e Hardware Maintenance Manual - Page 106
Microsoft and Windows are trademarks of the Microsoft group of companies. Intel is the trademark of Intel Corporation in the United States, other countries, or both. Other company, product, or service names may be trademarks or service marks of others. 102 Lenovo H520e Hardware Maintenance Manual - Lenovo H520e | Lenovo H520e Hardware Maintenance Manual - Page 107
-service CRUs 66 P part numbers 1, 65 parts replacement, completing 90 password Administrator 54 considerations 54 Power-On Password 54 setting, changing, deleting 54 passwords erasing 55 lost or forgotten 55 passwords, using 53 PCI card 72 installing, replacing 72 slots 72 power supply assembly - Lenovo H520e | Lenovo H520e Hardware Maintenance Manual - Page 108
startup device 55 the BIOS, updating (flashing) 98-99 troubleshooting, basic 33 troubleshooting, diagnostics 33 U updating (flashing) the BIOS 98 updating (flashing) the BIOS 99 using passwords 53 Setup Utility 53 104 Lenovo H520e Hardware Maintenance Manual V viewing and changing settings - Lenovo H520e | Lenovo H520e Hardware Maintenance Manual - Page 109
- Lenovo H520e | Lenovo H520e Hardware Maintenance Manual - Page 110
-
 1
1 -
 2
2 -
 3
3 -
 4
4 -
 5
5 -
 6
6 -
 7
7 -
8
-
9
-
10
-
11
-
12
-
13
-
14
-
15
-
16
-
17
-
18
-
19
-
20
-
21
-
22
-
23
-
24
-
25
-
26
-
27
-
28
-
29
-
30
-
31
-
32
-
33
-
34
-
35
-
36
-
37
-
38
-
39
-
40
-
41
-
42
-
43
-
44
-
45
-
46
-
47
-
48
-
49
-
50
-
51
-
52
-
53
-
54
-
55
-
56
-
57
-
58
-
59
-
60
-
61
-
62
-
63
-
64
-
65
-
66
-
67
-
68
-
69
-
70
-
71
-
72
-
73
-
74
-
75
-
76
-
77
-
78
-
79
-
80
-
81
-
82
-
83
-
84
-
85
-
86
-
87
-
88
-
89
-
90
-
91
-
92
-
93
-
94
-
95
-
96
-
97
-
98
-
99
-
100
-
101
-
102
-
103
-
104
-
105
-
106
-
107
-
108
-
109
-
110
 |
 |

Lenovo H520e Hardware Maintenance Manual
Machine Types:
90AM