Lenovo NetVista A22 User guide for NetVista 2256, 2257, 6339, 6341, 6342, 6346 - Page 35
Geheugen installeren, DIMM's installeren, Gebruik 3, 3 V, synchroon, 168-pens, ongebufferd, 133 MHz
 |
View all Lenovo NetVista A22 manuals
Add to My Manuals
Save this manual to your list of manuals |
Page 35 highlights
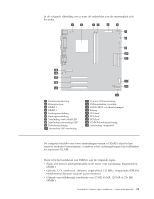
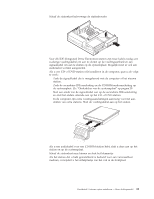
In de volgende afbeelding ziet u waar de onderdelen van de systeemplaat zich bevinden. 1 Ventilatoraansluiting 2 Microprocessor 3 DIMM 1 4 DIMM 2 5 Voedingsaansluiting 6 Voedingsaansluiting 7 Aansluiting vaste schijf-LED 8 Aansluiting netvoedings-LED 9 Disketteaansluiting 10 Secundaire IDE-aansluiting 11 Primaire IDE-aansluiting 12 USB-aansluiting voorzijde 13 CMOS/BIOS wis/herstel-jumper 14 Batterij 15 PCI-sleuf 16 PCI-sleuf 17 PCI-sleuf 18 CD-ROM-audioaansluiting 19 Aansluiting voorpaneel Geheugen installeren De computer beschikt over twee aansluitingen waarin u DIMM's (dual in-line memory modules) kunt plaatsen, waardoor u het systeemgeheugen kunt uitbreiden tot maximaal 512 MB. DIMM's installeren Houd u bij het installeren van DIMM's aan de volgende regels: v Plaats een nieuwe geheugenmodule in de eerste vrije aansluiting, beginnend bij DIMM 1 v Gebruik 3,3 V, synchroon, 168-pens, ongebufferd, 133 MHz, nonpariteits SDRAM (synchronous dynamic random access memory) v Gebruik een willekeurige combinatie van 32 MB, 64 MB, 128 MB of 256 MB DIMM's Hoofdstuk 3. Interne opties installeren - klein desktopmodel 21
-
 1
1 -
2
-
3
-
4
-
5
-
6
-
7
-
8
-
9
-
10
-
11
-
12
-
13
-
14
-
15
-
16
-
17
-
18
-
19
-
20
-
21
-
22
-
23
-
24
-
25
-
26
-
27
-
28
-
29
-
 30
30 -
 31
31 -
 32
32 -
 33
33 -
 34
34 -
 35
35 -
 36
36 -
 37
37 -
 38
38 -
 39
39 -
 40
40 -
41
-
42
-
43
-
44
-
45
-
46
-
47
-
48
-
49
-
50
-
51
-
52
-
53
-
54
-
55
-
56
-
57
-
58
-
59
-
60
-
61
-
62
-
63
-
64
-
65
-
66
-
67
-
68
-
69
-
70
-
71
-
72
-
73
-
74
-
75
-
76
-
77
-
78
-
79
-
80
-
81
-
82
-
83
-
84
-
85
-
86
-
87
-
88
 |
 |
