Lenovo Tab 2 A7-30 (English) Hardware Maintenance Manual - Lenovo TAB 2 A7-30 - Page 54
Vibrator motor, Speaker see Step 2 on in 1040 Speaker
 |
View all Lenovo Tab 2 A7-30 manuals
Add to My Manuals
Save this manual to your list of manuals |
Page 54 highlights
Lenovo TAB 2 A7-30 Hardware Maintenance Manual 1080 Vibrator motor For access, remove the following FRU: • "1010 Rear cover and side key" on page 28 and Detach the following FPC and FRUs: • Battery FPC (see Step 1 on page 30 to Step 3 on page 31 in "1020 Battery pack") • Speaker (see Step 2 on page 36 in "1040 Speaker") • Main board (see Step 1 on page 45 to Step 3 on page 46 in "1070 Main board assembly (with front camera and side key FPC)") 1. Desolder the wires of the vibrator motor from their connecting points on the main board at the position shown in the figure below. Figure 8-1. Position for desoldering the wires of the vibrator motor 50
-
 1
1 -
2
-
3
-
4
-
5
-
6
-
7
-
8
-
9
-
10
-
11
-
12
-
13
-
14
-
15
-
16
-
17
-
18
-
19
-
20
-
21
-
22
-
23
-
24
-
25
-
26
-
27
-
28
-
29
-
30
-
31
-
32
-
33
-
34
-
35
-
36
-
37
-
38
-
39
-
40
-
41
-
42
-
43
-
44
-
45
-
46
-
47
-
48
-
 49
49 -
 50
50 -
 51
51 -
 52
52 -
 53
53 -
 54
54 -
 55
55 -
 56
56 -
 57
57 -
 58
58 -
 59
59 -
60
-
61
-
62
-
63
-
64
-
65
-
66
-
67
 |
 |

Lenovo TAB 2 A7-30 Hardware Maintenance Manual
50
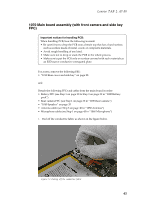
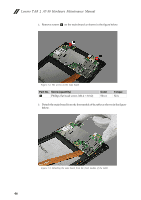
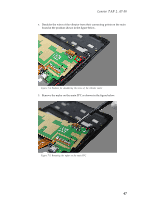
1080 Vibrator motor
For access, remove the following FRU:
•
“1010 Rear cover and side key” on page 28
and
Detach the following FPC and FRUs:
•
Battery FPC (see Step 1 on page 30 to Step 3 on page 31 in “1020 Battery
pack”)
•
Speaker (see Step 2 on page 36 in “1040 Speaker”)
•
Main board (see Step 1 on page 45 to Step 3 on page 46 in “1070 Main board
assembly (with front camera and side key FPC)”)
1.
Desolder the wires of the vibrator motor from their connecting points on the
main board at the position shown in the figure below.
Figure 8-1. Position for desoldering the wires of the vibrator motor