Lenovo ThinkCentre A52 (English) Rescue and Recovery 4.3 Deployment Guide - Page 59
Best practices, Scenario 1 - New rollouts, Preparing the hard disk drive, Installing
 |
View all Lenovo ThinkCentre A52 manuals
Add to My Manuals
Save this manual to your list of manuals |
Page 59 highlights
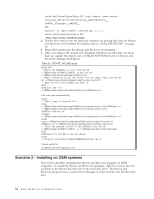
Chapter 4. Best practices This chapter provides best practice scenarios to install and configure the Rescue and Recovery program for your enterprise. Within this chapter, you will find the following topics: v "Scenario 1 - New rollouts" v "Scenario 2 - Installing on OEM systems" on page 54 v "Scenario 3 - Installing with WIM files and Windows 7" on page 56 v "Scenario 4 - Standalone install for CD or script files" on page 57 v "Scenario 5 - Working with Active Directory and ADM files" on page 57 v "Scenario 6 - Performing a Bare Metal Restore from an Admin Backup" on page 58 v "Scenario 7 - Manually creating the Service Partition of S drive" on page 58 Scenario 1 - New rollouts This section describes installing the Rescue and Recovery program in a new rollout on Lenovo-branded computers. Preparing the hard disk drive The first step to consider when deploying a system is preparing the hard disk drive of your donor system. In order to make sure you are starting with a clean hard disk drive, you must clean out the Master Boot Record on the primary hard disk drive. 1. Remove all storage devices, such as second hard disk drives, USB hard disk drives, USB memory keys and PC Card Memory from the donor system, except the primary hard disk that you are going to install Windows on. Attention: Running this command will erase the entire contents of the target hard disk drive. After running, you will be unable to recover any data from the target hard disk drive. 2. Create a DOS boot diskette and place the cleandrv.exe file on it. 3. Boot the diskette (only one storage device attached). At the DOS prompt, type the following command: CLEANDRV /HDD=0 4. Install the operating system and applications. Build your donor system as though you were not installing the Rescue and Recovery program. The last step in the process is to install the Rescue and Recovery program. Installing This first step in the installation process is the extraction of the InstallShield executable to the c:\SWTOOLS directory. If you are going to install the Rescue and Recovery program on multiple systems, performing this process one time will reduce the installation time on each machine by roughly one-half. 1. Assuming that the installation file is located in the root of the C drive, create a file EXE_EXTRACT.cmd, which will extract the file z902zisXXXXus00.exe for Windows 7 (where XXXX is the build ID) to the C:\SWTOOLS\APPS\rnr directory: :: This package will extract the WWW EXE to the directory c:\SWTOOLS for an :: administrative installation. © Copyright Lenovo 2008, 2009 51
-
 1
1 -
2
-
3
-
4
-
5
-
6
-
7
-
8
-
9
-
10
-
11
-
12
-
13
-
14
-
15
-
16
-
17
-
18
-
19
-
20
-
21
-
22
-
23
-
24
-
25
-
26
-
27
-
28
-
29
-
30
-
31
-
32
-
33
-
34
-
35
-
36
-
37
-
38
-
39
-
40
-
41
-
42
-
43
-
44
-
45
-
46
-
47
-
48
-
49
-
50
-
51
-
52
-
53
-
 54
54 -
 55
55 -
 56
56 -
 57
57 -
 58
58 -
 59
59 -
 60
60 -
 61
61 -
 62
62 -
 63
63 -
 64
64 -
65
-
66
-
67
-
68
-
69
-
70
-
71
-
72
-
73
-
74
-
75
-
76
-
77
-
78
-
79
-
80
-
81
-
82
-
83
-
84
-
85
-
86
-
87
-
88
-
89
-
90
-
91
-
92
-
93
-
94
-
95
-
96
 |
 |