Lenovo ThinkCentre M51e (English) Quick reference guide - Page 44
Running, Diagnostics, Rescue, Recovery, workspace, Creating, diskette
 |
View all Lenovo ThinkCentre M51e manuals
Add to My Manuals
Save this manual to your list of manuals |
Page 44 highlights
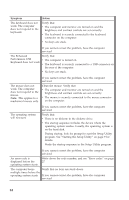
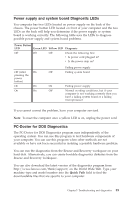
Running Diagnostics from the Rescue and Recovery workspace Use the following steps to run diagnostics from the Rescue and Recovery workspace: 1. Shut down your operating system, and turn off the computer. 2. When you turn on your computer, repeatedly press and release the Enter or F11 key when indicated on the screen to start the Rescue and Recovery workspace. 3. From the main menu, select Diagnose Hardware. 4. Follow the prompts on the screen. 5. Restart the computer. Creating a Diagnostics diskette Use the following steps to create a diagnostics diskette: 1. Shut down your operating system, and turn off the computer. 2. When you turn on your computer, repeatedly press and release the Enter or F11 key when indicated on the screen to start the Rescue and Recovery workspace. 3. From the main menu, select Create a diagnostics disk. 4. Follow the instructions on the screen. 5. When prompted, insert a blank, formatted diskette into the diskette drive, and follow the instructions on the screen. Notes: 1. You can also download the latest version of the diagnostic program from http://www.lenovo.com/think/support/ on the World Wide Web. In the Quick Path field, type your machine type to find the downloadable files specific to your computer. 2. You can download a self starting bootable CD image (known as an .iso image) of the diagnostics program from http://www.lenovo.com/think/support to support systems without a diskette drive. Running the Diagnostics diskette Use the following steps to run the diagnostics diskette or CD image: 1. Shut down the operating system, and turn off the computer. 2. Insert the diagnostics diskette into the diskette drive or CD into the drive. 3. Turn on your computer. 4. When the diagnostics program opens, Follow the instructions that are displayed on the screen. For help, press F1. 5. When the program finishes, remove the diskette or CD from the drive. 26
-
 1
1 -
2
-
3
-
4
-
5
-
6
-
7
-
8
-
9
-
10
-
11
-
12
-
13
-
14
-
15
-
16
-
17
-
18
-
19
-
20
-
21
-
22
-
23
-
24
-
25
-
26
-
27
-
28
-
29
-
30
-
31
-
32
-
33
-
34
-
35
-
36
-
37
-
38
-
 39
39 -
 40
40 -
 41
41 -
 42
42 -
 43
43 -
 44
44 -
 45
45 -
 46
46 -
 47
47 -
 48
48 -
 49
49 -
50
-
51
-
52
-
53
-
54
-
55
-
56
-
57
-
58
-
59
-
60
-
61
-
62
-
63
-
64
-
65
-
66
-
67
-
68
-
69
-
70
-
71
-
72
-
73
-
74
-
75
-
76
-
77
-
78
-
79
-
80
-
81
-
82
-
83
-
84
-
85
-
86
-
87
-
88
-
89
-
90
-
91
-
92
-
93
-
94
 |
 |
