Lenovo ThinkCentre M55p User Manual - Page 41
Installing, adapters
 |
View all Lenovo ThinkCentre M55p manuals
Add to My Manuals
Save this manual to your list of manuals |
Page 41 highlights
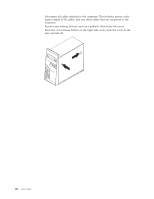
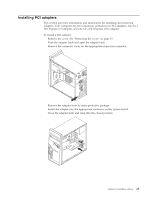
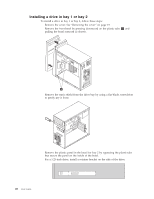
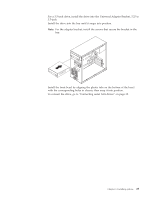
Installing PCI adapters This section provides information and instructions for installing and removing adapters. Your computer has two expansion connectors for PCI adapters, one for a PCI Express (x1) adapter, and one for a PCI Express (x16) adapter. To install a PCI adapter: 1. Remove the cover. See "Removing the cover" on page 19. 2. Push the adapter latch and open the adapter latch. 3. Remove the connector cover for the appropriate expansion connector. 4. Remove the adapter from its static-protective package. 5. Install the adapter into the appropriate connector on the system board. 6. Close the adapter latch and snap into the closed position. Chapter 3. Installing options 25
-
 1
1 -
2
-
3
-
4
-
5
-
6
-
7
-
8
-
9
-
10
-
11
-
12
-
13
-
14
-
15
-
16
-
17
-
18
-
19
-
20
-
21
-
22
-
23
-
24
-
25
-
26
-
27
-
28
-
29
-
30
-
31
-
32
-
33
-
34
-
35
-
 36
36 -
 37
37 -
 38
38 -
 39
39 -
 40
40 -
 41
41 -
 42
42 -
 43
43 -
 44
44 -
 45
45 -
 46
46 -
47
-
48
-
49
-
50
-
51
-
52
-
53
-
54
-
55
-
56
-
57
-
58
-
59
-
60
-
61
-
62
-
63
-
64
-
65
-
66
-
67
-
68
-
69
-
70
-
71
-
72
-
73
-
74
-
75
-
76
-
77
-
78
-
79
-
80
-
81
-
82
-
83
-
84
-
85
-
86
-
87
-
88
-
89
-
90
 |
 |
Installing
PCI
adapters
This
section
provides
information
and
instructions
for
installing
and
removing
adapters.
Your
computer
has
two
expansion
connectors
for
PCI
adapters,
one
for
a
PCI
Express
(x1)
adapter,
and
one
for
a
PCI
Express
(x16)
adapter.
To
install
a
PCI
adapter:
1.
Remove
the
cover.
See
“Removing
the
cover”
on
page
19.
2.
Push
the
adapter
latch
and
open
the
adapter
latch.
3.
Remove
the
connector
cover
for
the
appropriate
expansion
connector.
4.
Remove
the
adapter
from
its
static-protective
package.
5.
Install
the
adapter
into
the
appropriate
connector
on
the
system
board.
6.
Close
the
adapter
latch
and
snap
into
the
closed
position.
Chapter
3.
Installing
options
25