Lenovo ThinkCentre M71z (English) User guide - Page 41
Installing or replacing hardware, Installing external options
 |
View all Lenovo ThinkCentre M71z manuals
Add to My Manuals
Save this manual to your list of manuals |
Page 41 highlights
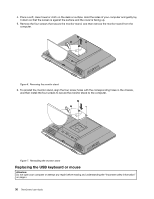
Chapter 5. Installing or replacing hardware This chapter provides instructions on how to install or replace hardware for your computer. Installing or replacing hardware This section provides instructions on how to install or replace hardware for your computer. You can expand the capabilities of your computer and maintain your computer by installing or replacing hardware. Attention: Do not open your computer or attempt any repair before reading and understanding the "Important safety information" on page v. Notes: 1. Use only computer parts provided by Lenovo. 2. When installing or replacing an option, use the appropriate instructions in this section along with the instructions that come with the option. Installing external options You can connect external options to your computer, such as external speakers, a printer, or a scanner. For some external options, you must install additional software in addition to making the physical connection. When installing an external option, see "Locating connectors, controls, and indicators on the front of your computer" on page 8 and "Locating connectors on the rear of your computer" on page 9 to identify the required connector. Then, use the instructions that come with the option to help you make the connection and install any software or device drivers that are required for the option. Installing a computer wall mount Note: When installing a computer wall mount, make sure that you leave at least a 60 mm (2.36 inches) space between the wall and your computer for easy access to the connectors on the computer rear panel. Removing and reinstalling the monitor stand Attention: Do not open your computer or attempt any repair before reading and understanding the "Important safety information" on page v. This section provides instructions on how to remove and reinstall the monitor stand. CAUTION: Turn off the computer and wait three to five minutes to let the computer cool before removing the monitor stand. To remove and reinstall the monitor stand, do the following: 1. Remove any media from the drives and turn off all attached devices and the computer. 2. Disconnect all power cords from electrical outlets. 3. Disconnect the power cords, Input/Output cables, and any other cables that are connected to the computer. See "Locating connectors, controls, and indicators on the front of your computer" on page 8 and "Locating connectors on the rear of your computer" on page 9. © Copyright Lenovo 2011, 2012 29
-
 1
1 -
2
-
3
-
4
-
5
-
6
-
7
-
8
-
9
-
10
-
11
-
12
-
13
-
14
-
15
-
16
-
17
-
18
-
19
-
20
-
21
-
22
-
23
-
24
-
25
-
26
-
27
-
28
-
29
-
30
-
31
-
32
-
33
-
34
-
35
-
 36
36 -
 37
37 -
 38
38 -
 39
39 -
 40
40 -
 41
41 -
 42
42 -
 43
43 -
 44
44 -
 45
45 -
 46
46 -
47
-
48
-
49
-
50
-
51
-
52
-
53
-
54
-
55
-
56
-
57
-
58
-
59
-
60
-
61
-
62
-
63
-
64
-
65
-
66
-
67
-
68
-
69
-
70
-
71
-
72
-
73
-
74
-
75
-
76
-
77
-
78
-
79
-
80
-
81
-
82
-
83
-
84
-
85
-
86
-
87
-
88
-
89
-
90
-
91
-
92
-
93
-
94
-
95
-
96
-
97
-
98
-
99
-
100
-
101
-
102
-
103
-
104
-
105
-
106
 |
 |
