Lenovo ThinkCentre M72e Hardware Maintenance Manual (HMM) - Page 128
Installing or replacing a PCI card
 |
View all Lenovo ThinkCentre M72e manuals
Add to My Manuals
Save this manual to your list of manuals |
Page 128 highlights
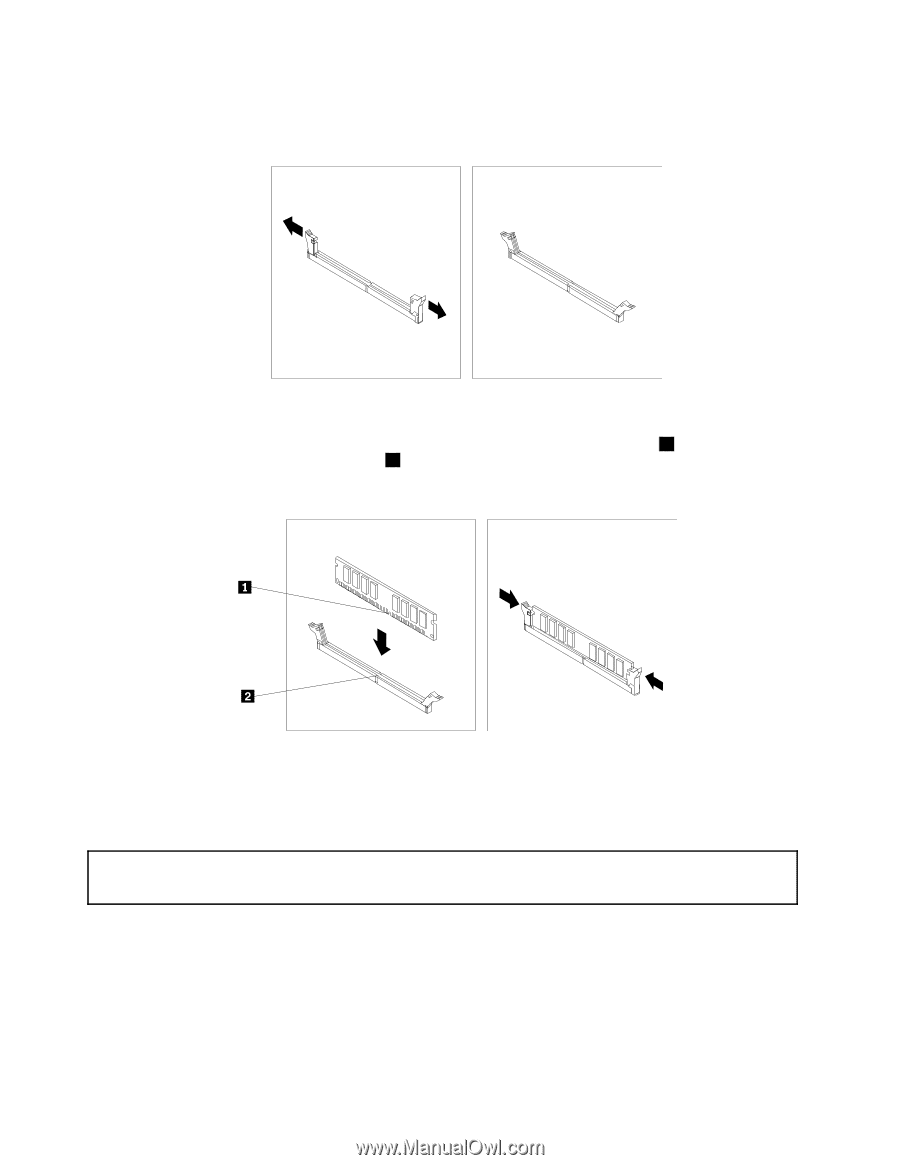
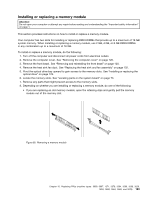
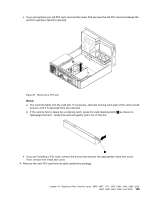
• If you are installing a memory module, open the retaining clips of the memory slot into which you want to install the memory module. Figure 59. Opening the retaining clips 9. Position the new memory module over the memory slot. Make sure that the notch 1 on the memory module aligns correctly with the slot key 2 on the system board. Push the memory module straight down into the slot until the retaining clips close. Figure 60. Installing a memory module 10. To complete the installation or replacement, go to "Completing the parts replacement" on page 156. Installing or replacing a PCI card Attention: Do not open your computer or attempt any repair before reading and understanding the "Important safety information" on page 1. This section provides instructions on how to install or replace a PCI card. Your computer has two PCI Express x1 card slot and one PCI Express x16 graphics card slot. To install or replace a PCI card, do the following: 1. Turn off the computer and disconnect all power cords from electrical outlets. 2. Remove the computer cover. See "Removing the computer cover" on page 120. 3. Depending on whether you are installing or replacing a PCI card, do one of the following: 124 ThinkCentre Hardware Maintenance Manual
-
 1
1 -
2
-
3
-
4
-
5
-
6
-
7
-
8
-
9
-
10
-
11
-
12
-
13
-
14
-
15
-
16
-
17
-
18
-
19
-
20
-
21
-
22
-
23
-
24
-
25
-
26
-
27
-
28
-
29
-
30
-
31
-
32
-
33
-
34
-
35
-
36
-
37
-
38
-
39
-
40
-
41
-
42
-
43
-
44
-
45
-
46
-
47
-
48
-
49
-
50
-
51
-
52
-
53
-
54
-
55
-
56
-
57
-
58
-
59
-
60
-
61
-
62
-
63
-
64
-
65
-
66
-
67
-
68
-
69
-
70
-
71
-
72
-
73
-
74
-
75
-
76
-
77
-
78
-
79
-
80
-
81
-
82
-
83
-
84
-
85
-
86
-
87
-
88
-
89
-
90
-
91
-
92
-
93
-
94
-
95
-
96
-
97
-
98
-
99
-
100
-
101
-
102
-
103
-
104
-
105
-
106
-
107
-
108
-
109
-
110
-
111
-
112
-
113
-
114
-
115
-
116
-
117
-
118
-
119
-
120
-
121
-
122
-
 123
123 -
 124
124 -
 125
125 -
 126
126 -
 127
127 -
 128
128 -
 129
129 -
 130
130 -
 131
131 -
 132
132 -
 133
133 -
134
-
135
-
136
-
137
-
138
-
139
-
140
-
141
-
142
-
143
-
144
-
145
-
146
-
147
-
148
-
149
-
150
-
151
-
152
-
153
-
154
-
155
-
156
-
157
-
158
-
159
-
160
-
161
-
162
-
163
-
164
-
165
-
166
-
167
-
168
-
169
-
170
 |
 |