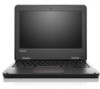
Lenovo ThinkPad 11e Chromebook Hardware Maintenance Manual - ThinkPad 11e Chro - Page 3

Contents, Locations - manual

Page 3 highlights

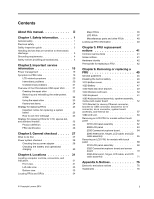
Contents About this manual iii Chapter 1. Safety information 1 General safety 1 Electrical safety 1 Safety inspection guide 2 Handling devices that are sensitive to electrostatic discharge 3 Grounding requirements 4 Safety notices (multilingual translations 4 Chapter 2. Important service information 19 Power management 19 Symptom-to-FRU index 19 LCD-related symptoms 20 Intermittent problems 20 Undetermined problems 21 Overview of the Chromebook USB repair shim . . 21 Creating the repair shim 22 Removing and reinstalling the write-protect screw 22 Using the repair shim 23 Factory test items 24 Strategy for replacing FRUs 25 Important notice for replacing a system board 25 How to use error message 25 Strategy for replacing FRUs for CTO, special-bid, and standard models 25 Product definition 25 FRU identification 26 Chapter 3. General checkout . . . . . 27 What to do first 27 Power system checkout 28 Checking the ac power adapter 28 Checking the battery and operational charging 29 Chapter 4. Locations 31 Locating computer controls, connectors, and indicators 31 Front view 31 Left-side view 33 Bottom view 33 Locating FRUs and CRUs 34 Major FRUs 35 LCD FRUs 37 Miscellaneous parts and other FRUs . . . . 40 Looking up FRU information 40 Chapter 5. FRU replacement notices 41 Common service tools 41 Screw notices 41 Hardware identity 42 Prerequisite for replacing a FRU 42 Chapter 6. Removing or replacing a FRU 45 General guidelines 45 Disabling the built-in battery 46 1010 Bottom cover 46 1020 Battery 47 1030 Hard disk drive bracket 49 1040 Wireless LAN card 50 1050 Keyboard 51 1060 Keyboard bezel assembly, speaker assembly, media-card-reader board 52 1070 Bracket for dummy Ethernet connector, bracket for USB connector, bracket for dc-in connector, dc-in connector, system board assembly, and thermal fan 57 1080 LCD unit 60 Removing an LCD FRU for models without touch panel 62 2010 LCD bezel assembly 62 2020 LCD panel 63 2030 Camera/microphone board 64 2040 Antenna kit, hinges, LCD cable, and LED cable assembly 65 Removing an LCD FRU for models with touch panel 68 3010 LCD panel assembly 68 3020 Camera/microphone board and sensor board 70 3030 Antenna kit, hinges, LCD cable, and LED cable assembly 71 Appendix A. Notices 75 Electronic emissions notices 76 Trademarks 76 © Copyright Lenovo 2014 i

  • 1
  • 2
  • 3
  • 4
  • 5
  • 6
  • 7
  • 8
  • 9
  • 10
  • 11
  • 12
  • 13
  • 14
  • 15
  • 16
  • 17
  • 18
  • 19
  • 20
  • 21
  • 22
  • 23
  • 24
  • 25
  • 26
  • 27
  • 28
  • 29
  • 30
  • 31
  • 32
  • 33
  • 34
  • 35
  • 36
  • 37
  • 38
  • 39
  • 40
  • 41
  • 42
  • 43
  • 44
  • 45
  • 46
  • 47
  • 48
  • 49
  • 50
  • 51
  • 52
  • 53
  • 54
  • 55
  • 56
  • 57
  • 58
  • 59
  • 60
  • 61
  • 62
  • 63
  • 64
  • 65
  • 66
  • 67
  • 68
  • 69
  • 70
  • 71
  • 72
  • 73
  • 74
  • 75
  • 76
  • 77
  • 78
  • 79
  • 80
  • 81
  • 82
  • 83
  • 84

Contents
Aboutthismanual
...........
iii
Chapter1.Safetyinformation
......
1
General safety
................
1
Electrical safety
...............
1
Safety inspection guide
............
2
Handling devices that are sensitive to electrostatic
discharge
..................
3
Grounding requirements
............
4
Safety notices (multilingual translations)
......
4
Chapter2.Importantservice
information
..............
19
Power management
............
19
Symptom-to-FRU index
...........
19
LCD-related symptoms
.........
20
Intermittent problems
..........
20
Undetermined problems
.........
21
Overview of the Chromebook USB repair shim . .
21
Creating the repair shim
.........
22
Removing and reinstalling the write-protect
screw
................
22
Using the repair shim
..........
23
Factory test items
............
24
Strategy for replacing FRUs
.........
25
Important notice for replacing a system
board
................
25
How to use error message
........
25
Strategy for replacing FRUs for CTO, special-bid,
and standard models
............
25
Product definition
............
25
FRU identification
............
26
Chapter3.Generalcheckout
.....
27
What to do first
..............
27
Power system checkout
...........
28
Checking the ac power adapter
......
28
Checking the battery and operational
charging
...............
29
Chapter4.Locations
.........
31
Locating computer controls, connectors, and
indicators
.................
31
Front view
...............
31
Left-side view
.............
33
Bottom view
..............
33
Locating FRUs and CRUs
..........
34
Major FRUs
..............
35
LCD FRUs
..............
37
Miscellaneous parts and other FRUs
....
40
Looking up FRU information
.........
40
Chapter5.FRUreplacement
notices
................
41
Common service tools
...........
41
Screw notices
...............
41
Hardware identity
.............
42
Prerequisite for replacing a FRU
........
42
Chapter6.Removingorreplacinga
FRU
..................
45
General guidelines
.............
45
Disabling the built-in battery
.........
46
1010 Bottom cover
.............
46
1020 Battery
...............
47
1030 Hard disk drive bracket
.........
49
1040 Wireless LAN card
...........
50
1050 Keyboard
..............
51
1060 Keyboard bezel assembly, speaker assembly,
media-card-reader board
..........
52
1070 Bracket for dummy Ethernet connector,
bracket for USB connector, bracket for dc-in
connector, dc-in connector, system board
assembly, and thermal fan
..........
57
1080 LCD unit
...............
60
Removing an LCD FRU for models without touch
panel
..................
62
2010 LCD bezel assembly
........
62
2020 LCD panel
............
63
2030 Camera/microphone board
......
64
2040 Antenna kit, hinges, LCD cable, and LED
cable assembly
............
65
Removing an LCD FRU for models with touch
panel
..................
68
3010 LCD panel assembly
........
68
3020 Camera/microphone board and sensor
board
................
70
3030 Antenna kit, hinges, LCD cable, and LED
cable assembly
............
71
AppendixA.Notices
..........
75
Electronic emissions notices
.........
76
Trademarks
................
76
© Copyright Lenovo 2014
i