Lenovo ThinkPad R40 (English) Deployment Guide for IBM Access Connections - Page 24
Deploying, Access, Connections, location, profiles, remotely, Unattended, deployment - removing password
 |
View all Lenovo ThinkPad R40 manuals
Add to My Manuals
Save this manual to your list of manuals |
Page 24 highlights
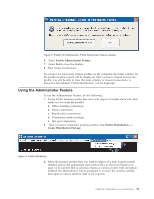
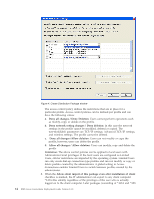
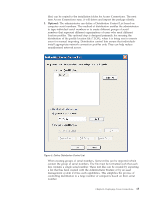
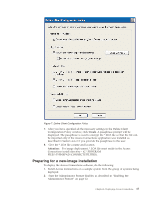
3. Create the location profiles, as described in section "Using the Administrator Feature" on page 13. 4. Create the deployment package, as described in section "Using the Administrator Feature" on page 13. 5. While creating the location deployment package, mark the check box beside Do not allow clients to become administrator in the Client Configuration Policy window. 6. Save the *.loa and the *.sig files, which were created in "Using the Administrator Feature" on page 13, to another computer, removable media, or network drive to generate a collection of deployment packages. Note: The *.sig file contains the signature data generated from the password used in generating the deployment package. This file will be located in the install directory of Access Connections, typically C:\PROGRAM FILES\THINKPAD\CONNECTUTILITIES 7. Install Access Connections on the image building system according to your process. v If the computer that you are using to create the build image is the same as a computer on which you created the location profiles, uninstall Access Connections from the build-image computer so that the Administrator Feature is removed. Add Access Connections to the image in an uninstalled state. Simply create a directory that contains the setup files plus the *.loa and *.sig files, which were saved in step 6. v Add a new DWORD value under HKLM\SOFTWARE\Microsoft\Windows\CurrentVersion\RunOnce in the registry. v Name the value ACinstall and set it to \setup.exe -s 8. Upon the first boot of the client computers, Access Connections will silently install and automatically launch. Access Connections will import the *.loa file silently. The *.loa and *.sig files will be deleted Deploying Access Connections location profiles remotely There are two ways to deploy Access Connections remotely: unattended deployment and attended deployment. The following sections will describe each remote deployment method. Unattended deployment After computers have been deployed in the manner discussed in "Preparing for a new-image installation" on page 17, an administrator can use systems management applications (such as SMS, Tivoli®, etc.) to push updated *.loa files to the client and have Access Connections silently import them if the following conditions are met: 1. The *.loa files must be created using the exact password which was used originally in the build that was deployed on the client computer. 2. The *.loa files must be placed in the Access Connections installation directory. Access Connections must be restarted, either by restarting the computer or by closing the System Tray icon (QCTRAY.EXE), and then launching Access Connections again. 18 IBM Access Connections Deployment Guide Version 3.3.0
-
 1
1 -
2
-
3
-
4
-
5
-
6
-
7
-
8
-
9
-
10
-
11
-
12
-
13
-
14
-
15
-
16
-
17
-
18
-
 19
19 -
 20
20 -
 21
21 -
 22
22 -
 23
23 -
 24
24 -
 25
25 -
 26
26 -
 27
27 -
 28
28
 |
 |