Lenovo ThinkPad T40 English - Setup Guide for ThinkPad T40 - Page 7
Start setup utility, Replacing the Mini-PCI Card, To make sure that the SO-DIMM is installed correctly - memory
 |
View all Lenovo ThinkPad T40 manuals
Add to My Manuals
Save this manual to your list of manuals |
Page 7 highlights
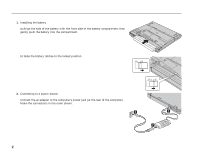
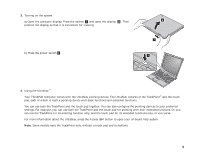
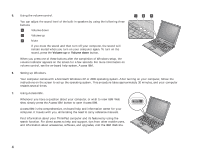
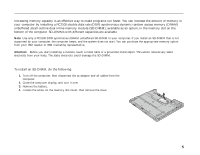
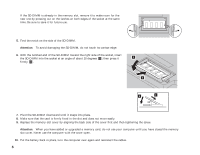
To make sure that the SO-DIMM is installed correctly, do as follows: 1. Turn the computer on. 2. While the "To interrupt normal startup, press the blue Access IBM button" message is displayed at the lower-left of the screen, press the Access IBM button. 3. Select Start setup utility. The BIOS Setup Utility screen opens. The "Installed memory" item shows the total amount of memory installed in your computer. For example, if your computer has 256 MB of memory and you install a 256-MB SO-DIMM in it, the quantity shown in "Installed memory" should be 512 MB. To replace the SO-DIMM shipped with your computer, do as follows: 1. Turn off the computer; then disconnect the ac adapter and all cables from the computer. 2. Close the computer display, and turn it over. 3. Remove the battery. 4. Remove the keyboard (refer to the procedure in Replacing the Mini-PCI Card in your on-line help system, Access IBM). 5. To replace the SO-DIMM, follow the procedure on page 6, steps 5 to 8. 6. Reinstall the keyboard (refer to the procedure in Replacing the Mini-PCI Card in your on-line help system, Access IBM). 7. Put the battery back in place, turn the computer over again, and reconnect the cables. 7
-
 1
1 -
 2
2 -
 3
3 -
 4
4 -
 5
5 -
 6
6 -
 7
7 -
 8
8
 |
 |