Lenovo ThinkPad W530 Hardware Maintenance Manual - Page 113
Panel Replacement Utility program.
 |
View all Lenovo ThinkPad W530 manuals
Add to My Manuals
Save this manual to your list of manuals |
Page 113 highlights
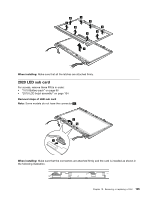
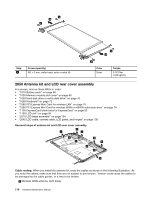
Read this first before replacing the LCD panel For ThinkPad W530 models with a color sensor: Important: If your LCD panel needs a replacement, order a special LCD panel FRU kit for color sensor model from Lenovo. The FRU kit contains a LCD panel, a CD and an instruction flyer. For the correct FRU kit part number, check on the Web site at http://www.lenovo.com/serviceparts-lookup. To replace the LCD panel, be sure to follow these steps: 1. Before you replace the LCD panel, locate the label on the plastic jacket of the new LCD panel. Locate the numeric key number on the label and record it. 2. Replace the failing LCD panel with the new one that was shipped to you. For the detailed replacement procedure, see "Removal steps of LCD cable, camera cable, LCD panel, and hinges" on page 107. 3. Start the computer and enter the Windows operating environment. 4. Insert the CD that came with the new LCD panel. If the autorun function is enabled, the Panel Replacement Utility program starts automatically. If the program does not start automatically, run the program manually by exploring the CD and double-clicking PanelReplacementUtility.exe. 5. Follow the instructions on the screen to perform the initial color calibration. When the key number is required, type the number that you recorded in step 1. Then the Panel Replacement Utility program starts to measure the new LCD panel and perform the initial color calibration. 6. When the initial calibration is finished, a dialog box is displayed. Click OK to exit the Panel Replacement Utility program. Important: If the computer is protected by a hard disk drive password or a Windows password, do one of the following: • Ask the customer for the password to run the Panel Replacement Utility program. • Provide the CD and the numeric key number to the customer and guide the customer to run the Panel Replacement Utility program. Failing to run the Panel Replacement Utility program will require another LCD panel replacement. Removal steps of LCD cable, camera cable, LCD panel, and hinges In step 1 , release the antenna cables from the left and right hinges. Chapter 10. Removing or replacing a FRU 107
-
 1
1 -
2
-
3
-
4
-
5
-
6
-
7
-
8
-
9
-
10
-
11
-
12
-
13
-
14
-
15
-
16
-
17
-
18
-
19
-
20
-
21
-
22
-
23
-
24
-
25
-
26
-
27
-
28
-
29
-
30
-
31
-
32
-
33
-
34
-
35
-
36
-
37
-
38
-
39
-
40
-
41
-
42
-
43
-
44
-
45
-
46
-
47
-
48
-
49
-
50
-
51
-
52
-
53
-
54
-
55
-
56
-
57
-
58
-
59
-
60
-
61
-
62
-
63
-
64
-
65
-
66
-
67
-
68
-
69
-
70
-
71
-
72
-
73
-
74
-
75
-
76
-
77
-
78
-
79
-
80
-
81
-
82
-
83
-
84
-
85
-
86
-
87
-
88
-
89
-
90
-
91
-
92
-
93
-
94
-
95
-
96
-
97
-
98
-
99
-
100
-
101
-
102
-
103
-
104
-
105
-
106
-
107
-
 108
108 -
 109
109 -
 110
110 -
 111
111 -
 112
112 -
 113
113 -
 114
114 -
 115
115 -
 116
116 -
 117
117 -
 118
118 -
119
-
120
-
121
-
122
 |
 |
