Lenovo ThinkPad X131e Chromebook Hardware Maintenance Manual - Page 14
Power system checkout, Checking the ac power adapter, continuity and installation. - laptop
 |
View all Lenovo ThinkPad X131e Chromebook manuals
Add to My Manuals
Save this manual to your list of manuals |
Page 14 highlights
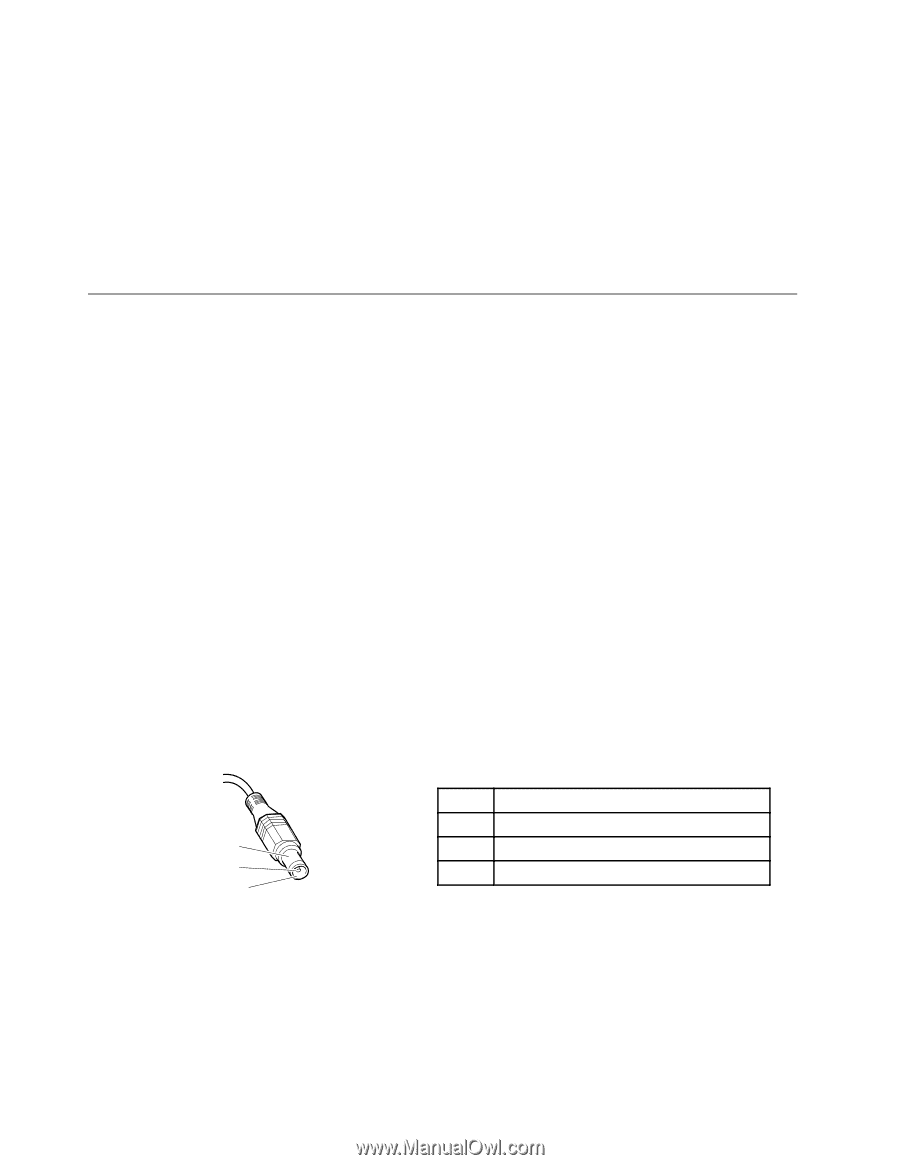
• Plastic parts, latches, pins, or connectors that have been cracked or broken by excessive force • Damage caused by liquid spilled into the system • Damage caused by the improper insertion of a PC Card or the installation of an incompatible card • Fuses blown by attachment of a nonsupported device • Forgotten computer password (making the computer unusable) • Sticky keys caused by spilling a liquid onto the keyboard • Use of an incorrect ac power adapter on laptop products The following symptom might indicate damage caused by nonwarranted activities: • Missing parts might be a symptom of unauthorized service or modification. Power system checkout To verify a symptom, do the following: 1. Turn off the computer. 2. Remove the battery pack. 3. Connect the ac adapter. 4. Check that power is supplied when you turn on the computer. 5. Turn off the computer. 6. Disconnect the ac adapter and install the charged battery pack. 7. Check that the battery pack supplies power when you turn on the computer. If you suspect a power problem, see the appropriate one of the following power supply checkouts: • "Checking the ac power adapter" on page 8 • "Checking operational charging" on page 9 • "Checking the battery pack" on page 9 Checking the ac power adapter You are here because the computer fails only when the ac power adapter is used. • If the power-on indicator does not turn on, check the power cord of the ac power adapter for correct continuity and installation. • If the computer does not charge during operation, go to "Checking operational charging" on page 9 To check the ac adapter, do the following: 1. Unplug the ac adapter cable from the computer. 2. Measure the output voltage at the plug of the ac adapter cable. See the following figure: 3 2 1 (20V) Pin Voltage (V dc) 1 +20 2 0 3 Ground Note: Output voltage across pin 2 of the ac power adapter might differ from the one you are servicing. 3. If the voltage is not correct, replace the ac adapter. 4. If the voltage is acceptable, replace the system board. Note: Noise from the ac adapter does not always indicate a defect. 8 Hardware Maintenance Manual
-
 1
1 -
2
-
3
-
4
-
5
-
6
-
7
-
8
-
 9
9 -
 10
10 -
 11
11 -
 12
12 -
 13
13 -
 14
14 -
 15
15 -
 16
16 -
 17
17 -
 18
18 -
 19
19 -
20
-
21
-
22
-
23
-
24
-
25
-
26
-
27
-
28
-
29
-
30
-
31
-
32
-
33
-
34
-
35
-
36
-
37
-
38
-
39
-
40
-
41
-
42
-
43
-
44
-
45
-
46
-
47
-
48
-
49
-
50
-
51
-
52
-
53
-
54
-
55
-
56
-
57
-
58
-
59
-
60
-
61
-
62
 |
 |