Lenovo ThinkPad X200 Hardware Maintenance Manual - Page 40
Restoring the factory contents by using Recovery Disc Set, Operating System Recovery Disc - update drivers
 |
View all Lenovo ThinkPad X200 manuals
Add to My Manuals
Save this manual to your list of manuals |
Page 40 highlights
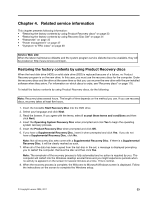
Restoring the factory contents by using Recovery Disc Set When the hard disk drive (HDD) or solid state drive (SSD) is replaced because of a failure, no product recovery program is on the new drive. In this case, you must use the Recovery Disc Set for the computer. Order the Recovery Disc Set and the drive at the same time so that you can recover the new drive with the pre-installed software when they arrive. For information on which discs to order, see "Recovery discs" on page 176. The recovery disc set consists of the user instructions and the following set of DVDs to restore the computer to the original factory configuration. Operating System Recovery Disc (one disc) This disc restores the Microsoft® Windows operating system. Use this disc to start the recovery process. Applications and Drivers Recovery Disc (one or more discs) This disc restores the preinstalled applications and drivers on the computer. Supplemental Recovery Disc This disc contains additional content, such as updates to the software that was preinstalled on the computer. Not all recovery disc sets come with a Supplemental Recovery Disc. Notes: • You must have a DVD drive to use the recovery discs. If you do not have an internal DVD drive, you can use an external USB DVD drive. • During the recovery process, all data on the drive will be deleted. If possible, copy any important data or personal files that you want to keep onto removable media or a network drive before you start the recovery process. To restore the computer to the original factory configuration using the recovery disc set, do the following: Note: Recovery takes several hours. The length of time depends on the method you use. If you use recovery discs, recovery takes at least five hours. 1. Make the CD/DVD drive the first startup device in the startup sequence using the following procedure: a. Press and hold down the F1 key, and then turn on the computer. When the logo screen is displayed or if you hear repeating beeps, release the F1 key. The Setup Utility program opens. b. Use the arrow keys to select Startup ➙ Boot. c. Select the CD/DVD drive as the 1st Boot Device. 2. Insert the Operating System Recovery Disc into the DVD drive. 3. Press F10 to save the Setup Utility configuration changes. Follow the instructions on the screen to begin the recovery process. 4. Select your language and click Next. 5. Read the license. If you agree with the terms and conditions, select I accept these terms and conditions and then click Next. If you do not agree with the terms and conditions, follow the instructions on the screen. 6. Click Yes in the displayed window to begin the operating system recovery process. 7. Insert the Applications and Drivers Recovery Disc when prompted and then click OK to begin the applications and drivers recovery process. 8. If you have a Supplemental Recovery Disc, insert it when prompted and click Yes. If you do not have a Supplemental Recovery Disc, click No. 9. When all of the data has been copied from the last disc in the set and has been processed, remove the disc and restart the computer. 34 Hardware Maintenance Manual
-
 1
1 -
2
-
3
-
4
-
5
-
6
-
7
-
8
-
9
-
10
-
11
-
12
-
13
-
14
-
15
-
16
-
17
-
18
-
19
-
20
-
21
-
22
-
23
-
24
-
25
-
26
-
27
-
28
-
29
-
30
-
31
-
32
-
33
-
34
-
 35
35 -
 36
36 -
 37
37 -
 38
38 -
 39
39 -
 40
40 -
 41
41 -
 42
42 -
 43
43 -
 44
44 -
 45
45 -
46
-
47
-
48
-
49
-
50
-
51
-
52
-
53
-
54
-
55
-
56
-
57
-
58
-
59
-
60
-
61
-
62
-
63
-
64
-
65
-
66
-
67
-
68
-
69
-
70
-
71
-
72
-
73
-
74
-
75
-
76
-
77
-
78
-
79
-
80
-
81
-
82
-
83
-
84
-
85
-
86
-
87
-
88
-
89
-
90
-
91
-
92
-
93
-
94
-
95
-
96
-
97
-
98
-
99
-
100
-
101
-
102
-
103
-
104
-
105
-
106
-
107
-
108
-
109
-
110
-
111
-
112
-
113
-
114
-
115
-
116
-
117
-
118
-
119
-
120
-
121
-
122
-
123
-
124
-
125
-
126
-
127
-
128
-
129
-
130
-
131
-
132
-
133
-
134
-
135
-
136
-
137
-
138
-
139
-
140
-
141
-
142
-
143
-
144
-
145
-
146
-
147
-
148
-
149
-
150
-
151
-
152
-
153
-
154
-
155
-
156
-
157
-
158
-
159
-
160
-
161
-
162
-
163
-
164
-
165
-
166
-
167
-
168
-
169
-
170
-
171
-
172
-
173
-
174
-
175
-
176
-
177
-
178
-
179
-
180
-
181
-
182
-
183
-
184
-
185
-
186
-
187
-
188
-
189
-
190
-
191
-
192
-
193
-
194
-
195
-
196
-
197
-
198
 |
 |